Ram Promaster Forum
(http://www.promasterforum.com/forum/index.php)
- Promaster Builds and Conversions
(http://www.promasterforum.com/forum/forumdisplay.php?f=105)
- - MsNomer: Hiker's Paradise
(http://www.promasterforum.com/forum/showthread.php?t=35706)
MsNomer: Hiker's Paradise
This will be a slow build because we spend so much time hiking. I did get a small start, though, before we leave this weekend.
The first improvement was a floor mat from Eurocampers. "Dark Grey" is darker than in the pictures, but light enough to brighten the cabin a bit. The fit is excellent. The hold-downs are for carpet, so I will do a bit of modification to anchor it to the seats. So far, it hasn't moved, though. 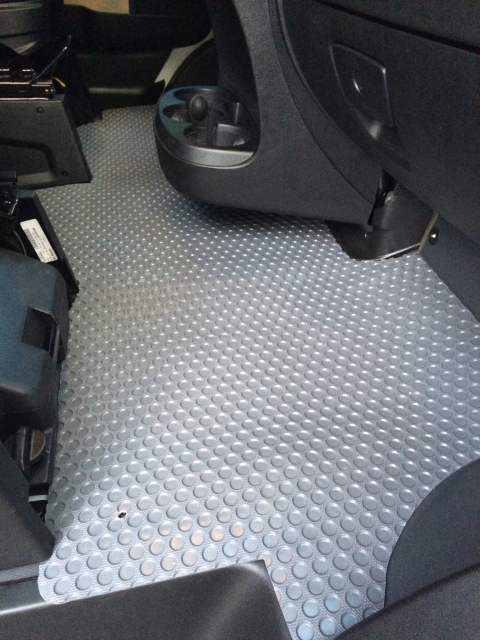  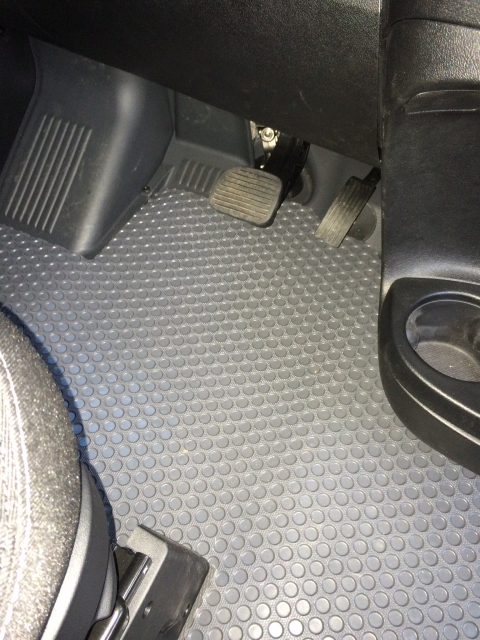 |
Those cup holders are dusty because of my first real project. Yeah, the cabin has cup holders, but they are waaay too low. And we need a spot for the GPS to supersede the lousy speedometer. I was determined to preserve the usefulness of the original cup holders.
A nice piece of curly maple should do nicely. 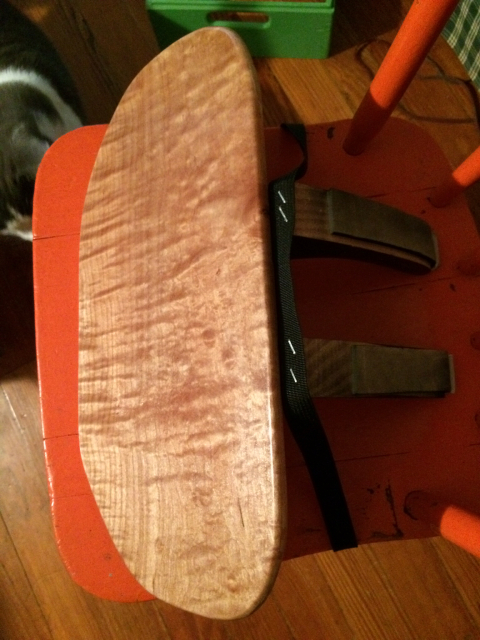 To support it without any modifications to or holes in the vehicle, I first shaped a bracket to the curve of the recess. This support rests on the shelf behind the cup holders. I covered the back side with foam tape so the wood would not rub against the plastic. The maple does not go all the way to the back, leaving room for a nylon strap.  This nylon strap has Velcro sewn onto the ends. There are vertical rods behind the console that these can cinch tight around. But without more, the shelf would slide right down. That more begins with supports that bridge the intersections between the original cup holders. The ones in this picture had off-centered holes. I later realized that centered was best. Dowels run up from them to the outermost hole in the L-Bracket. (The lower hole in the bracket was part of that first failed attempt, so ignore it.) 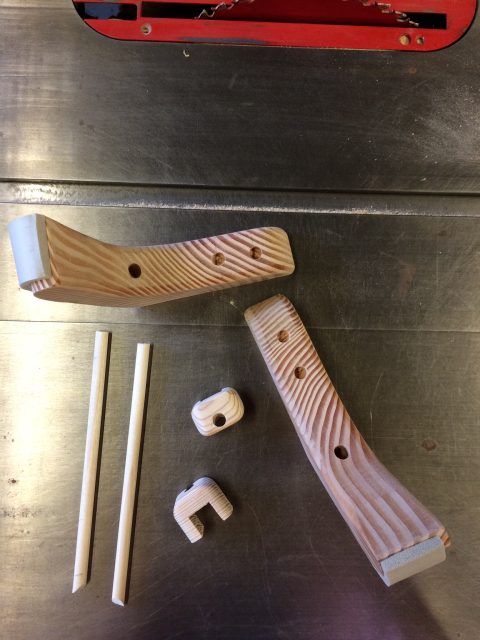 Support members were all painted black, so they fade away, leaving the maple appearing to float. (I didn't realize until I saw this picture that the black needs a bit of touch-up.) 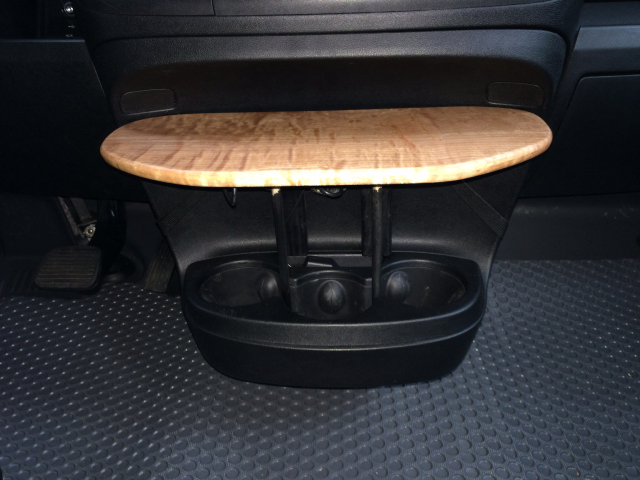 Cup holders from Walmart and the GPS fit nicely. 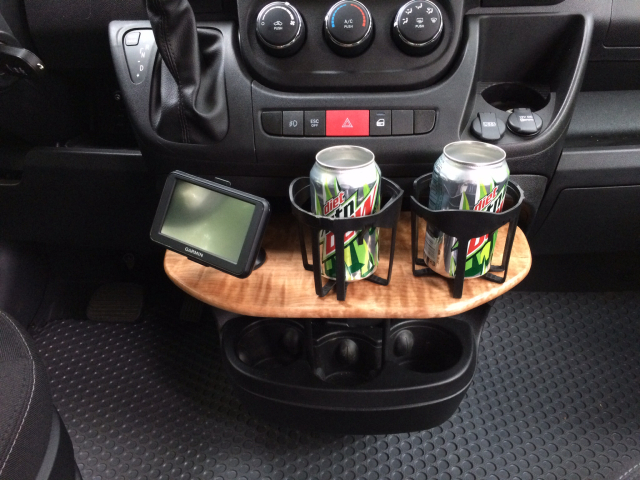 Underneath the maple, I have Velcro and cup hooks to manage the GPS cords. The cup hooks will also be handy to stabilize plastic grocery bags--hook the handle to keep the bag from falling over. 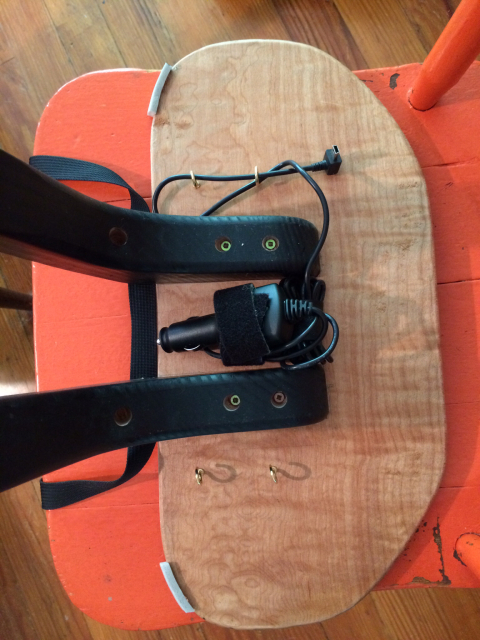 |
Hi,
Very nice -- thanks! Please keep us updated on your conversion. Gary |
A touch of wood, a touch of class. Nice!
|
Thumbs up on that! Since the origional cup holders appear to be intact can they be used for something used occasionally... perhaps a flashlight or ?????
|
Original cup holders are as functional as they ever were. We like iced drinks on long drives. Top cup holder for the drink. Bottom cup holder for the rest of the can.
|
I can't actively work on my van now because we are traveling through November, but I have made some progress in my travels, particularly in Portland, Oregon. I was fortunate that we had a couple days to spare and a cooperative husband.
First Stop: Motion Windows in Vancouver, WA, outside Portland. They are one of the few manufacturers of windows for the Promaster. These windows have the slight bend instead of forcing the panel flat as generic windows would. Very friendly folk and a quality product. The installer patiently walked us through the installation process and we left with precise hardboard templates for each window. When I get home, I will order the windows--the largest that will fit all around--and we will join the company of brave?? souls who attack their new vehicles with sharp objects. Second Stop: A flooring store that sells Marmoleum. I got a remnant at a good price with no sales tax and no shipping because it fit in the truck. I am super pleased with this purchase. It must be installed >68°, so I will have to create a monolithic floor, cut the ply to fit, install the Marmoleum on the ply and cure it in the house, then install the unit in the van. Don't want to think about how heavy and unwieldy that will be, but the alternative is wait til summer. Third Stop: A business which upfits Sprinters and Promasters--that day they had about equal numbers of each. A stupidly simple conversion was going to cost its owner $38,000 on top of the cost of the van itself. I was not impressed with what I saw. Fiberglass insulation. No sound insulation. Wall panels were a fabric about the consistency of burlap wrapped around Luan, then screwed on. They are a custom shop, though, and what I saw was what the customer ordered. I assume they can do better if paid even more money to do so. Fourth Stop: CampingWorld. I asked to see Class Bs. The first one I was shown was a Viva by Itasca on a Promaster cutaway chassis--didn't know it existed. I was then shown the Travato, the Trend, and a Sprinter. Overall impression: the Promaster wins hands-down for roominess. It didn't look particularly crowded even with all amenities. A couple things I learned about mileage and swivels I will post separately. I learned a lot from the upfitter and from the models. The most important thing I learned is that I would have to do some really crappy work to sink to their level. The upfitting on the Winnebagos in particular was pathetic. Now I have to wait another month doing mundane things like the Grand Canyon rim-to-rim (maybe rim-rim-rim) before I can really dive into my Promaster project. |
So sorry! All that fun stuff waiting, working on your PM... And you're stuck trudging in the Canyon... I feel for ya! :):);):D:laugh:
|
Cool shelf and mounting arrangement.
Hello, We're out in Hood River, OR (East of Portland on I-84) and would like to see your van if you have time. I'd like to get to know the ProMaster a little better. I have a Sprinter you can check out. We have developed some niche products for the Sprinters and looking to expand our offerings to other vans. Maybe we can produce that cool shelf for some other folks. We also have 3M Thinsulate on hand if you want to see it. We are home mostly so feel free to stop by. I'll PM my number and address. -Hein |
Just missed you, but thanks for the offer. The Promaster, though, is still in the driveway. Only my husband could explain why we aren't traveling in it. This is the farewell journey for the truck tent that has served us well for 10 years.
|
Nice work. Make it look more functional. I agree the cup holders are way too low and the one on the dash is not level and the one in the door is for sealed vessels only (as I slammed the door, then realized I left my coffee).
I like my GPS to the left of the rear view mirror instead of down low, but that's just me. Do the brackets carry the weight or the support dowels? Maybe spreading the brackets out a little to pick up the meaty part of the original cup holders might spread the load?? Did not know there were support bars behind the panel. Good to know and again nice job! |
The dowels transfer the weight to the joins between the original cup holders via the inverted u-shaped brackets. The strap keeps the assembly from pivoting forward. It must be as tight as possible; fortunately, it doesn't seem to have stretched. The brackets can't carry any load because there's nowhere to give them solid flat feet except in the original cupholders, which would inhibit their use.
|
Quote:
|
The Ceiling
Finally, I have some real progress. The part that took the most time is now covered up, but I'm pleased with what I see. I can't contemplate how many hours I've spent studying the framework, including its >500 holes, and looking at other builds, pro and self-build, online.
First, a MaxxAir fan with remote control. I splurged for the remote control because sometimes I get vertigo would not be able to look up at the manual controls. A conveniently located tree branch was quite helpful.  The first thing up for the ceiling was the side supports. 45° bevels on 1x4. The holes are simply to allow the ceiling to breathe.  Next I installed 1" furring strips along the ceiling ribs, made from 2x4, thus 1.5" wide. The curve is a perfect arc of a circle with radius somewhere in the 10-12' range. The strips total 54.5" long, but for ease of handling, I cut them at 28" and 26.5". These strips were fascinating to work with. The curve is so subtle that I had to be careful which surface I was working on. 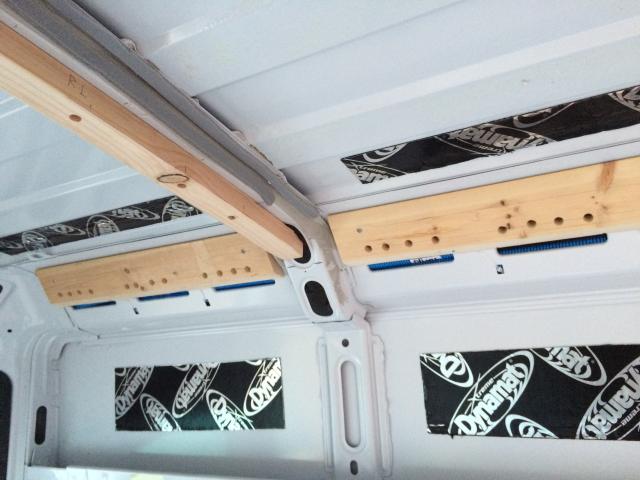 Up front, I used Loctite PL Premium 8x to attach a screwing strip to the ceiling weld just rear of the ceiling liner. This strip is made from 1x4, is 1.5" deep, and has the same curve as the ribs. I thought I would need several supports while it set, but one on each side held it firmly. I used scrap resting on the black tray as a base for the support. It is as solid as if it were part of the vehicle. 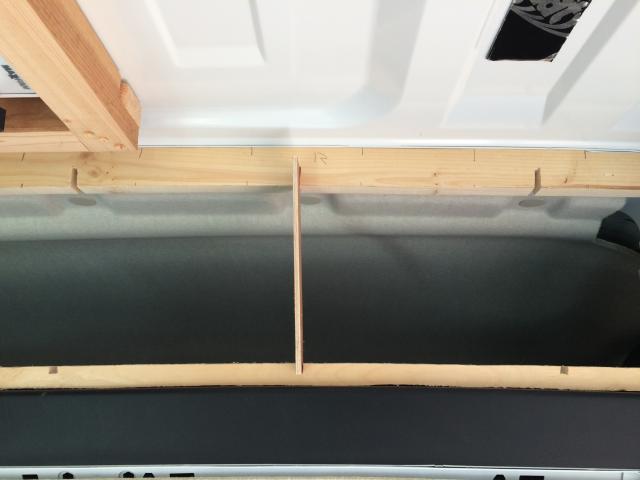 I put tapered shims on the fan surround. 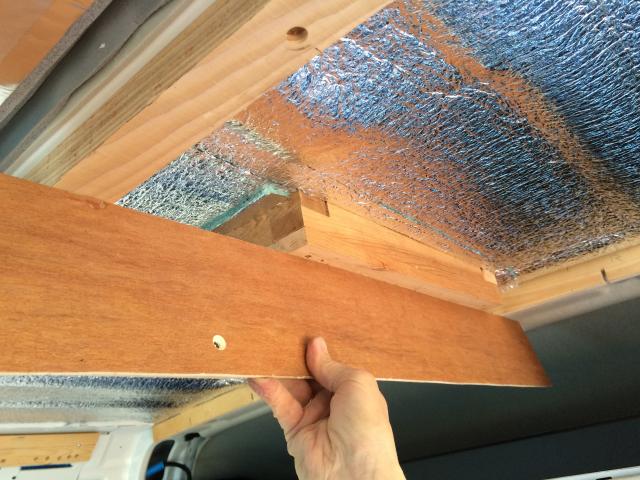 The rear was the hardest. Same curve cut out of 2x4, bottom edge 1.5" below ceiling weld (like the front), but with all the bumps back there it was difficult to hold it in position for screwing. 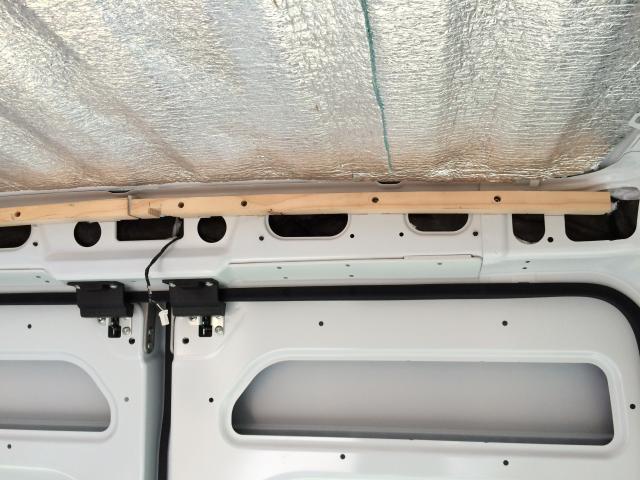 After agonizing over insulation, I settled on EZ-Cool with Thinsulate. I got the EZ-Cool off eBay for the same price as Reflectix and it appears to be a much better product. The two fit the space perfectly. I understand that I lost any reflectance benefit. 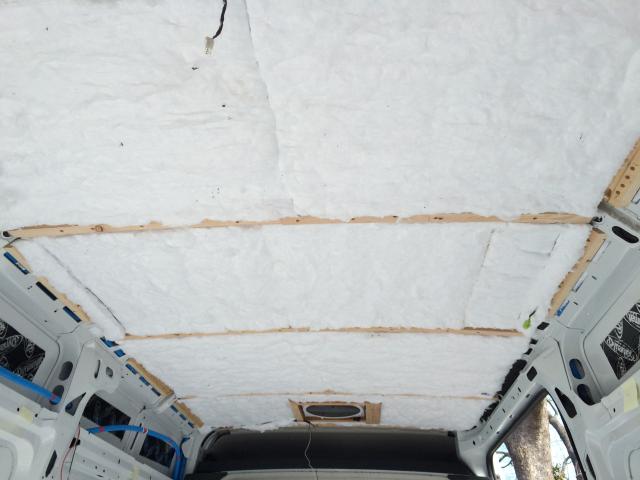 The ceiling panels are 1/4" (actually 3/16") Luan ply. I got the best I could find, but the quality was so poor that there was no hope for a really smooth surface. Accepting that reality, I applied primer, two coats of paint matched to the white of the van, and three coats of Minwax Polycrylic all with random strokes--no feathering. I like the effect. We will also be carrying momentos of our cats (hair) on our travels. :laugh: I actually cut the panels too precisely. Installation above the head is not so precise a maneuver. Fortunately, I was smart enough to install front and rear first, then make adjustments on the middle two that were just rectangles. It was critical, though, that the front edge butt the lip in the headliner, that the screw line be 2 7/8" back from the front edge, and the hole for the fan start 7" back from that edge. That fit perfectly. The result passes my ultimate test--reflections are true with no dips or waves. Thin battens and moldings will cover the seams, but these will come with the upper walls. 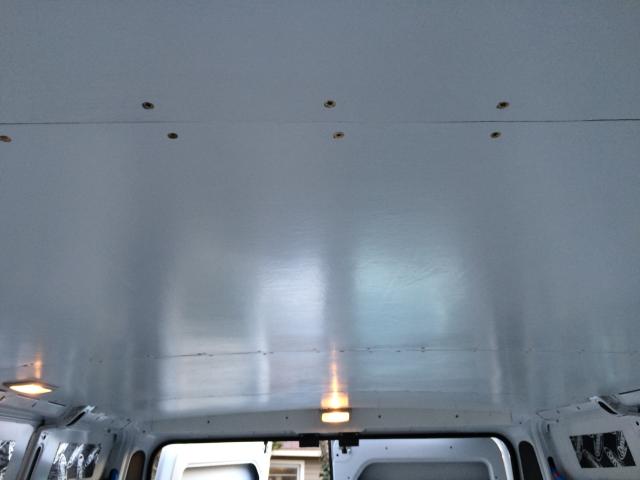 (You may notice the rear light turned 180° and installed in the ceiling.) 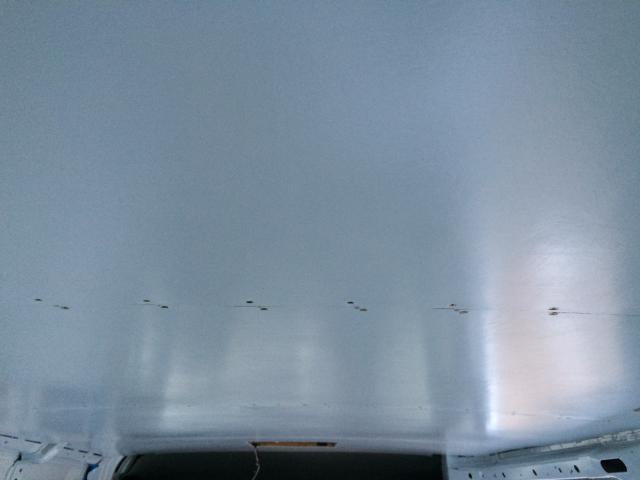 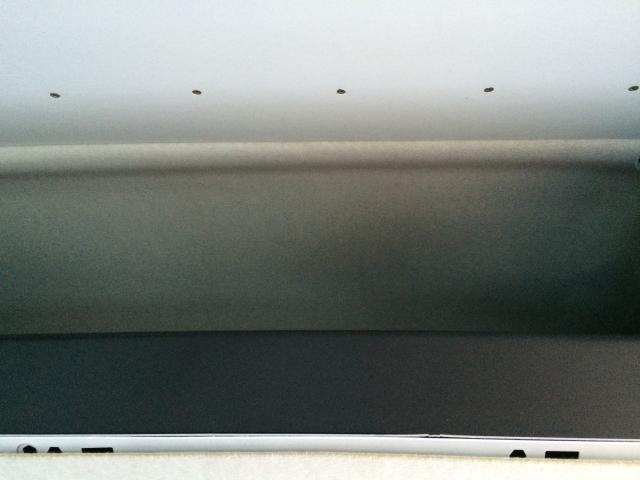 |
Immediate Proof of Insulation Benefit
Only the ceiling is insulated. I have a 1500W utility heater.
In the bare van, the heater could raise the interior temperature 20 degrees, from 30° to 50° in two hours. It couldn't do any better. With the ceiling in, the inside temperature went from 25° to 50° in an hour. After 1:45, inside temperature was 65° and still rising. Outside temperature had risen to 30°. |
Great job!!! Look very well done!
Do you know how much weight that added to the van? I have racks and bins which add with all the stuff about 500 to 750 pounds. |
44 Attachment(s)
So you effectively lowered the ceiling 1.5"? Is that correct? Was it to fit more insulation?
Sent from AutoGuide.com Free App |
I lowered the ceiling 1" below the ribs. The 1.5" front and back is because the welds are 1/2" higher than the ribs.
Two reasons: insulation and the sides fit better--the smooth curve can go all the way across. I saw the dilemma other folk were having with the sharp curves at the side. We are both 5'6", so the loss of an inch is noise. |
I'm no good at estimating weights; my husband estimates around 50 lb. I do think that if I could stack all the materials just right, I could lift it. Certainly, no individual component felt the least bit heavy. The real wood part was the equivalent of about one 2x4 and one 1x4.
|
The Upper Side Panels
A bit more progress. I have installed the rear panels above the window panels. The front one behind the driver is made, but I will not install until the electrical in that area is finished.
I just thought the ceiling was weird. What finally worked was a "crown mold" made from 2x4. One edge 45°, another 36° and the third I'm not sure--whatever worked.  This was attached to the wall panels before installation.  Turns out the 2x4 wasn't quite wide enough and my two hands weren't sufficient to hold things in place for measuring, so I filled the resulting gap with a thin strip (5/16").  That boo-boo resulted in a nice shadow effect. The wall panel actually has a bit of bow as it crosses an intermediate cross piece, but it is not noticeable. It has suddenly become much easier to address that chunk of rib sticking out. Later.  Windows go below this panel--as large as will fit the spaces. They are ordered and will arrive early April. I'm thinking they will have to be framed with fabric because I have not the talent to fabricate something that shape out of wood. Slowly but surely. Next up is the Marmoleum floor. |
The Floor
There were a few compromises, but the floor is in.
One of my first purchases was a Marmoleum remnant as we passed through Portland, OR, last fall. The manufacturer says material and surface must be warm for 7 days before and 7 days after installation, and an installers' forum had reports of failure even near an outside door in winter, so we decided to do the install onto the plywood in our den, then transport the finished floor to the van. This required two compromises, or at least we thought it did. Before we knew we would have help, we decided that 1/2" was the most we could handle, though I would have preferred 3/4". As it turned out, one neighbor who came to help could have twirled the thing on his finger.  The second compromise we still consider as necessary--we installed in two sections with a seam through both surface and ply between the wheel wells. I assumed and accepted that this seam would not look good, but most of it will be hidden. The result is actually better than I had hoped for. Fortunately, wood glue with floor shavings is the recommended repair, so I could glue the seam and "repair" it in the same operation.  Underneath, I have the factory rubber mat, which was also useful as a pattern, and a layer of Silent Blue closed cell foam underlayment. Before the floor was fastened down, I walked on it and realized that the SB's Mylar backing was squeaking. It was easy to peel off. We bought Sprinter tie-downs with cups from e-Bay. Much more elegant than the Promaster's.  The end result, minus trim pieces at the doors:  |
Thanks, it looks nice but those thumbnail pictures are not big enough! I plan 1/2 inch floor so if it turns out to be a mistake let us know. You do nice work.
|
Rd, I don't know what the deal is with the pictures. As you can see earlier in the thread, I've not had the problem before. This time when I went to Photobucket, it didn't act the same.
I forgot to add--according to my iPhone app of unknown and dubious accuracy, I appear to have lost about 10 db with the addition of the floor. It is noticeable--conversation is now possible instead of, "what did you say?" |
I think I got the pictures right this time:
|
I gotta say I love Marmoleum as a finished product. It feels warm looks natural, is repairable, etc.. It is a bit fussy to deal with so I have never laid it in sheets only tiles of it.
Since the dB scale is logarithmic (as is our perception of sound) you have decreased the sound level an impressive amount. Closing up the walls with the insulation inside will help tremendously too. BTW I use "dB 10th" on my iPhone and I think it is fairly good. Calibration is another thing as you know. Quiet bedroom should be about 35, house in the day 45, along a street with cars 70+, noisy ATV or motorcycle nearby 90+, and ear damaging Jet take off 110+. You can check. |
I've been using Decibels. I looked at yours and liked it better. They appear to be tracking very closely. I just wish they would show the frequencies. Are there instructions somewhere for calibrating?
My goal is to match my '06 Tundra (zero rattles or squeaks at 100,000 miles) at 70 dB on a nearby poor-condition brick street. I've gone from 85 to 75 with the floor, so it appears possible. Everything I read says professional installation only for the sheet. I can see that for larger areas, but for a van, go for it. If you have the warm weather so you can lay it in situ, no big deal and no seams. |
Trimmed out the interior edges with 5/8" foam backer rod. A credit card was the perfect tool. Besides looks across the front and along the rear sides, which are the only parts that will show, I want to avoid the possibility of losing a screw under there. That could be a nightmare.
   Went for a longer ride today. I could hear the engine for the first time. |
Quote:
|
We leave three weeks from today for 3 months in Europe. My near goal is to at least spend one night in the van before we go, thus I want windows and support for the bed. I may make it.
The 48" x 72" mattress will lie crosswise. The head 2' can fold over without disrupting the bedding. Folding it over exposes a walkway between front and back. Underneath is a maze of storage places with specific purposes--our years of camping in the truck tent have given us a pretty clear notion of what we want where. In this diagram, yellow is the bed. All cabinetry under the bed is 28" tall. The sink cabinet will be 36".  The "boxes" are 12”x18"x9" wooden boxes that are so familiar we can't imagine camping without them. They will stack 3-high on angle iron supports. "Boots" are shelves to store our boots. The "pull-out table" is a torsion box made from Luan and insulation board--amazingly strong for its light weight. It will pull out like a cutting board in kitchen cabinetry. The "drawers" will be on slides; I haven't decided their sizes yet--I'm still absorbing how luxuriously huge that space is. The dead space to the left of the sink cabinet will be accessible through a trap door in the bed. Storage above the wheel wells is very specific: Each space will hold 8 soft drink cartons. Not only am I a MountainDewaholic, we also use the cartons for other items such as cups, bread, fuel, etc. 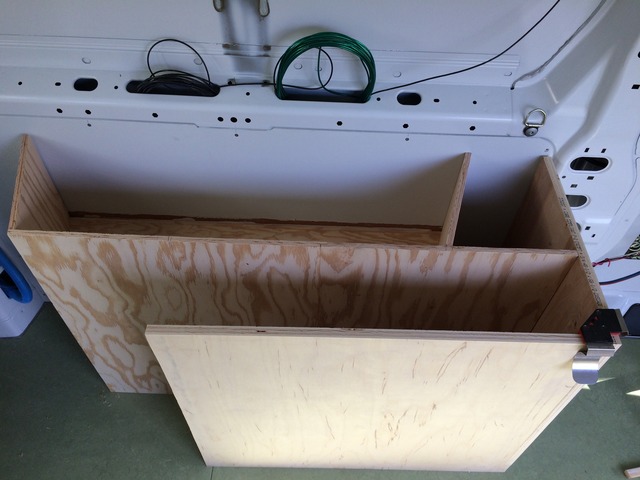 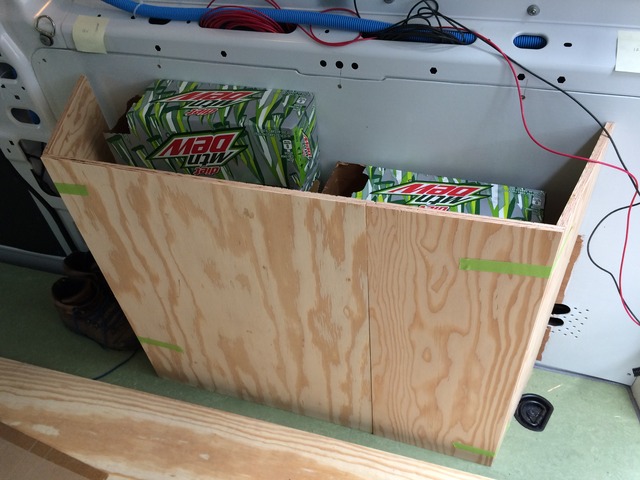 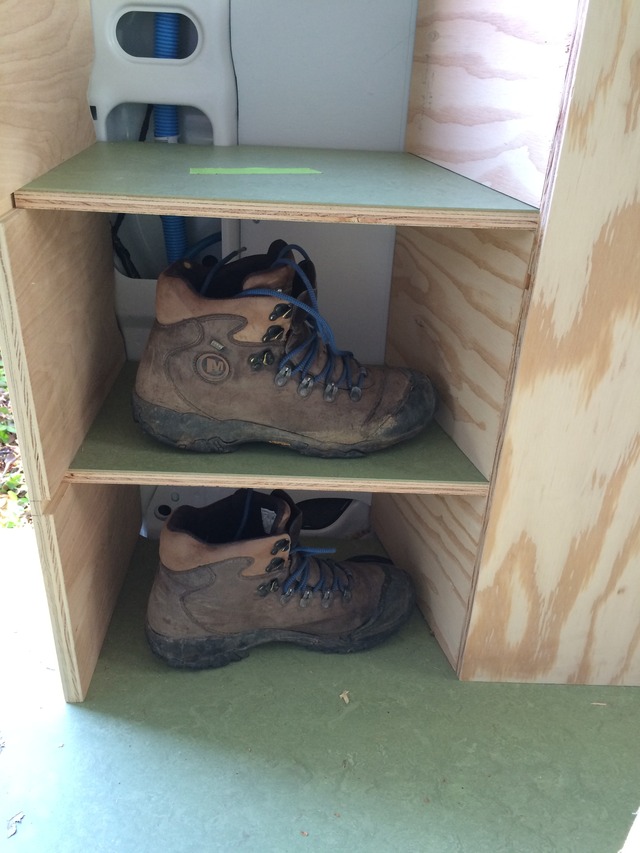 . (Back wall will be finished later and end board cut.) . (Back wall will be finished later and end board cut.)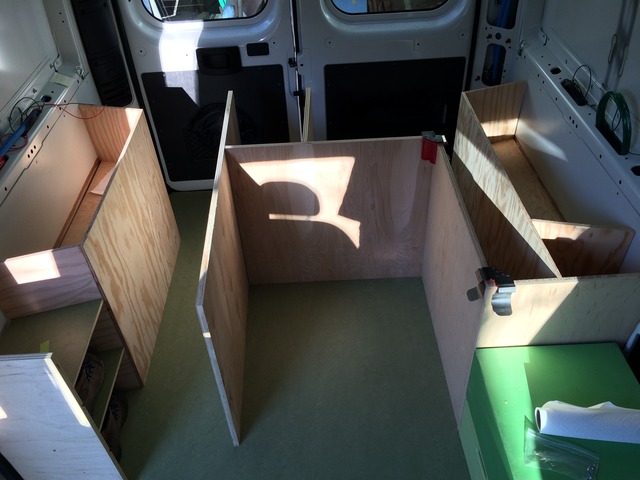 ONE BOARD took me two hours! A matter of personal pride, I wanted that board just inside the side door to be as close to perfect as I could make it. Nobody else may ever notice, but I will. It I was the toughest scribe I've ever done with crazy coping on the back, but it finally turned out well: 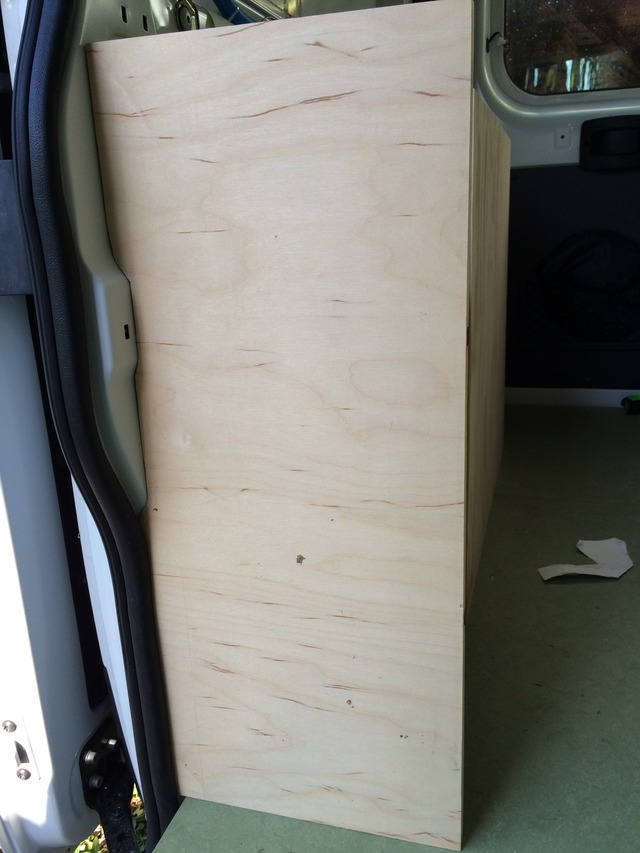 Then attaching those shelves--another challenge. The wheel wells have 15° sides, thus the shelves have 15° sides. The first time I ever had the situation where if the board looks like it's too short, cut some more!! Now I'm about to the painting stage. Hopefully, I can do some packing while the paint dries. Oh--we pick up the windows tomorrow. Motion Windows T-sliders all around. |
Picked up the windows today at the Fedex freight depot. Well-packed, quality windows. I like what I see.
We plan to install the first one Saturday. |
Looking good!
Wondering where you got those spring clips that are holding the vertical pieces of plywood in place at right angles before they are fastened. Could have used those a thousand times :) Gary |
Gary, They are available on Amazon here:
They were a splurge even when I bought them maybe 10 years ago--I'm guessing $20/pair and I bought two pair. However, they have definitely earned their keep many times over. I don't like to think how nerve-wracking setting this up would have been without them. Now they need to make a T version. How do you guys put the cute little Amazon link in posts? Edit: Well, I'll be. That little Amazon thingie just appeared like magic! |
Yeah we arn't as smart as you gave us credit for! Or verse vicey.
|
Quote:
Gary |
The Cabinetry Becomes Portable
I had no intent to make my cabinetry removeable. Cargo van becomes camper, end of story. OTOH, my husband was immediately enamored with the convenience and capacity of the van compared to our now-available 8-ft-bed Tundra. I refused to budge.
Until I had made the cabinetry and laid it out to paint. Duh. Except for the wheel well assemblies, this is just a bunch of flat panels. If I assemble with barrel nuts (X-dowels), I will have knock-down cabinetry that assembles-disassembles in just a few minutes and stores easily, plus a happier hubby. In addition, it can be easily modified if we decide this panel needs to move there. Barrel nuts are not the easiest woodworking task if you're not Ikea, but not that difficult. It's a fantastic sense of accomplishment when you feel the screw grab the nut deep in the bowels of a plywood sheet. In keeping with this theme, I am using insert nuts to attach the cabinetry to the plywood floor and to attach the bed board to the cabinetry. A bit of angle iron and aluminum angle will be used to make the transition at the floor. The mattress, which we already had in the truck, is 4' x 6' x 4" foam in three 2' sections. It rests on a 1/2" Baltic birch board, which is in 4 sections. The center 38" will be attached to the cabinetry. The head 2' (passenger side) will be on a piano hinge to fold over with the mattress to expose the walkway. At the other end, two smaller hatches on piano hinges will expose the wheel well storage and the dead storage. I'm generally not fond of plywood grains, and the ply I used for the cabinetry had lousy grain, so I painted everything my favorite color. However, when I got the Baltic birch for the bed board, I found it more pleasing, so if I ever decide it's worth the trouble, I could easily remake the panels in Baltic birch. This is as far as I will get for the next three months--we leave next Wednesday for three months' hiking in Norway and Poland. We normally memorize guidebooks before such trips, but this time we have to take them because we haven't even read them! Within a couple weeks after we return July 16, we need the van for Wyoming and points west. All that's left to make this much of the cabinetry useful is tying things together and that shouldn't take long. Otherwise, even without the sink cabinetry and extra battery, we will still be in more luxury than the tent. 10 drawers will fill the front spaces. 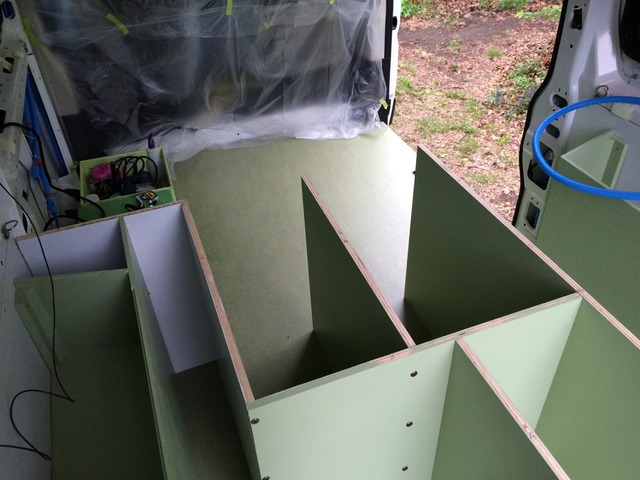 Left side in this photo will fold over to expose walkway and wheelwell storage. 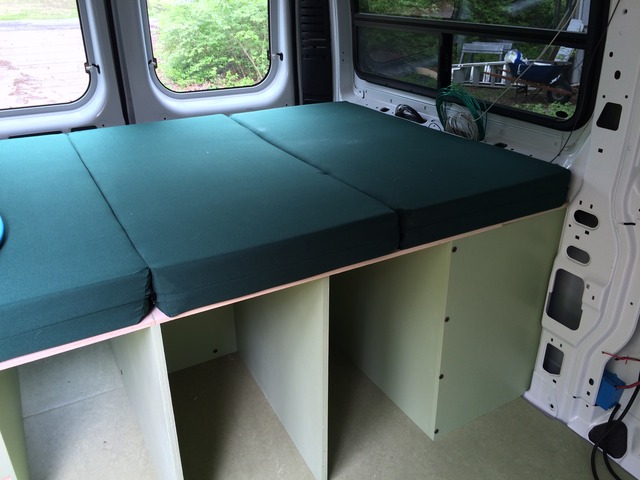 |
Electrical
We didn't have time to be jet lagged when we got back from Norway July 17. We had 3 weeks minus other obligations to get the PM ready for its first camping trip. The weather has been absolutely awful.
Two necessities: 12v system and anchor the bed assembly. Current electrical needs: Engel MT45 fridge, MaxxAir fan, charge various iPhones, Kindles, etc. Simple 12v system: Trojan Overdrive 100A AGM battery installed behind driver seat with a Surepower 1315 battery separator. There is also a HF 750W/1500W inverter which can be switched into the system if/when needed--no present need. AC is presently entirely separate--14-gauge extension cord from bumper inlet to behind driver seat. Fridge is also plugged in there, so it will run off AC when we have shore power. Battery box is securely fastened to the floor and to the tie-down spot on the riser. The top will also be painted--not highest priority right now. Separator and inverter are by the wall. There are 12v sockets and USB ports along the wall. 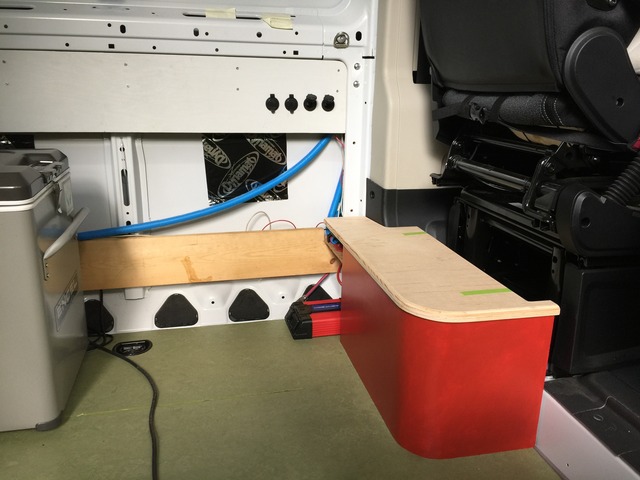 I built the box; my husband did all of the electrical. We were quite pleased and relieved that everything worked the first try. The fridge will eventually be built into a cabinet along this wall which will also house a sink. In the process of putting up temporary support for the outlets, we discovered that 1x boards fit very nicely within the wall frame if they are built out with 3/8" ply. This is so solid, we may eventually add similar supports for the rear cabinetry. 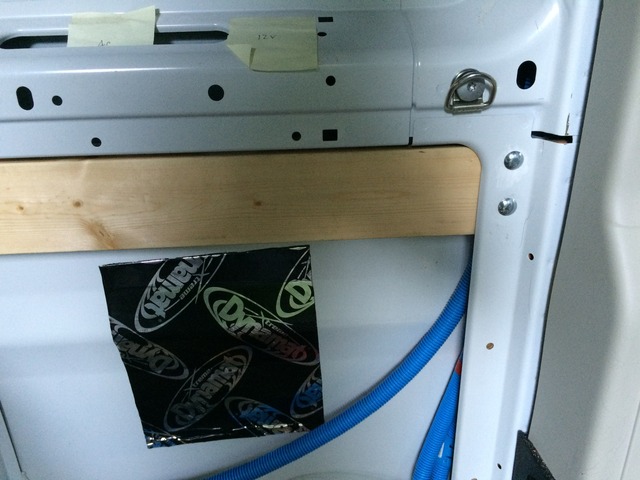 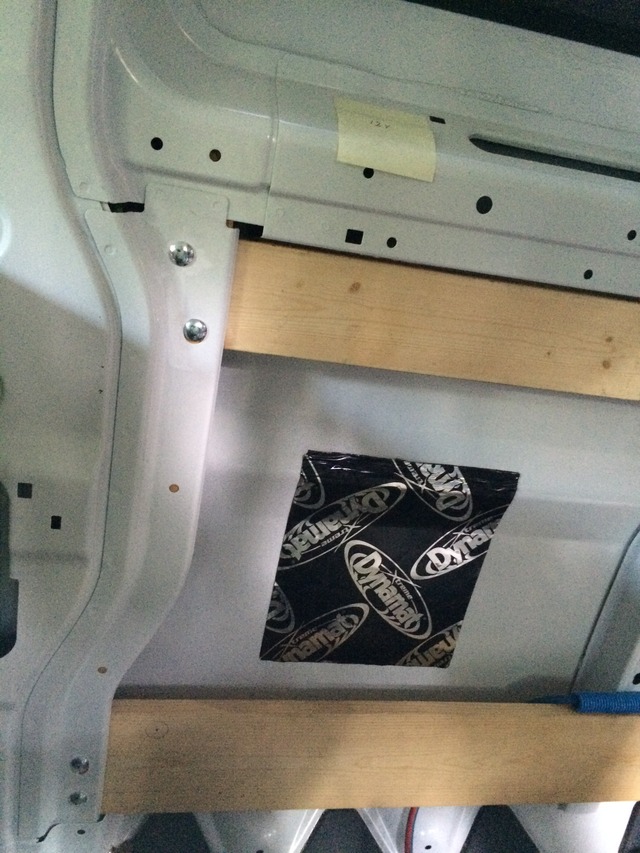 When we return from this trip, we will have a few weeks before we head to California. My goal is to have at least some of the drawers in. This trip, we will suffer the lack of them, but we really won't be in the van much. We will backpack 15 miles to Titcomb Basin in the Wind Rivers. Mules will bring extra supplies to enable us to stay a couple of weeks. |
Maiden voyage--for the campervan conversion, that is. I figure the conversion is maybe 50-75% complete, but quite liveable.
First night Ellis, KS. Really nice city campground that breaks up the 1,000 miles between OK and the west.  Then on to Wyoming. Spent one night at the Elkhart Park trailhead. Woke up to frost on the inside of the windshield and fogged windows, but the insulated surfaces were dry. I was pleased that even without storage completed, the van ate 6 bear kegs, two full packs, a large tent, and an extra duffel in addition to the stuff we would normally carry for camping in the van. Then into the Bridger Wilderness to Titcomb Basin for two weeks--packer brought in the extra bear kegs, etc.  The plan was to stay 2 weeks, but after 12 days, I hiked the 13 miles out to spend 3 glorious days alone in the van at Elkhart Park. Together again, we spent several days day hiking around Pinedale. 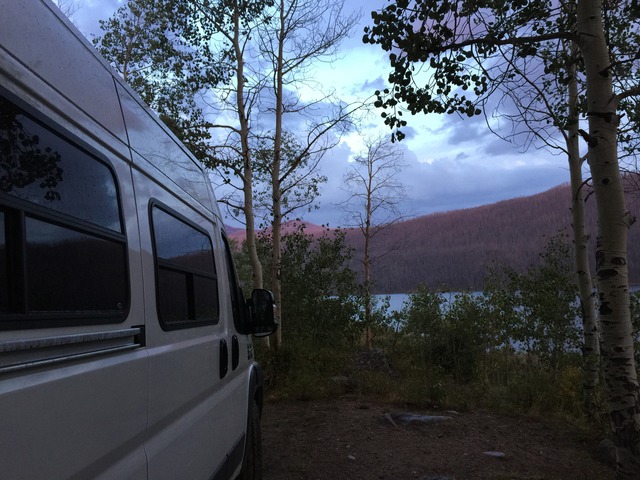 Then on the way home climbed Mt. Bierstadt (14,060) in Colorado, an easy walkup. From the trailhead:  Rethinks of my layout: I'm contemplating lowering the bed, but I probably won't. I had not contemplated that there would be 3 sets of footwear: boots, shoes, crocs. I have a place for the boots; need to make places for the others. With bedding in place, the storage over the wheel wells is awkward. I will probably incorporate water storage into the foot rest for the swiveled passenger seat. We had assumed that the front dome lights would work for someone reading in a swiveled front seats. Position is not good. Need to rethink. The MaxxAir fan is terribly noisy at highway speeds. It doesn't close all the way--I can see daylight between cover and body. It either needs fixing somehow or an interior cover. The radio speakers suck. I'm not an audiophile, but those crappy things need replacing. Things that work particularly well: The fridge. Yes, it was a splurge, but I will never regret it. Considering our travels, it probably won't get built in to a kitchen unit til next year, but it works fine tied down to the floor. Here's lunch: 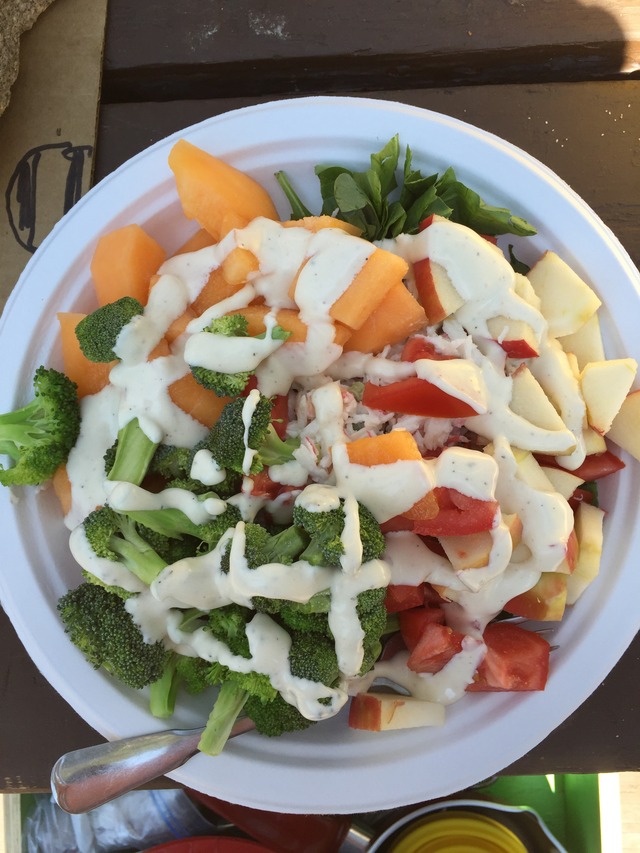 The open space. I caught some friendly flak here for guarding it so jealously, but we both consider it one of the van's best features, both for aesthetics and usefulness. We can both change clothes at the same time without any sense of being crowded. The bed. Ooh, it is comfortable. The 4' x 6' size is plenty big for anything the two of us want to do on it. The long narrow rear storage. I didn't anticipate how useful it would be: sleeping pads, soft drink cartons, hiking sticks, etc. I also didn't anticipate that my favorite spot for reading would be crosswise the bed leaning back in a camp chair: http://www.rei.com/product/783807/rei-trail-chair-long This means my husband uses the swiveled passenger seat and the driver seat may not be used so much. It also means that when I build the kitchen unit, I need to incorporate a cup holder for myself. The insulation. Even sitting in full sun with no window/windshield shades, I never measured more than 15° difference between outside and inside. When I came down from the mountains mid-afternoon to the van that had been parked in full sun for 12 days, I didn't even need the air conditioner to cool it off. In years past, the vehicle had been an oven. The vehicle itself. My husband drove it hard. It handled exceptionally well and averaged about 17.5-18 mpg. All-in-all, I felt like I needed to pinch myself to make sure my dream really had come true. No rest for the weary. Projects before the next trip (California late September) include drawers, better fitting bedding, and some kind of awning. |
Quote:
This drives me nuts. Been thinking that I need some sort of cover also. I've even thought of removing mine and/or moving it to the back, but that would be a huge task. I've thought I may have gotten a bad one because others have said the noise isn't bad. |
If the MaxxAir is rattling at highway speeds, contact them and they will send you a piece of weather strip with some instructions on how to fix.
I posted it on here somewhere months ago. Since the fix mine has been totally silent Instruction sheet is at bottom of thread, hope this helps. Easy fix just a pain because you have to remove it http://www.promasterforum.com/forum/...ad.php?t=41897 |
I may try this. I'm not sure I'd describe mine as a rattle... When it's closed and I'm going down the highway it sounds like a window is open. Mine is mounted about 3' rear of my head. Drowns out the TV for the back passengers. I really regret installing in that location.
|
I have 2 Maxxair fans -- one forward and one in the back. They have the "smoke" (black covers). They are closed all the way when the tops are horizontal when observed from outside the van. Yes, there is some light that comes through especially in bright sun. Mine are the remote control units and I have had no trouble with them and I am a happy camper.
|
Bconno, by what method did you contact MaxxAir. When I called, I just got a recording referring me to the website.
|
Quote:
|
Quote:
I would still recommend get in touch with the manufacturer, they were really helpful |
Quote:
|
Fridge Stand
I don't think the fridge is going anywhere it's not supposed to.
 Flex-angle, bed rail and 72 bolts. Fridge will have 8 bolts in holes designed by manufacturer for tie-down. Stand will attach to two through-the-floor tie-downs, plus several attachments to the wall. This will sit just in front of the C pillar on the driver's side. My husband constructed this part. My task will be to skin this with wood to make it look better, plus drawers in bottom and hinged counter on top. Downside is 3 vertical inches lost under fridge. Obstructed on all six sides. |
End result of Maxx-Air: Repair did not fix the problem, so they sent me a new fan, which has not been installed yet.
|
MsNomer, please post completed pics. looks interesting!
|
Will do, but probably not til after the new year. We are hastily finishing a few projects before a trip to Big Bend, Guadalupe Mtns and Grand Canyon in a couple weeks. Just having the fridge secure will be enough for now. I have finished the drawers, though, and will post pics of them soon, plus pics of my drawer stick and finished ceiling.
It took a year to convince myself I could make this window surround corner: 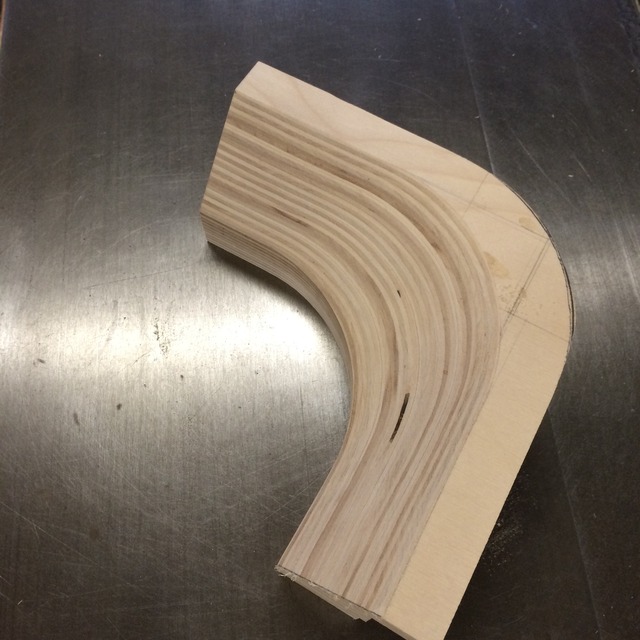 Two made, ten to go. I'm really excited to see how they go up, so I'll probably tackle that first and ruminate on the fridge surround as I do it. |
Sweet!!!!!
|
Wow, waiting for the how to videos!
|
Awesome cupholder fix. thanks for posting I have been pondering one for some time. I used to make fun of car reviews that complained about cup holders until I owned a diesel jetta and now a Promaster. I purchased the Thinsulate from Heins and love the stuff. Heins are real people and easy to deal with. I will be posting photos of my build out with cherry and oak sometime in the next month. Currently busy setting up our 53' custom build semi trailer rv to live in.
|
Guess How She Did It
Quote:
Very nice crafty work on the window surround!! I can't resist guessing on how you built up the profile: 1) three layers of ply 2) cut each layer/piece with the corresponding change in radius (each one bigger) at 90 degrees 3) router each piece (with guide jig) to desired slope (guessing 45) 4) glue and clamp all three layers together Howe'd I do?;) Its going to look great with the 4 straight sections attached! Thank you for the inspiration:) Cheers, Dave |
:D Not even close. I shudder to think how hard it would be to get that right. You are close with the 45°. I think mine is about 40°, but it could have been 45°. I really didn't bother to get a number--more important that it fit.
Start thinking again with a 6.875 x 6.875" x 3" glued-up block of 6 layers of 1/2" Baltic birch (or 4 layers of 3/4 which I didn't have). You'll need a table saw, a 14" band saw, and an orbital sander, each of which will be taxed to its extreme limit (thus the odd dimensions). After the year of convincing myself I could do it, I spent three days making the prototype by trial and error. When I woke up the next morning, my brain had processed what I had learned. I went out to the shop and made two final editions in half a day. It's exacting, but not actually that difficult. I will eventually do a tutorial--after all, I do have 10 more to make, but while I'm busy doing other things, like camping, you have the grand opportunity to solve the puzzle for yourself. >:D (I don't mean to be perverse or snooty or nanny-nanny-boo-boo. Just having a little fun.) |
This sort of detail work and your skill is why my woodwork looks like a mountain man with his new chainsaw made it and yours looks so nice. I'll be in Big Bend in about a week. Our first visit.
|
RD, I greatly admire how you accomplished so much in so little time. People who don't do this won't appreciate the skill/vision required to put that together with so much functionality in a small space.
Sure would be nice if we could meet up in Big Bend. Let me know when you're going to be there. I figure I've got more than 1,000 hours in already, not counting the pondering time. Now I understand why the bought-ready-made ones cost so much. Sometimes I wonder at my sanity, then I contemplate that I am really enjoying this process and there's nothing else I need to do except housework, so why not? Even early in the process, we were able to take off on camping trips, so the time I'm taking hasn't postponed enjoyment/use of the van. (Need to camp to get away from the house that didn't get cleaned.) The fridge got secured last night, so we are getting close to full functionality. I've been woodworking for about 15 years. I have been frustrated that there wasn't much I wanted to make for myself, so most everything was given away. This is for me. With all the curves and the desire to maximize space use, it is perhaps my most challenging project ever, which raises the satisfaction level when something goes right. I've been tempted to incorporate some of the spectacular wood I have stashed, but I remind myself that this is a vehicle. I don't want it to look like a house. In fact, I will eventually replace the figured maple cup holder with something painted because pretty as it is, it looks out of place. |
Challenge is on;)
Quote:
I'm up for it, you got me thinking now..... Cheers, Dave |
MsNomer,
I will PM you in a few days and let you know when we will be at the Bend. I hear you about the tension between the conversion being more house like or more vehicle like. I did the cabinets in a style that would not be used in a house. Being my first time using such a system I had challenges that I did not expect. However the warts are not interfering with our enjoyment. The upper and lower panels keep the look vehicular and the cabinets were supposed to look like modular units which they do. In time I have some aesthetic changes to make. I do have less time invested than you but were I to do another I could spend much less again. Save the wood for something special that can be built and appreciated in a hundred years. The van isn't that. RD |
The Drawers
The Drawers:
Ten of them, each 28" deep. Four 3.5", four 5.5", two 9". One bank is 16.5" wide, the other 13.5". Dovetailed drawer boxes. 1/2" BB, even bottoms so bottoms can be flat. 3/4 face screwed on. Frameless. Used 28" KV8400RV slides--spring loaded for RV's. 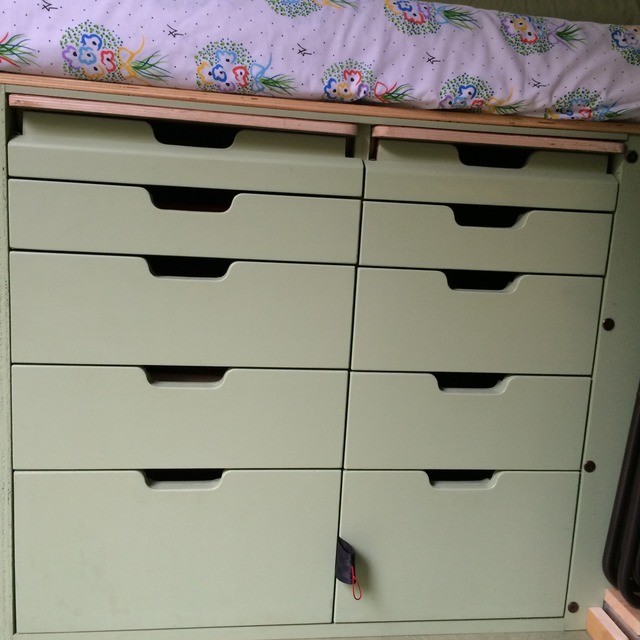 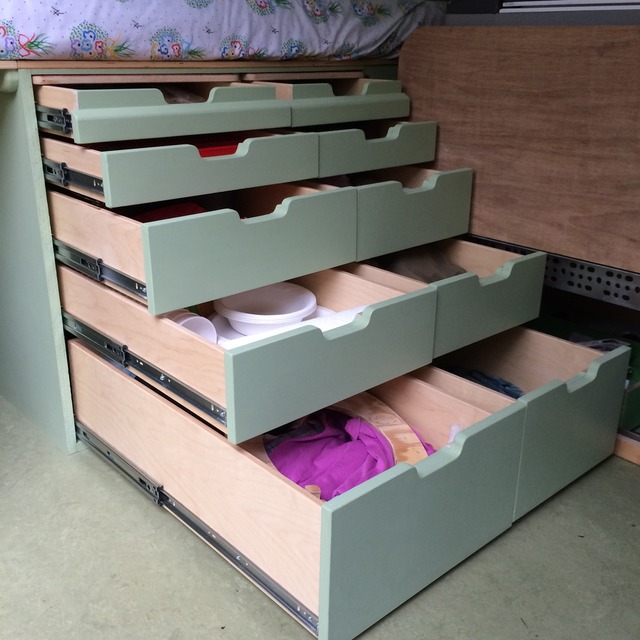 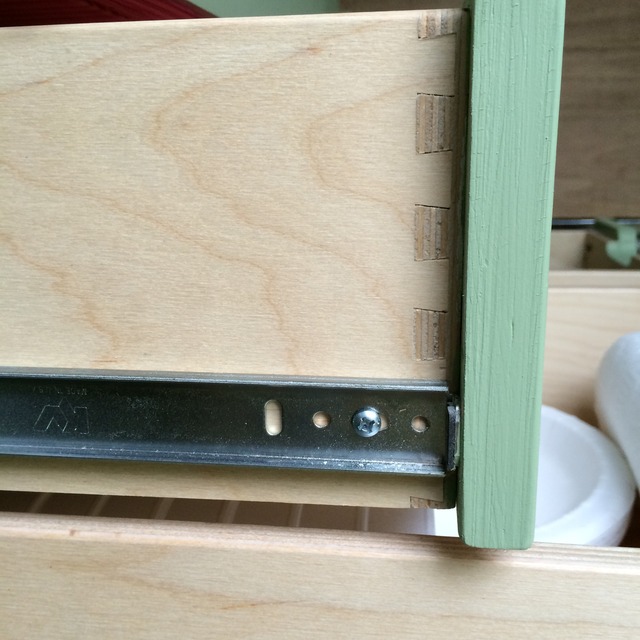 And what, you may ask, is that red/black thing hanging out? 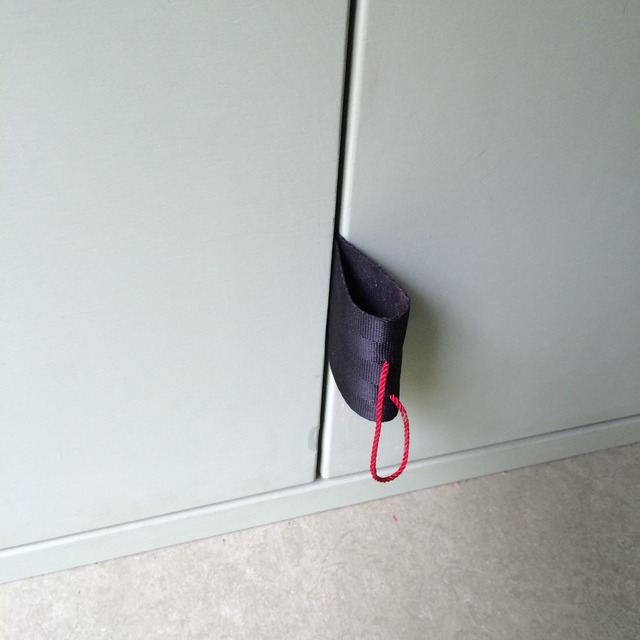 Well, those slides are fine for operation on an incline, etc., but they are worthless on forward-facing drawers in even a 30 mph stop, as we learned the hard way. Ordinary latches have no place to latch when there is no frame, so I had to get creative. You are seeing the end of this webbing that is attached with a carriage bolt deep in the bowels: 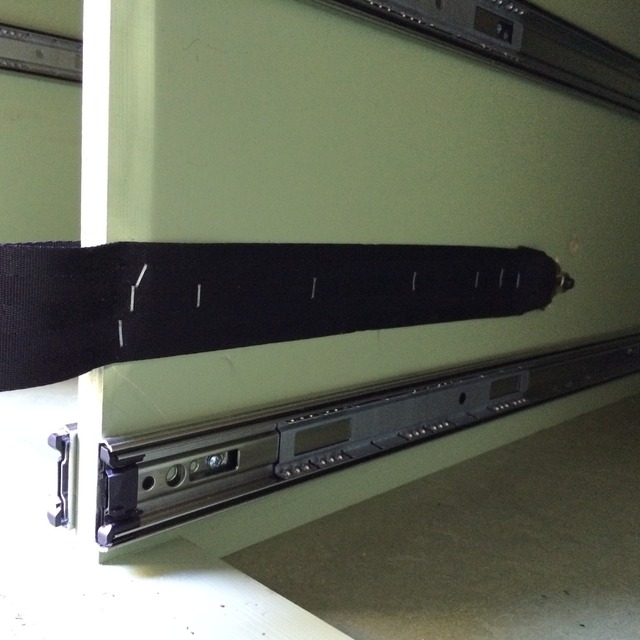 The strap works its way harmlessly behind the drawer faces after a few open-close cycles, but it is easy to retrieve with the red loop. Enter the "Drawer Stick": 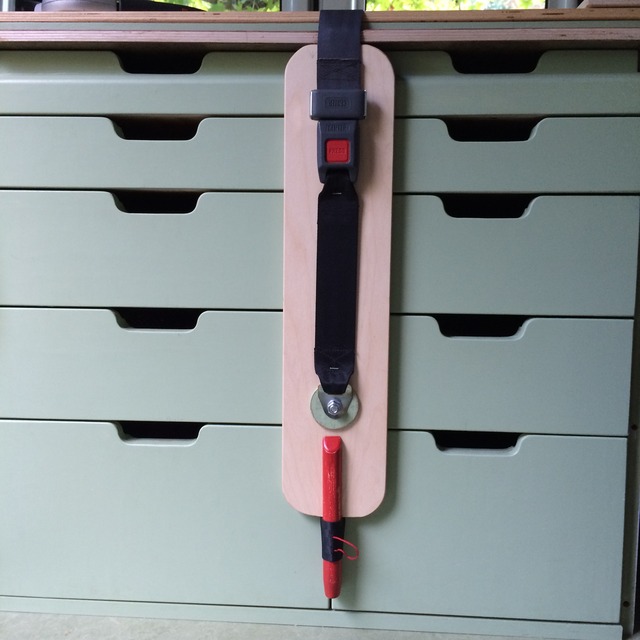 The Drawer Stick is 1/2" BB backed with foam-backed headliner material. Bottom end is a piece of broomstick lap-jointed on. That green circle is to add depth so that the carriage bolt can be recessed on back. A short piece of salvage seat belt runs up the middle. A tit at the top fits between the pull-out tables (described below) to completely prevent lateral movement. The other end of the seat belt is attached with a carriage bolt to the vertical member behind the drawers, comes up through a slot in the bed board, then across under the mattress. The end tucks under the mattress when we are using the drawers. The drawer stick will live on or near the driver's seat at least until we have a firm habit of installing it. Now to the tables: There is a Formica-topped pull-out table atop each drawer bank. As there is no frame for them to rest on and they are also 28" deep, the top drawer is pulled out simultaneously. Together, these make a 28"- tall 30" x 28" table, or they can be used individually at any depth as counter space. The tables have sleds underneath that rest on the top of the closed drawer slide. Therefore, the top drawer is fully functional without the pull-out budging from its closed position.  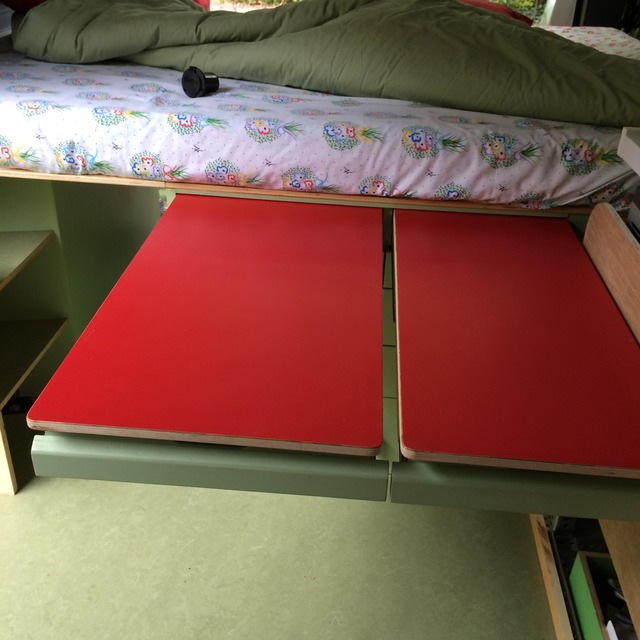 We have plenty of room for folding stools on the two open sides of the table. The split in the middle has not been an issue. |
Looks as if you are having "fun" I especially like the drawer stick idea;)
|
The Toilet
We (I) only need a toilet for middle-of-the-night and morning. I originally was going to build an ottoman/toilet/footrest, but decided it would be in the way. I wanted something that would disappear during the day.
Start with a folding stool. There are two of these that we use for eating and changing boots. They are 18" tall and fold to about 1" thick and store next to the bed. 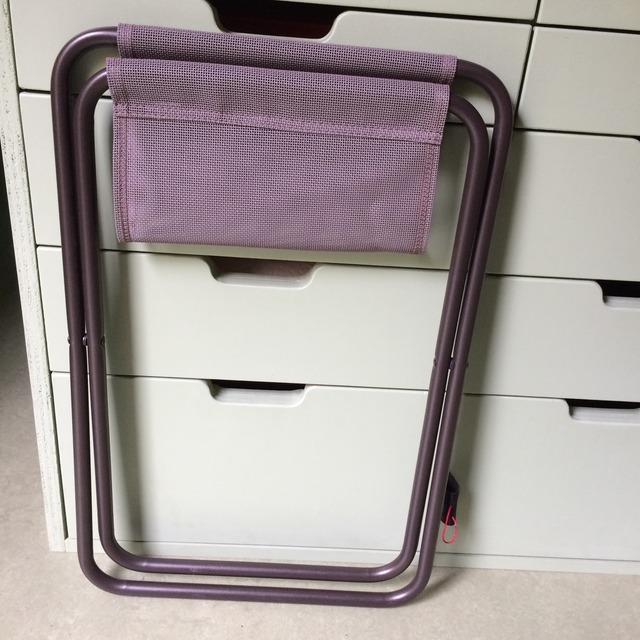 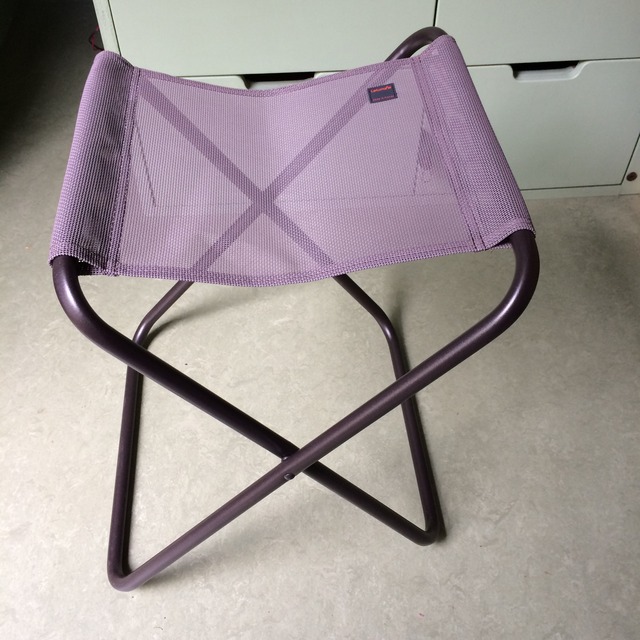 Turn it upside down and bring on the plastic paint bucket and a heavy-duty 13-gal trash bag: 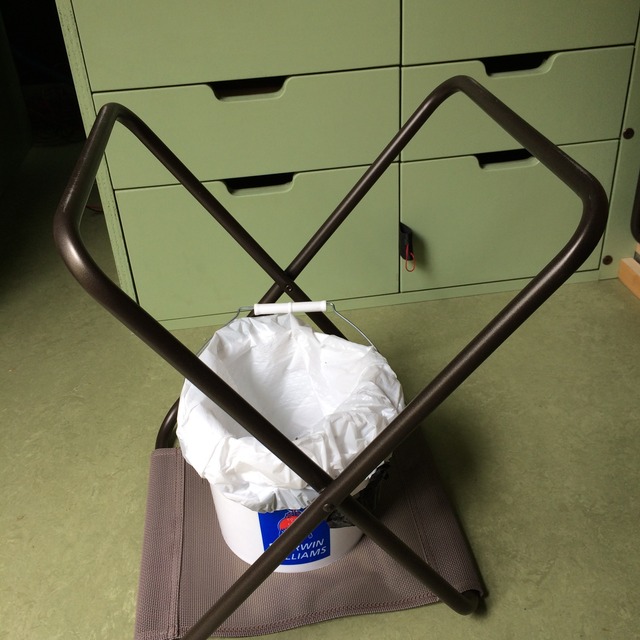 Grab the seat out of the drawer. It has fittings that snap onto the rail of the stool. 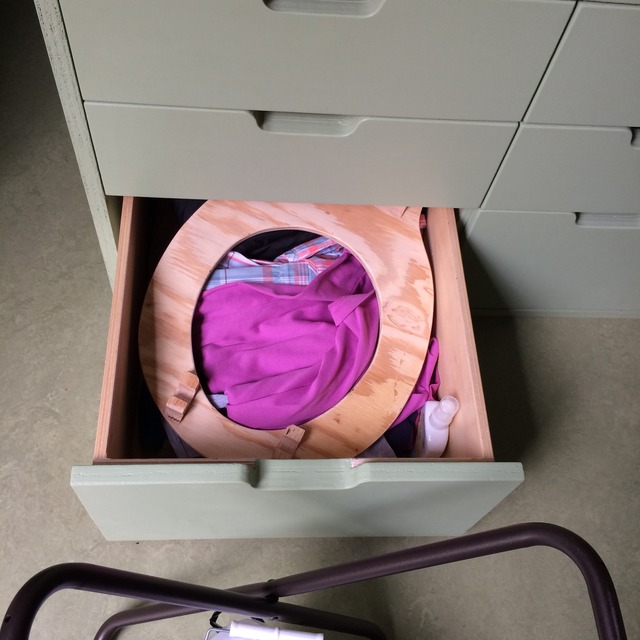 Pull the bag up over the seat and it's ready for use. 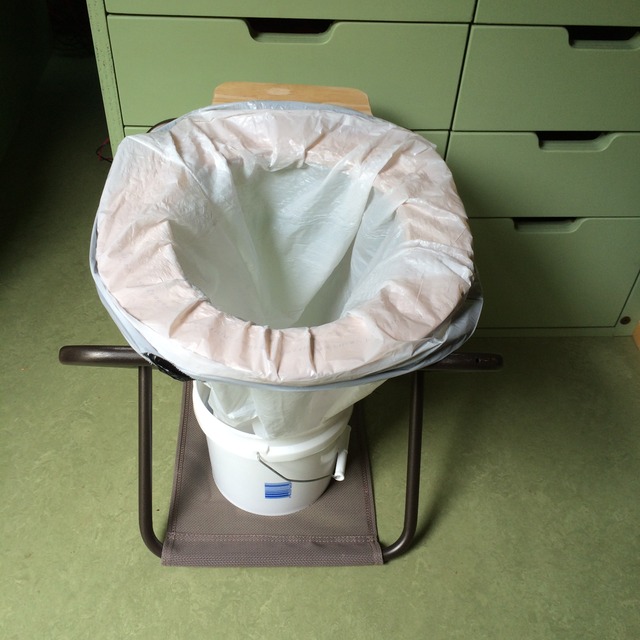 Between uses, just fold the bag over. I've never smelled anything: 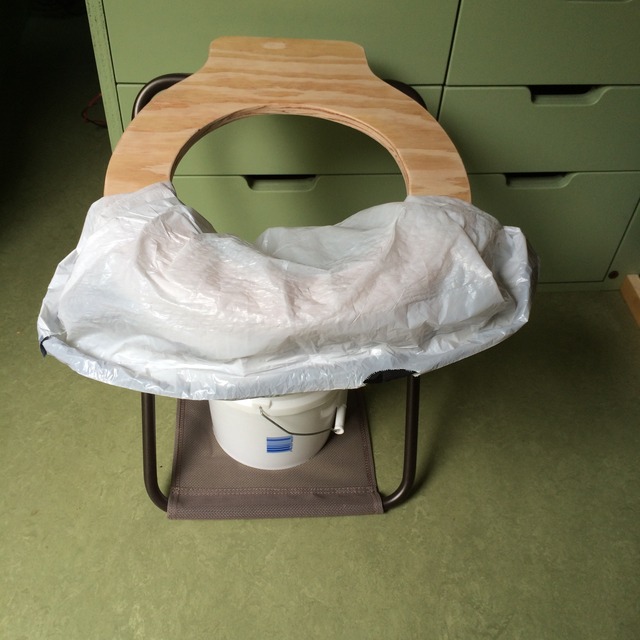 In the morning, take the bucket to the outhouse, empty and dispose of bag. 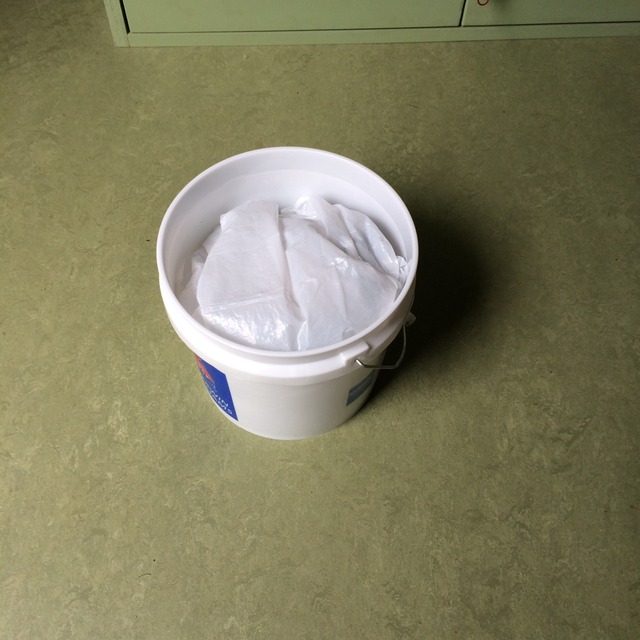 If there is no trash receptacle, the bag can be folded in on itself and carefully stashed. Because the seat was never exposed to the "elements," it goes right back into the drawer. I have used this now for several weeks with great satisfaction. I like that I can finally sit after ten years of using devices and bottles in the truck tent. I like that there is nothing to clean ever. I like that it completely disappears during the day. I assume that it could also be used for #2 , but see no need. |
Wow! That's cool!
|
Holy crap>:D!!!!
|
1 Attachment(s)
Although I prefer the relative luxury of a Thetford Curve, with it's electric flush and very comfortable seat....
http://www.promasterforum.com/forum/...1&d=1446333550 I can easily see the advantages of a no-tank, nothing-to-dump approach! Just watch out for splinters! >:D Thanks for sharing... every day brings a new idea here on the forum....:D I really like the look and design of the drawer cabinet with tabletops! Enjoy, Ed ps. Yeah, I know, still lots of work to do... and with winter coming here in New England... I appreciate the carport, but a garage that fits sure would be nice..... brrrrrrrr! pps. does anybody out there actually like to stain and finish wood? I like building it, but hate to deal with the "finishing touches" |
Quote:
|
Hello, I have small toilet with hidden potti.
  |
Quote:
|
Quote:
|
Quote:
I would also like to get a bigger holding tank on next one (ours is very smallest model made back then -- less than 3 gallons), and maybe even buy a second tank as a backup since we plan to camp less at private campgrounds. Although it requires cleaning and dumping more often, I prefer that over an RV hose any day. After each trip I clean and sanitize with Clorox and it's as clean as new. Can't say that about the toilet and holding tanks in my Class C. |
MsNomer,
I hope I haven't lead your build thread astray..... sorry! I'll start a new thread Ed |
Myke, You are male, right? Easy. My husband prefers, and still uses, a bottle.
For me as a woman, this was one of the main improvements I was looking forward to. Funnel devices are OK when there's nothing better, but risk of leakage is substantial and flow must be carefully controlled to avoid overflow. Now, I can just sit and let-'er-rip. Aah, what a relief it is. |
Quote:
If it were me, I would at least double bag it... one pinhole and you're screwed! |
Actually, I do double-bag. The bag in the photos is the one that stays put. I put in a second one to use. Just thought that detail would complicate the description.
|
MsNomer,
You are a very creative person! Really like the drawer set up. The frameless design looks good, Its what I would use but, I'll have to give it some thought now re the latching issues. I guess I will use rails behind the drawer fronts so I can add latches. Your use of colours adds a unique and personal feel to your conversion, very well done MsNomer. Speaking of giving tricky bits thought, I failed to figure out how you built the window surround and now its bugging me cause I can't get it out of my;) Cheers, dave |
Quote:
http://www.fiamma.com/EN/products/co...y_line/bi-pot/ Regards |
Rails behind the drawer fronts? I'm not envisioning it, so now we're even. However, another solution just popped into my head. You've got 1/2" on each side between drawer and box. Glue 3/4" by 7/16" sticks vertically between the slides on the front of the box.
Glad you like my color. Kinda 50's, the era I grew up in. I will make a new how-to thread for the window trim instead of burying it here. I don't anticipate that happening til we get back from Grand Canyon late November. There are a few critical photos I need. |
I had an epiphany.
I had always assumed that the van would have a small sink with jugs underneath. It would sit behind the driver next to the fridge. Even simple conversions have some kind of sink, right?
I found an appropriate one at Habitat for $10, but I never could get excited about it. Today, the realization hit me: I neither need nor want a sink. In all our years of camping, I've never said, "I wish I had a sink." All I need is a spray bottle of water to dampen a paper towel when there's no left-over water in the cooking pot. We use paper plates and bowls. Our cooking pots and skillet are Teflon that clean easily with a damp rag. With no sink, I can have a microwave, though at this point I assume it will only be used on shore power. |
We have come to really like our giant (for a campervan) Ikea sink/drainboard. Great to store stuff in during the day (really) great fireproof area to sit the butane stove on the drainer, great to wash up in, and brush, and with a small basin in it to do the few pans similar to yours. I have 6 gallon fresh and grey water jugs underneath and 5 gallons last for 10 or more days as we really don't fill the sink. Our dishwashing is the most minor use but we are happy to have it. Many DIY rigs many solutions!
|
I have a 30 gallon water tank, a sink, a 16 gallon gray water tank, and a 750 watt 4-gallon water heater in my DIY camper. I love it. I have no pressure water pump, just a foot pump to pressurize the system. Hot water is via shore power or from the house battery via an inverter.
The sink has many uses besides washing dishes. I use it for brushing teeth, shaving, washing myself via "bird baths", and even shampooing hair as my head fits in because I have a swing-away tall spout. The ability to do good body hygiene saves dollars as I do not need to find motels or truck stop showers. The sink is also useful for washing parts and my hands when doing projects or fixing things. I can't imagine a camper without a sink especially if trips many days long are planned. |
Agreed! What did you use for the water heater and how well does it work of the inverter? I have an almost new instant unit I removed from a job a while back (when I worked for a living) and have been toying with trying to incorporate it in the future.
|
keeponvaning --
My hot water heater is an Isotemp or Isotherm (can't remember which) widely used on boats. Very high quality and the only one I could find with a 750 watt element in lieu of the more common 1200 or 1500. When running on my 1000 watt inverter it pulls 70 some amps out of my 230 amp hour house battery. Typically it heats a tankfull in around 45 minutes taking around 55 amp hours out of the battery. A heavy draw like that on the battery all at once tends to reduce battery life. What I normally do is heat water 10 to 15 minutes at a time maybe 5 times a day which keeps it hot enough depending how much is used. A bigger battery and inverter would be nice. When shore power is available I leave it on continuously. |
It would be a great system in a diesel van to have a Webasto dual top for hot water and air heating, spendy though.
http://www.webasto.com/int/markets-p.../dual-top-evo/ Lower battery drain, lots of hot water, heat when you need it or want it.... like home with a changing view. I would not want to draw 70 amps from my storage battery for that total time even though I have golf cart batteries which can probably take it. |
Quote:
|
Steve do you use your Dual Top to heat your engine coolant too?
|
Steve has a gasoline coach with diesel just for the Webasto. I think the usual way of plumbing a Webasto into the cooling system would result in a natural 2 way heat exchange. An unusual choice but allows for no propane. I'm sure Steve will correct anything I have wrong. I have just enough knowledge to be dangerous. Sportsmobile forum is a great place to explore these kinds of options. The Sportsmobile company and Sportsmobile owners have been on to these type of systems for a while now.
|
Quote:
|
Quote:
|
MsNomer,
thanks for the info on the batt. box in my thread. How did you get the curved corner on the box? Any pics of inside the box and arrangement you can share? Nice build by the way, Tad |
Looking down inside the box.
 If I were making it again, I'd probably make the box a bit bigger, but it works well. Baltic birch. The kerfs cut all but the last ply and I still had to use boiling water to bend it. The rounded compartment holds electrical odds and ends, like a fuse puller and the battery handles. Isolator is between box and side wall. Husband today installed the shunt for the TriMetric meter between box and seat base. I plan to cut the bottom from the black trim so that it can be removed with battery box in place, but not any time soon. CORRECTION: Not Baltic Birch. 5-ply Arauco ply. |
Thanks MsNomer!!!
|
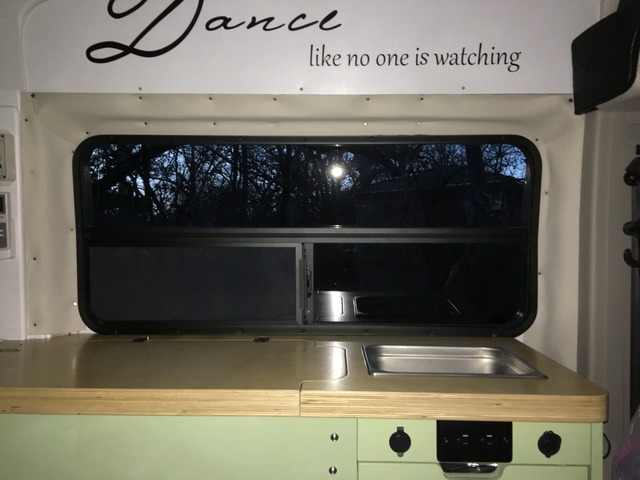
The Kitchen
It's been a long time since I updated, but time flies when you're having fun. In addition to working on the van, we've spent a fair amount of time in it, too.
The kitchen is along the wall behind the driver. Footprint on the floor is limited to 16" because of the under-bed drawers. Depth of counter from 1/2" overhang to the window is 21". Counter is 49" with space on either end. The kitchen build is determined by working around this "erector set" structure that houses the fridge. It is bolted to two tie-down points. If the van is smashed to smithereens, the fridge will surely survive. ;) The assembly presented some serious design challenges, though, and in the end I still lost use of some space, which I don't like but can't help. This shows an earlier stage of planning when there was going to be a sink, but you can see some of the fridge frame being addressed. I was able to create a couple of small storage areas around it.  The other design issue with the fridge is that it was made to be portable or live in the back of a truck, not made to be built in. I was loathe to interfere with the large vents on three sides and top of one end, and the lid opens from the end, not the side.  However, of all the fridges I looked at, it was the only one that would fit my space and I am still in awe of its efficiency and ease of use. As I stated in an earlier post, we decided not to have a full sink. Instead, we have a half-size (about 12" X 16") 6" deep stainless steam table pan. It lifts out easily, yet stays put. I do not anticipate that I will regret this decision. We already use it as a safe place for pouring and storing liquids. A 700W microwave lives underneath. So far, we've only used it on shore power, but we are getting a larger inverter soon. We have learned that when we are sitting at the pull-out table, one person can access the fridge, pan, MW, and kitchen drawers without getting up. Very convenient. I'm still lacking some drawer fronts (handles are temporary) and the top drawer, which will use the available space under the pan:  With final counter:  The counter top is also still a work in progress, but nearing completion. I decided early on that I want the fridge to be insulated from heat coming through the window, and that this would be a lid with 1" polyiso center. I also wanted access to the area between the fridge and bed where the stools and some spray bottles reside. This made for a strange shaped counter composed of three layers of 1/2" BB plus a 3/4" lip. I used no glue, just screws. 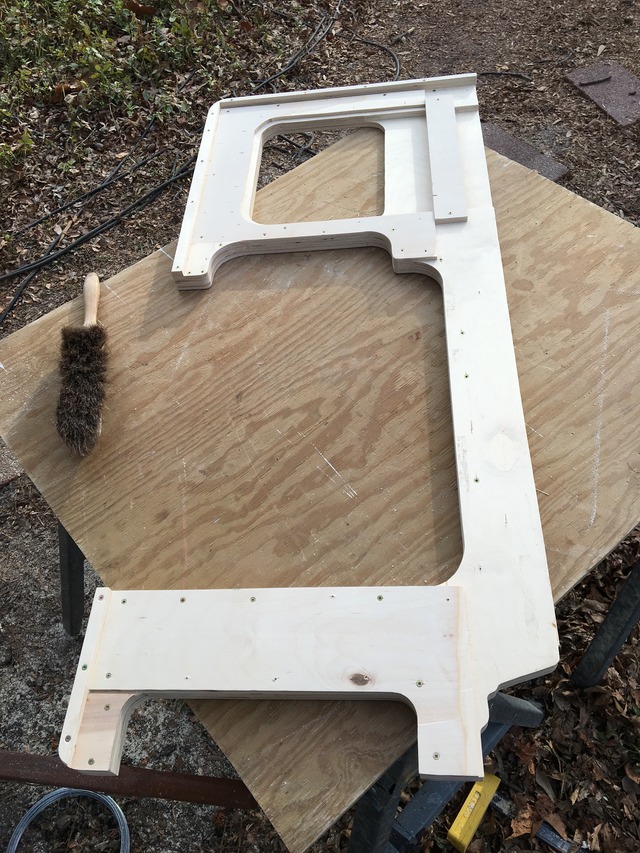 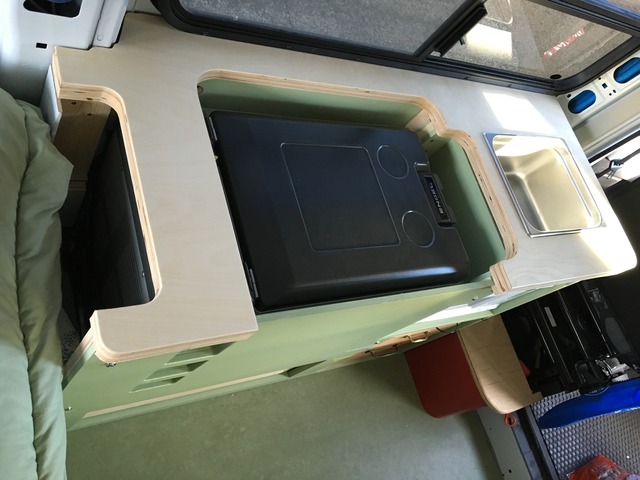 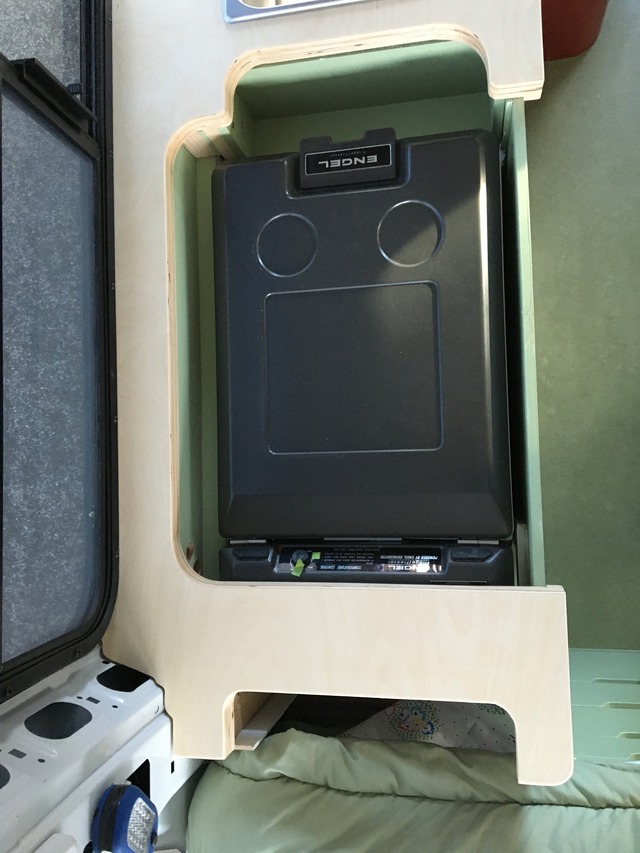 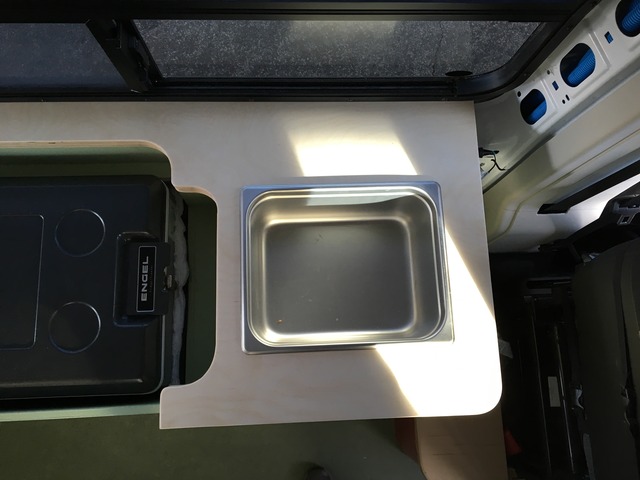 The lid for the fridge will have butler tray hinges that will lock at 90° and flat. The left lid will have sewing machine hinges that fold over flat. Considering that the windows were the first mod and the counter near the final mod, it was great relief and satisfaction to see them come together. I had planned to apply Formica, and even bought a sheet, but this last piece of BB has such nice grain and looks so good as-is, I have decided to apply poly and leave it alone. It will receive a lot of use, but not harsh use, given that there is no stove. |
Awesome build
Wow that sure is an awesome build on your van. I couldn't imagine how much time you have spent measure/cut/fit/trim/remeasure/cut/trim/refit. Also how much thought you've put into what you wanted inside the van.
I'm starting my build in a couple weeks, but will only be a work van. |
Quote:
My van is parked in a carport right next to our garage. I made the garage into my van-building workshop to make it easier. Still, the number of trips out to the van, measure, cut, test fit, mark adjustments, cut, sand, trim, etc......... I put a small step-stool outside the back door of the van. (Harbor Freight aluminum painter's step with the legs cut to make the step up about half way to the floor) . I would recommend that while working on the van, it's a lot easier to take the intermediate step when you enter. I must go in and out of the van about 40-50 times a day when I'm working on it! On my van, I added a 6" basement, so the step up is higher - the stool really makes a difference. Ms, Fantastic work! I like the color of the cabinets and it looks like you really took the time to develop a floor plan that works well for you and the Mr. I'm sure that future trips will be a bit more comfortable than the pickup-truck configuration you had before the PM! I'm sure you have more ideas to add, so we'll look forward to more updates. :D Ed Ps. still waiting for delivery of my Engel! Fedex says next week. Price was really good, so it's worth the wait for the delivery from FL. |
Thanks for the kind words. It's not much like any other I've seen, but it's pretty darned close to what I envisioned before I ever saw the van.
It's about 50 feet from my shop to the van in the driveway. Couldn't even guess how many times I've walked that in a day. I also can't guess how many times I've pulled this stunt: I'm in the shop. I need my hammer. Go to van. Forget what I went for. Go back to shop. Remember that I need my hammer. Go back to van. Can't find hammer. Go back to shop. Find hammer where I was in the first place. It's been just over a year since I got serious about the upfit. IIRC, the floor went in late January. In that time, we've been home about half the time. Three months we were traveling abroad, three months we were traveling in the US, mostly in the van. That leaves 6 months in which I spent virtually all day every day working on the van. That would be 1000 hours if it were working weeks, but this was dawn to dusk, 7 days/week. Why? Why not? It has been a really fun trip, and there's nothing else I have to do. I have truly enjoyed "solving the puzzle," particularly when I wake up in the morning and realize my brain found a solution while I was sleeping. I enjoy the van whether I'm building or camping. We leave Tuesday for 5 weeks in Portugal. When we return early April, I will be under the gun to finish the counter and rig up an awning and mosquito netting for a trip to NH late April-early May. We may also add another battery, which means another battery box, this one behind the passenger seat. It's always good to have trips planned to keep up the momentum. I was going to mount the TV above the foot of the bed, but before I got the shelf built, my husband wanted to use the TV anyway. He opened a drawer, propped up the TV, and we watched from the front seats. It worked so well, I decided not to build the mount. Looks like the window trim will be the final touch. |
Quote:
Please let me know. :) |
I'd call that the ultimate compliment. Thanks.
I'm hiking in Portugal at the moment (see blog). I'll see what I can do when I get home, but I'm not interested in sales. Perhaps I could make you a pattern. It is really very easy to make. |
Quote:
|
CNC guy at your service! I'm partial to the curved cuts and generous radii exhibited throughout this build. Nice work.
Nice fit to the van body work as well. ++! |
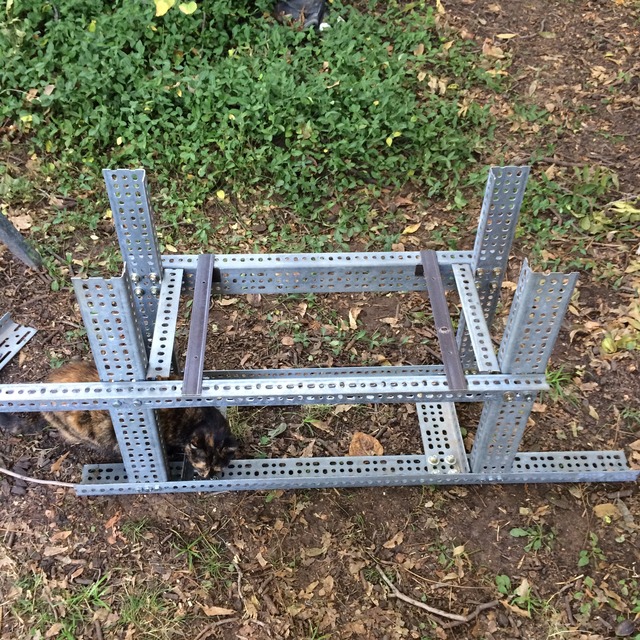
MsNomer, What do you call your metal framing for your galley? Did you find it at a home store or metal supply store. I need to build a substantial box with a shelf for my 4 house batteries 90#'sX4. Thinking that would make great framing... TIA
|
Yes, it would be excellent for that. My husband found it at a metal surplus store. We have not seen it in ordinary stores but have seen it online. Neither of us can remember the name, but the name is stamped into it and we will look when we get home.
|
It's called slotted or perforated steel angle. I didn't find the exact configuration MsNomer used, but it's available from places that sell hardware and steel.
https://www.grainger.com/product/GRA...ngle-Kit-3W095 |
Mosquito Screen
This project is not completely finished, but we just took it for an overnight test run and it has greatly exceeded our expectations, so I just can't wait to post. It is actually dual purpose--it will be part of my rain protection.
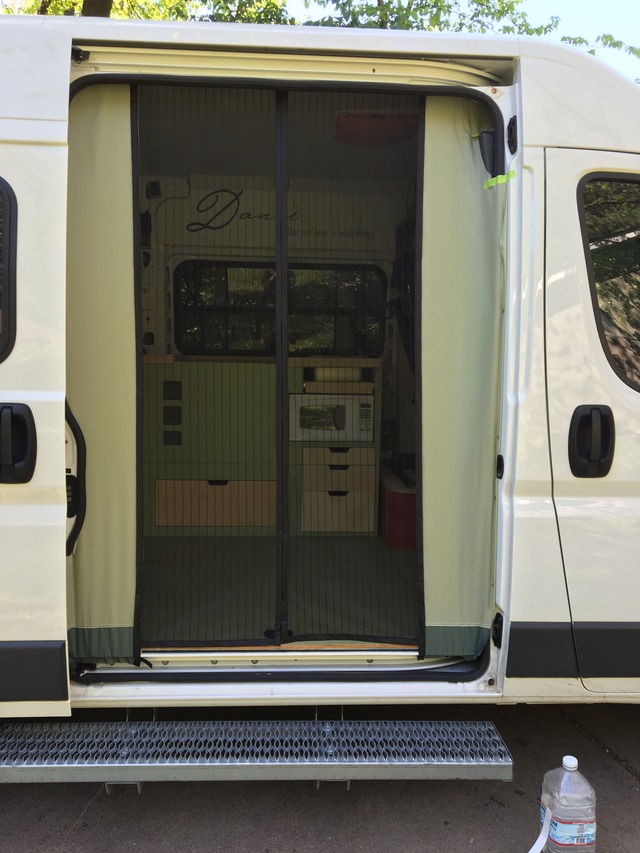 Total cost: about $60 with leftovers that can be used elsewhere, but not including the second screen I will use for the rear. Skill required: the ability to sew a straight seam. I started with this screen from Amazon. Notice that it only fits openings 34” wide. It is actually 36” wide with Velcro on top and sides. I chose this one after extensive reading of the reviews. It is high quality, well-made, and functions well. First I removed the side Velcro. It came off clean without damage to the screen assembly. I then cut 9.5" off the bottom. The bottom banding is a separate piece, so i removed it, cut 9.5" off the screen, then sewed the banding back on. I will admit, though, that the banding wants to stick under my pressure foot, so this was tedious. I installed the hook side of industrial strength Velcro across the top inside of the door (almost horizontal) and on the underside of the metal floor. I chose this one because it is rated to 140°. I learned my lesson when the adhesive on some fastener I used on the truck tent turned to goo in the heat. For the side panels, I turned to my favorite outdoor fabric supplier for their heavy-coated 1.9 oz ripstock nylon. Lucky me, the light sage is an almost perfect match for the van. This stuff is a dream to work with. Lightweight, tough as nails, does not fray. http://www.questoutfitters.com/coate...ated%20Fabrics Two yards was not quite long enough, and something a bit tougher would be good on the bottom, so I tacked on scraps from a tent I bought for parts. Probably not necessary. I sewed some of the Velcro loop I salvaged from the sides of the screen across the top and bottom. Now here's what makes this installation so easy. Once the sides are taut between top and bottom, the sides become irrelevant to the functioning of the screen opening. All stress is sheer across the Velcro, so already before doing anything to the outer edges, the screen is more secure than it would be in its originally intended house door opening. It is so taut something would bounce off of it. On the front side, the only issue is working around the black styrofoam (still working on that, but the rest of the way down can just be a few magnets and a cutout for the door latch. (Magnets will be encased in the fabric.) 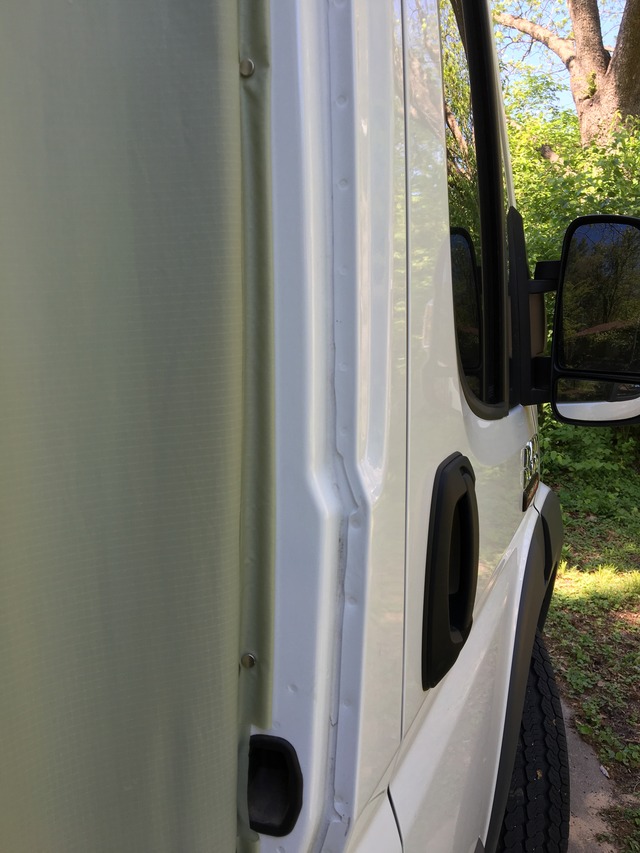 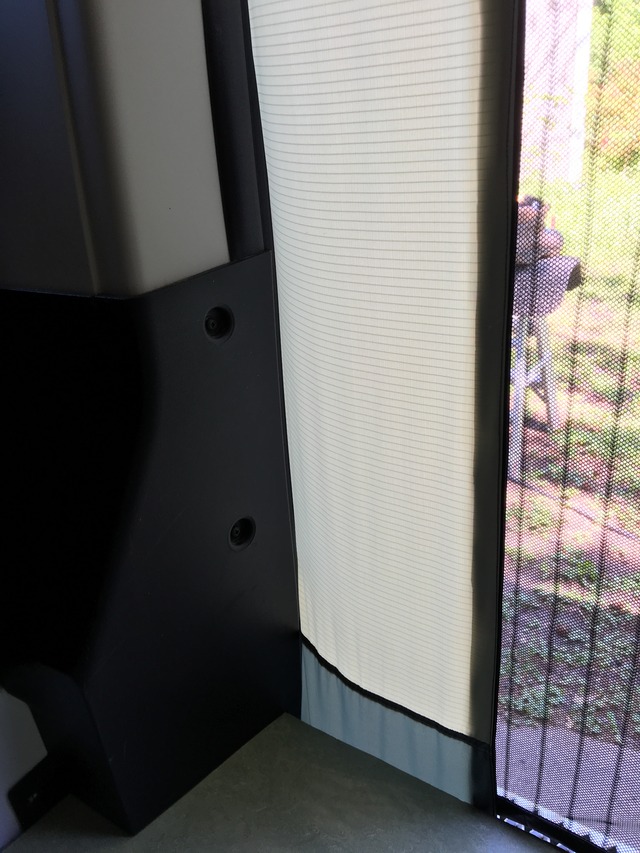 The rear side depends on what else is there. I worked around my cabinet and took it outside below the projection. 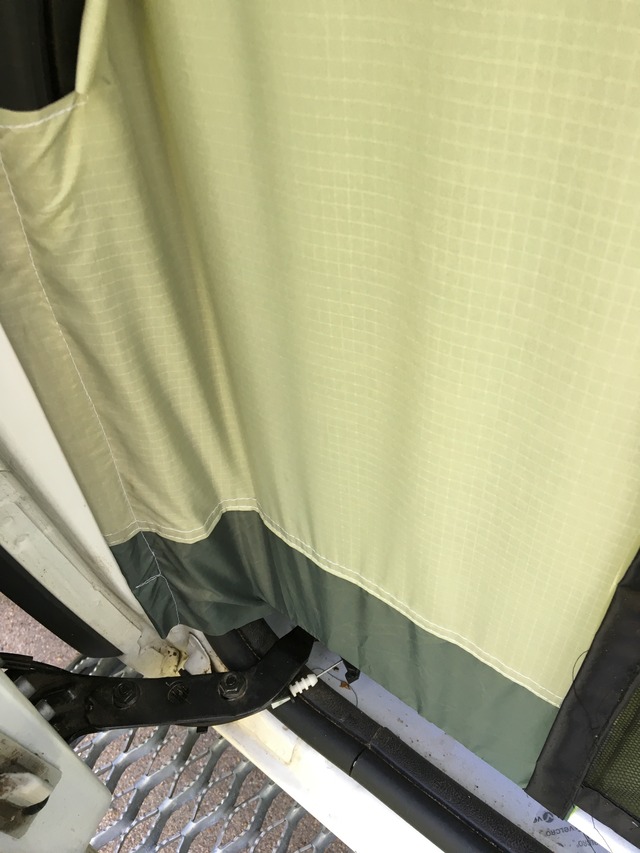 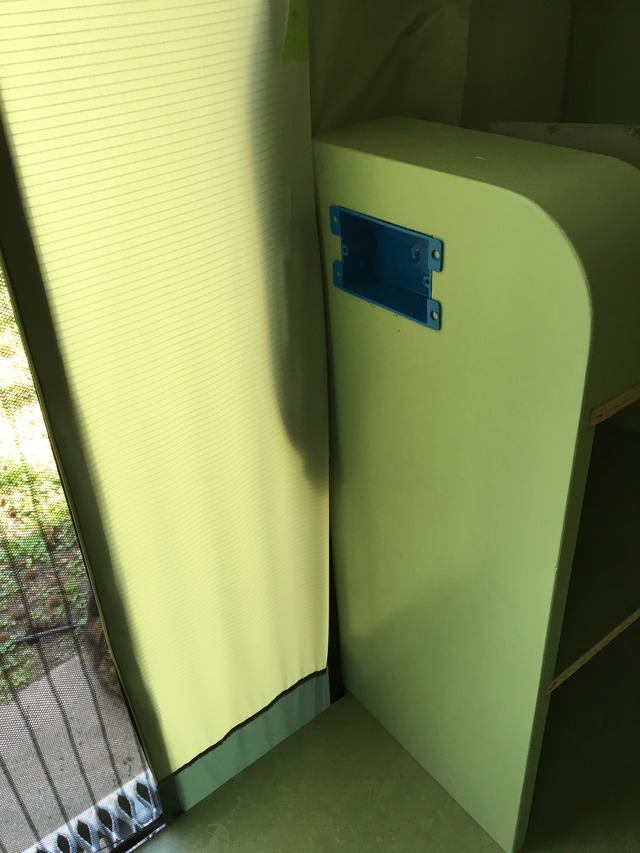 This is the top inside with Thinsulate in the holes. I have decided that the covering across the top of the door should be black.  Green masking tape from the auto parts store is one of my best friends in the shop and was a godsend on this project. It sticks well to the tent fabric, yet comes off easily with no residue. Good points:
Bad points:
When I was removing the bottom part, I discovered the neat rod magnets it was using. I figured they would be good for the sides (they are). Since I couldn't find them anywhere else, I bought a second screen. Without its magnets, I will use it for the rear. My awning will be made of this same tent material--we approach these projects from our own experiences. It is about half finished. With these two in place, I look forward to enjoying the rain. |
Very nice job on the screen - better than anything I have seen commercially available.
|
How do I get on the list to have you make me one ??? :)
|
Maybe after I finish the van.>:D (Will our vans ever be finished?)
|
Uh..... No they won't!
|
Driver Side C-Pillar
For a year and a half I looked at this:
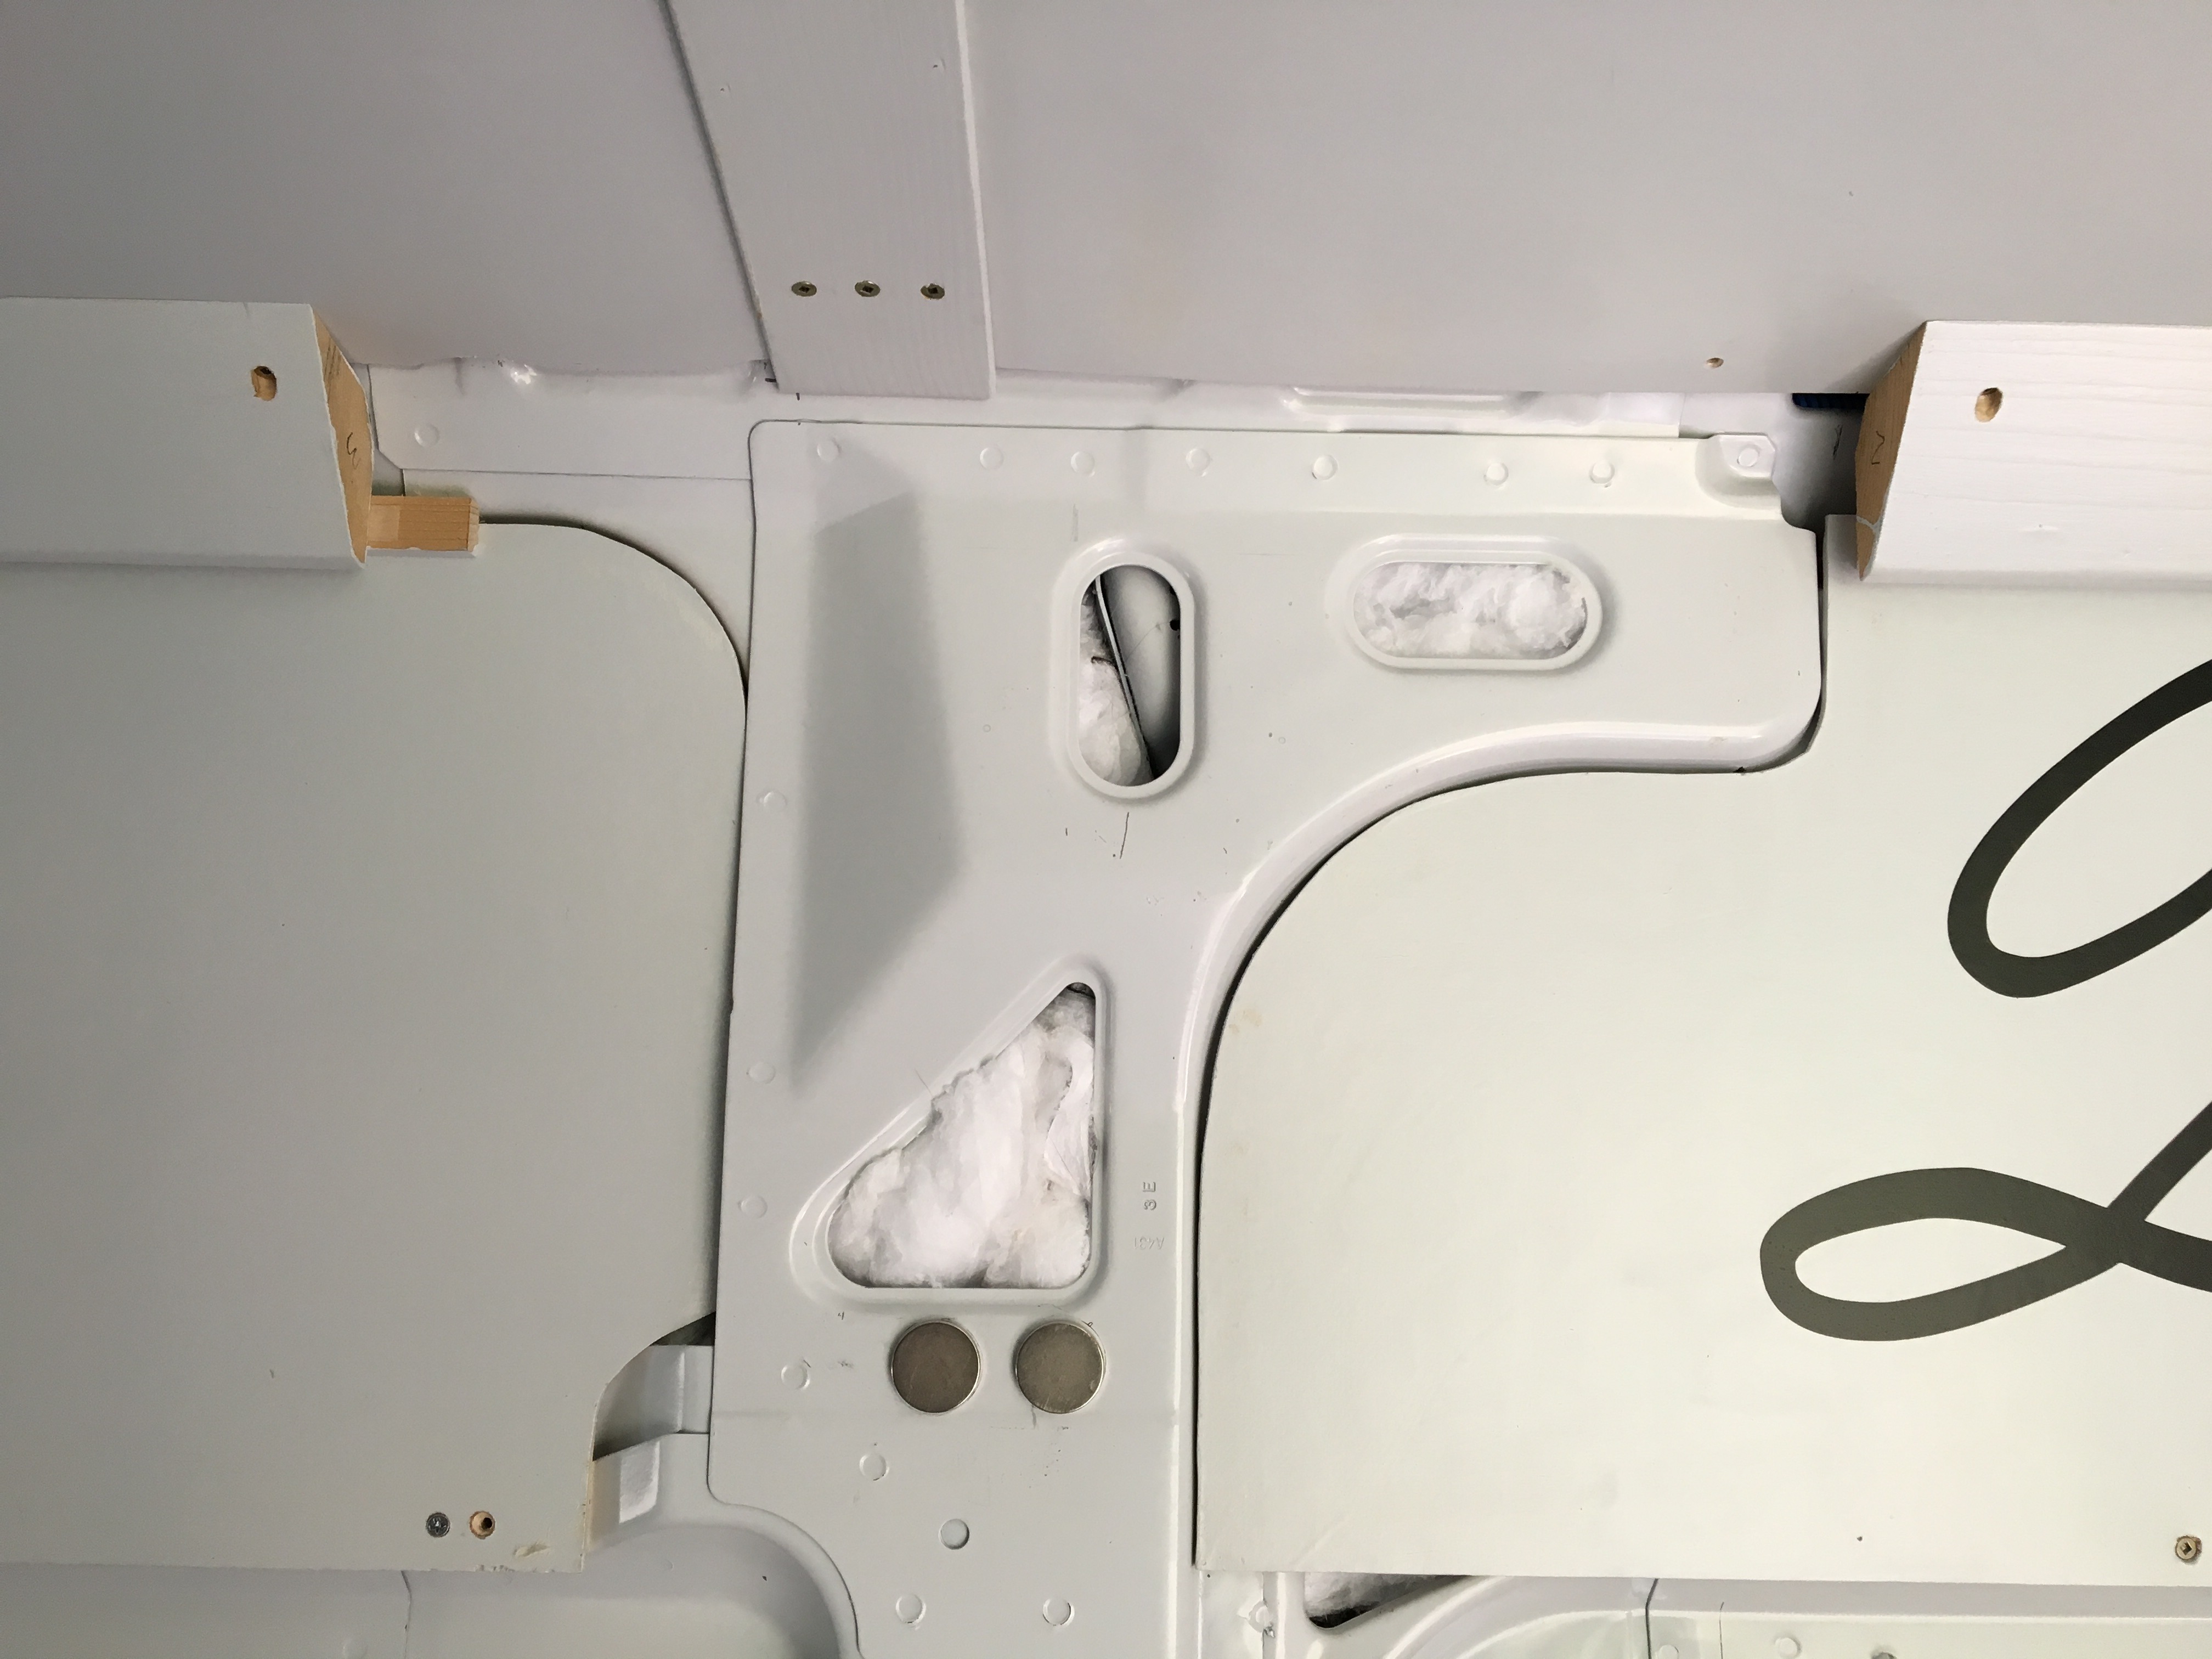 I knew that eventually, the answer would come. First step was the side pieces. For the photo, I arranged them provacatively, but in place, they frame the eyesore with a projection that matches the metal. Unfortunately, I didn't take a photo of them in place by themselves. 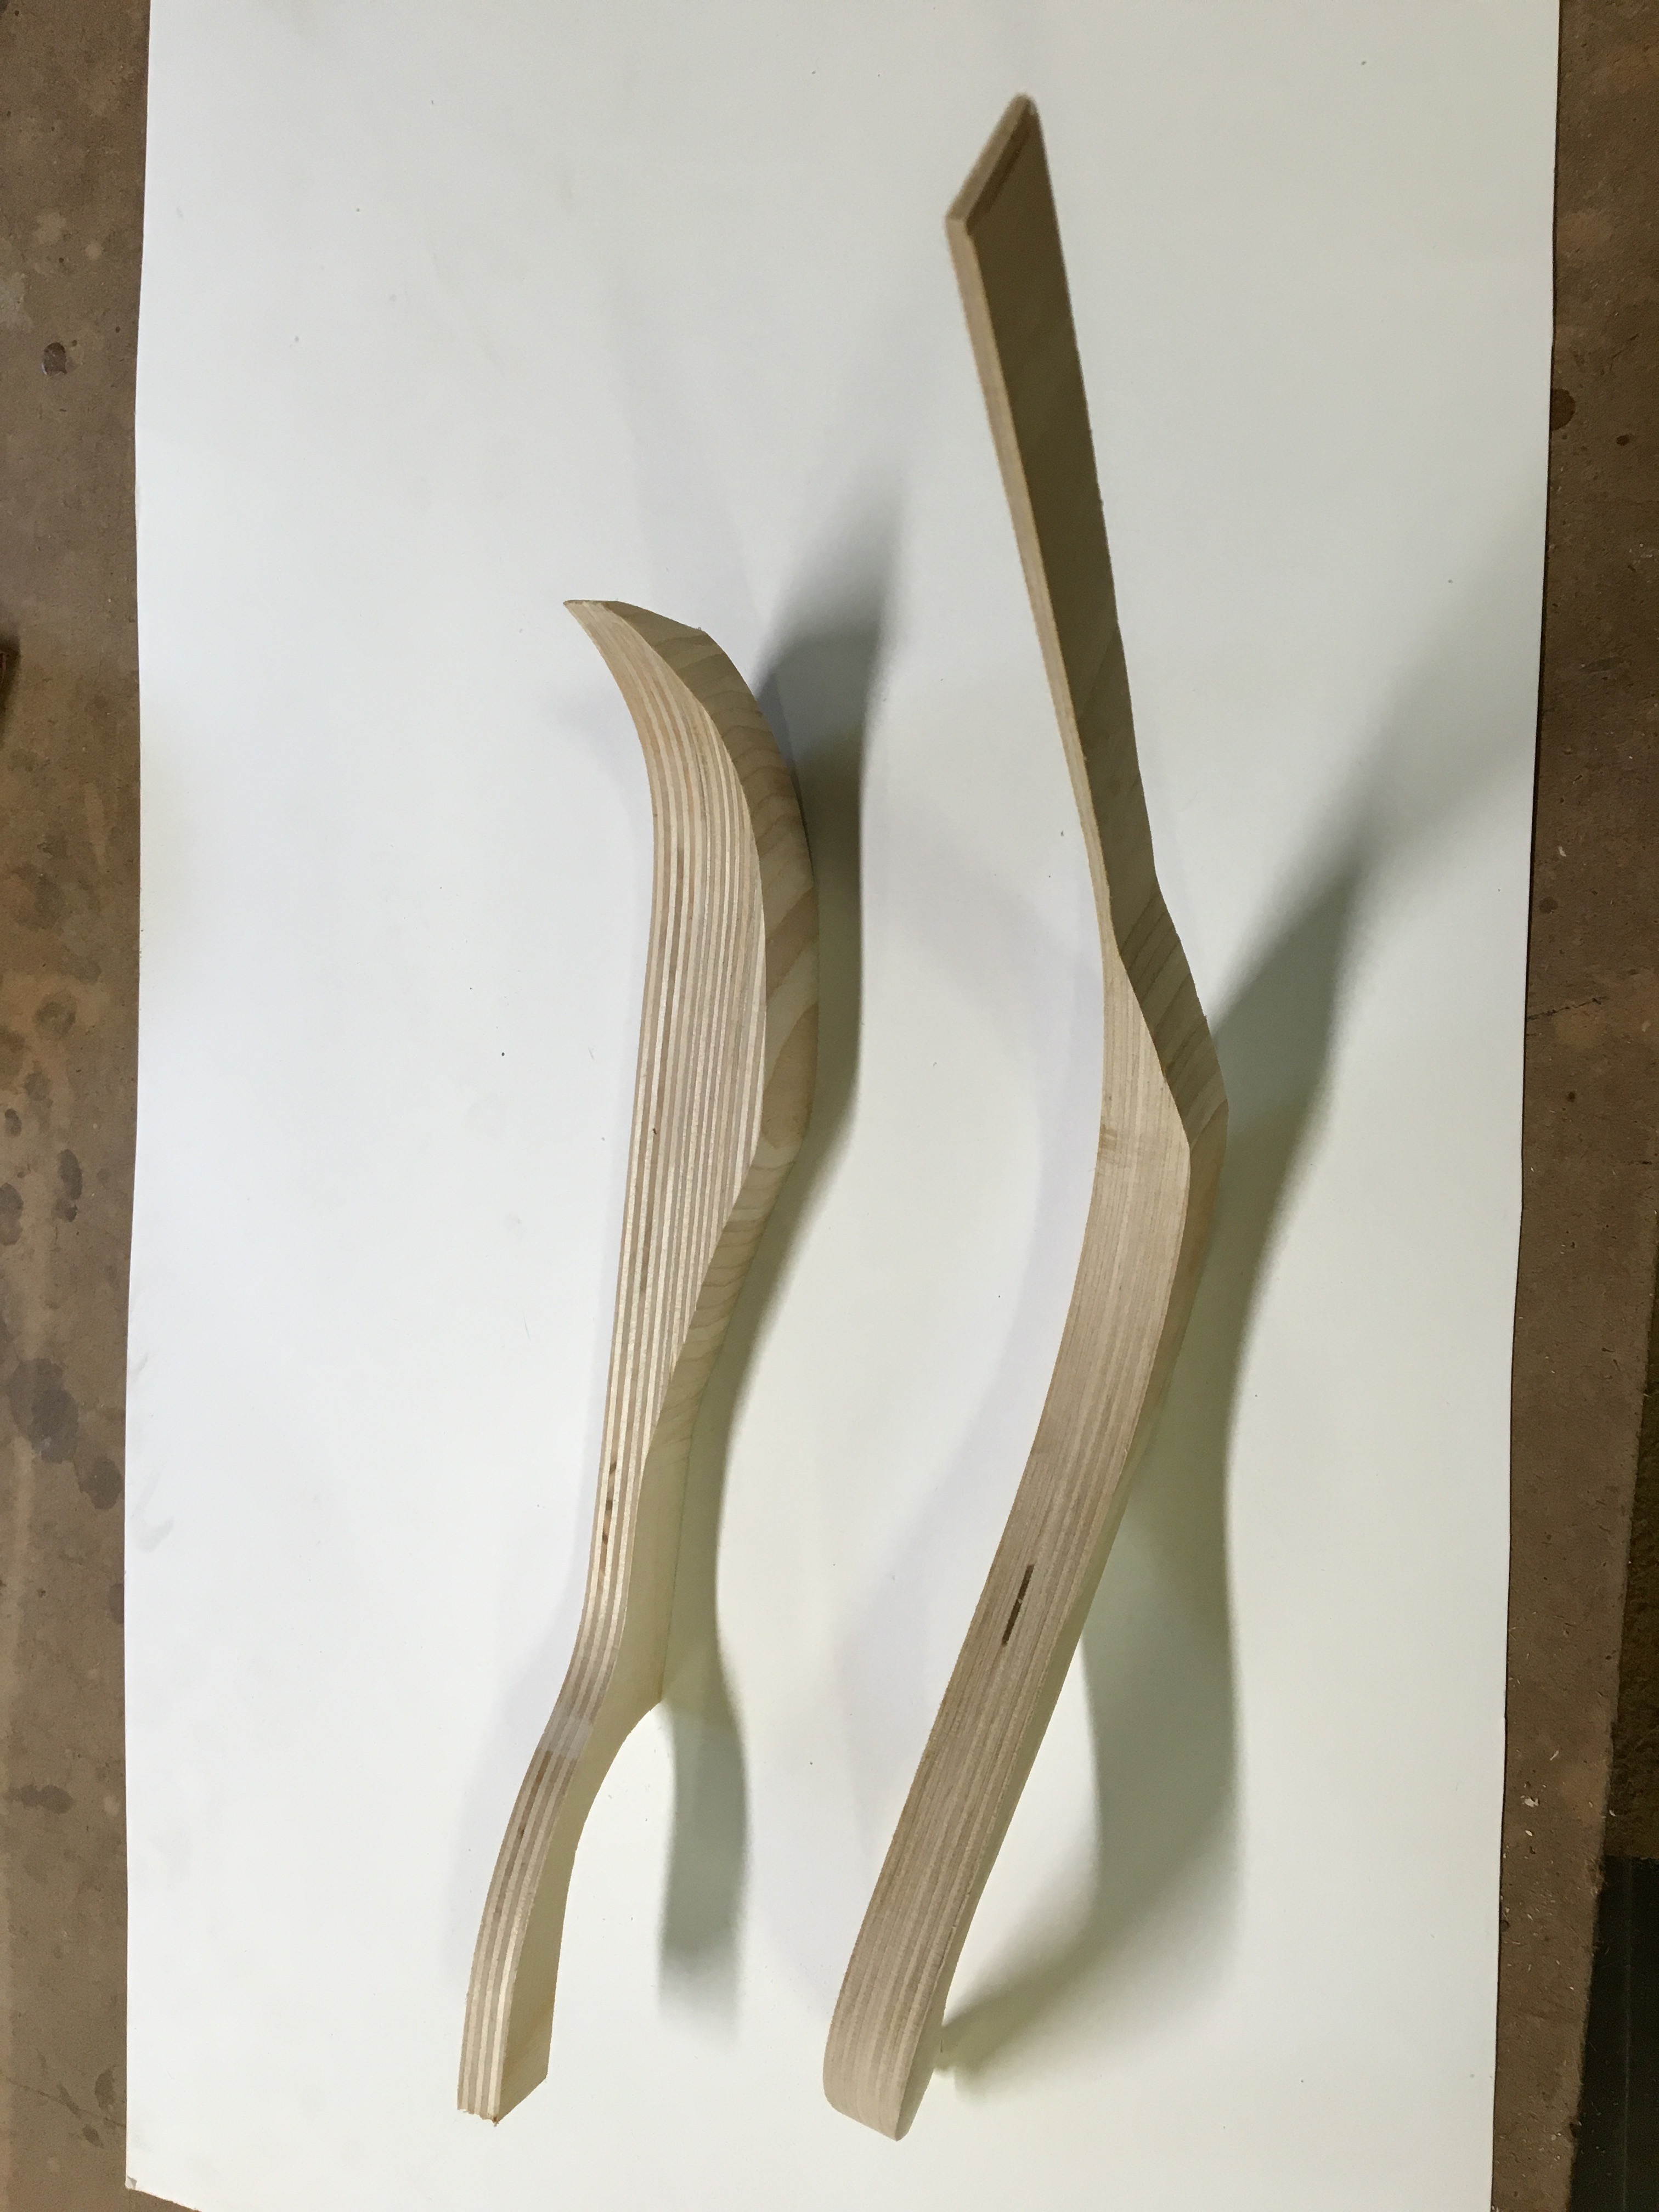 I first tried to span them with luan, but even with steam, the curvature was too much and the luan cracked. Fortunately, I was able to salvage the side pieces for a second attempt. This time I remembered exhibits I had seen in the Gaudi museum in Barcelona. I spanned with 1/8" lath cross-sections of Baltic Birch. I could have gotten a smoother surface with pine, but I wanted the horizontal striations. Here is the backside lathered in glue: 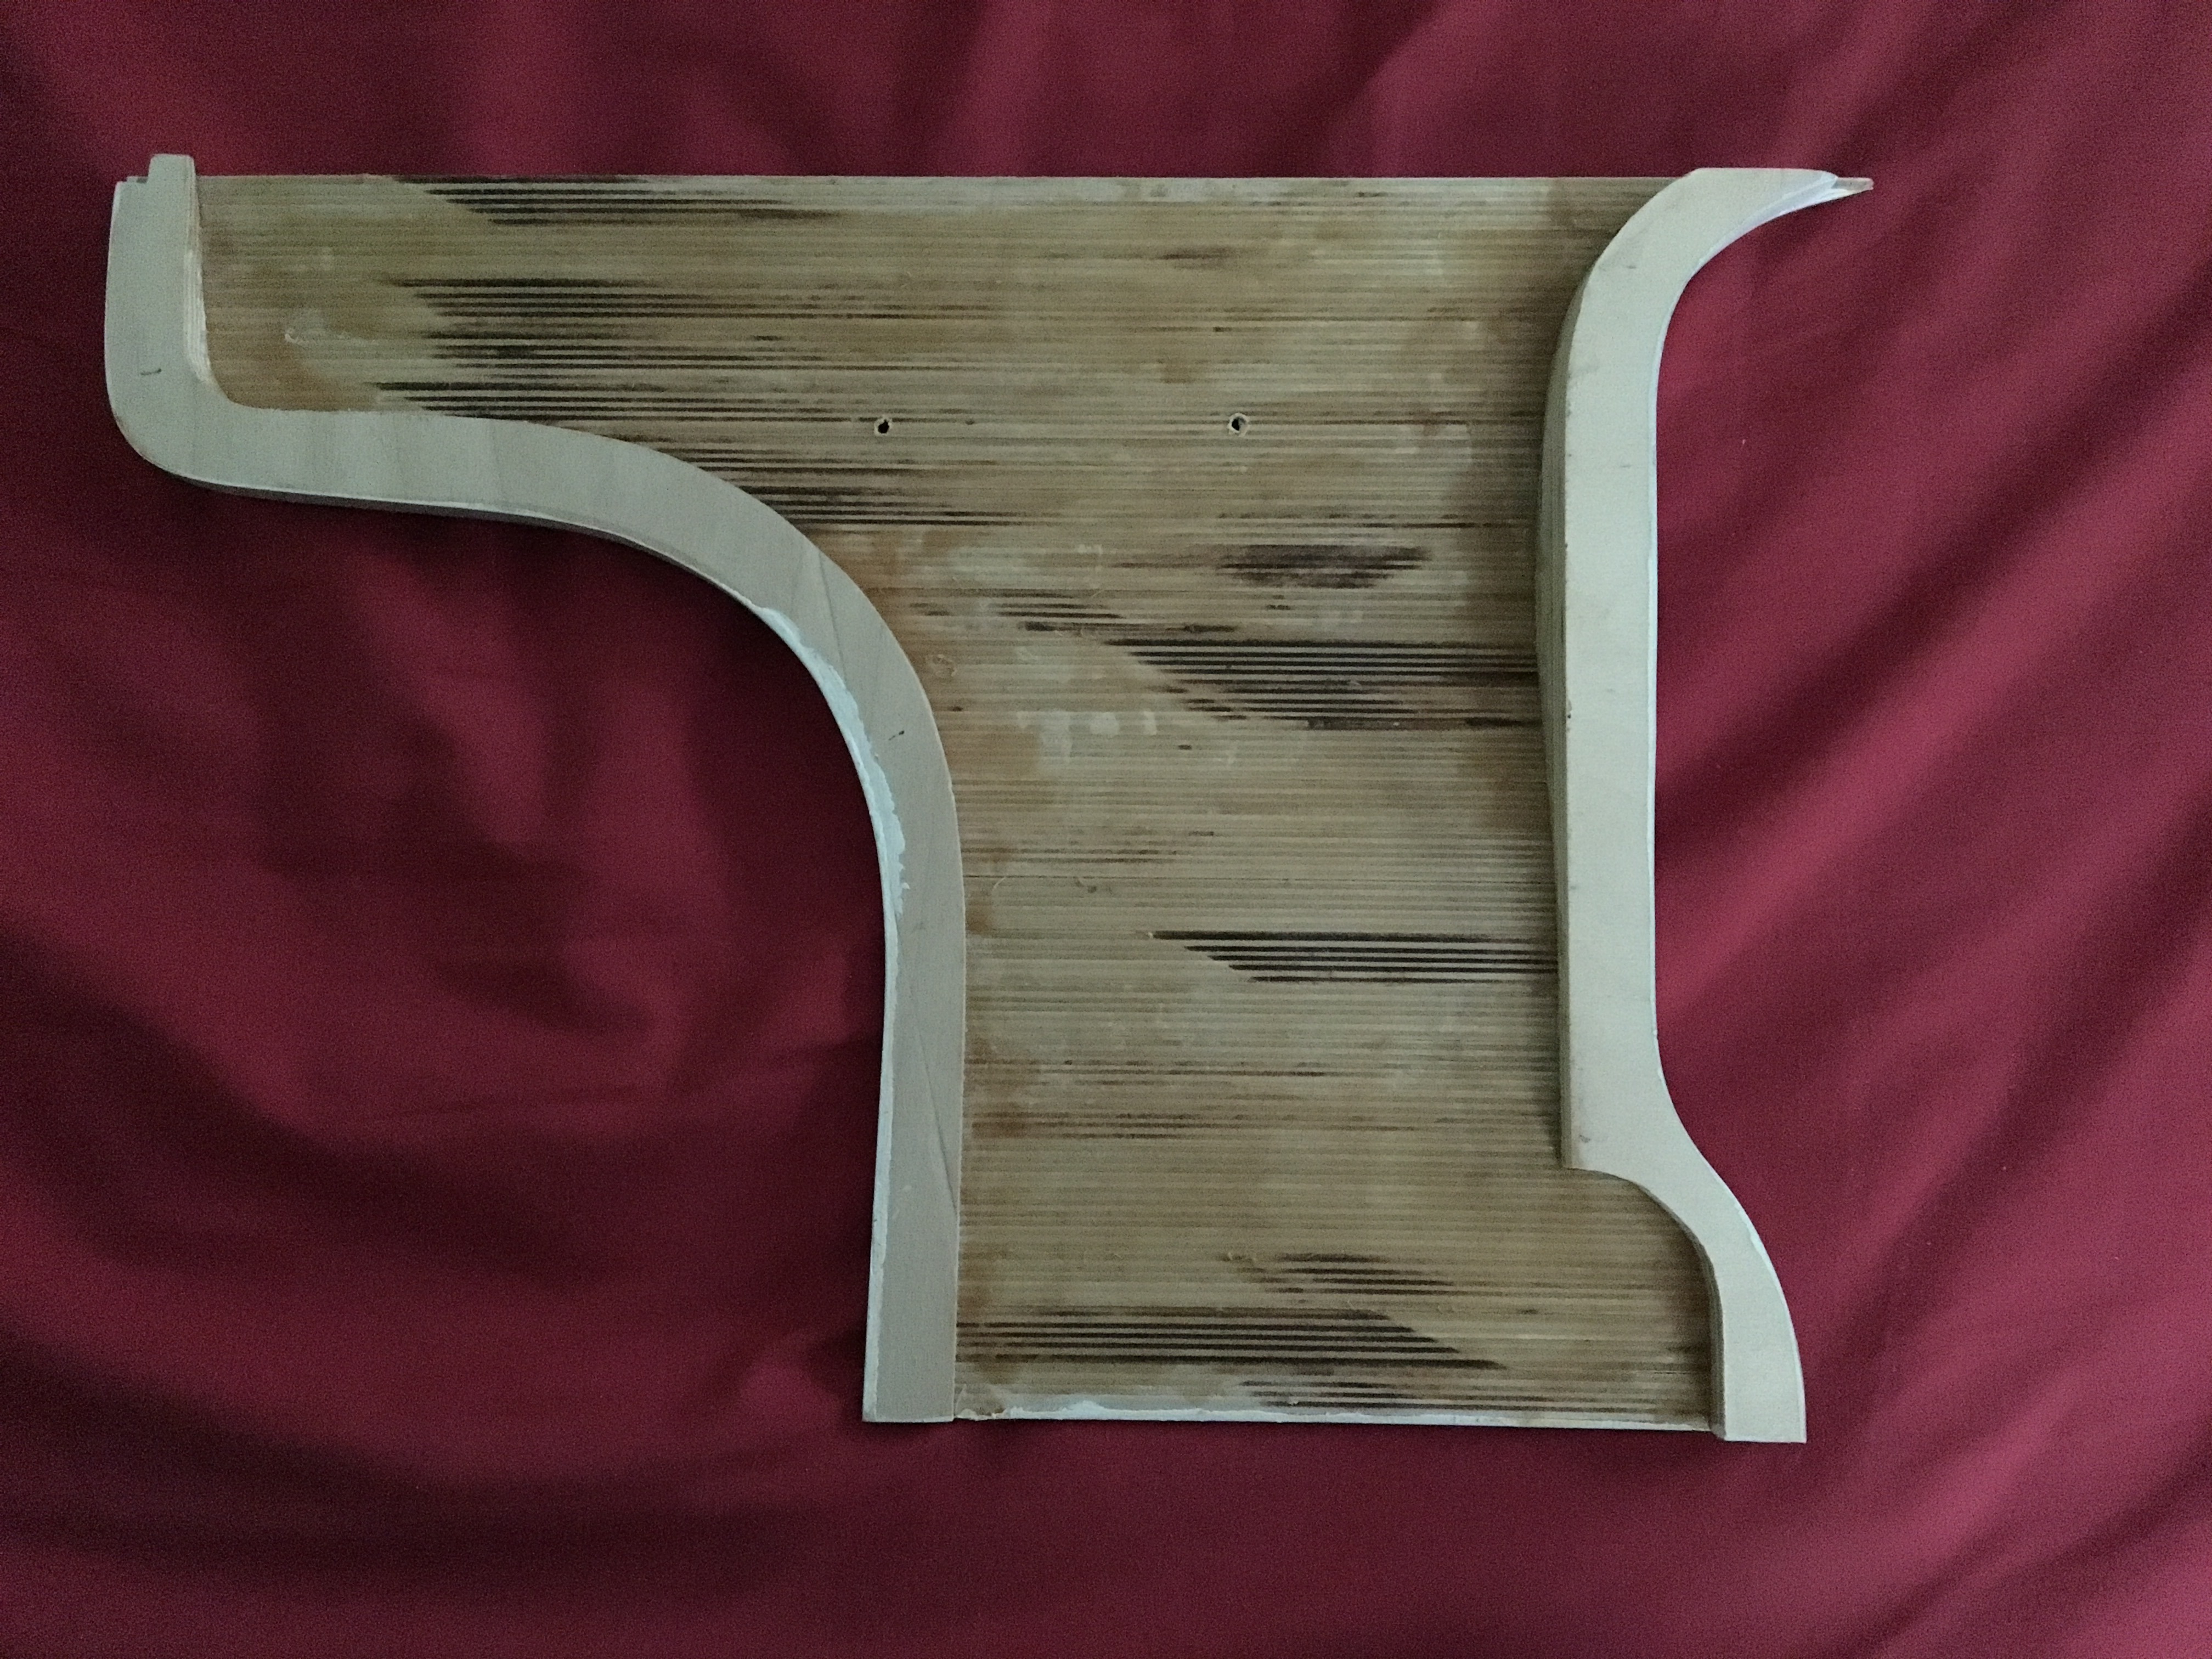 Here is the front side shaped and painted. I was tempted to play chicken and leave the edges square, but decided I would take the chance and sculpt them. I'm really glad I did: 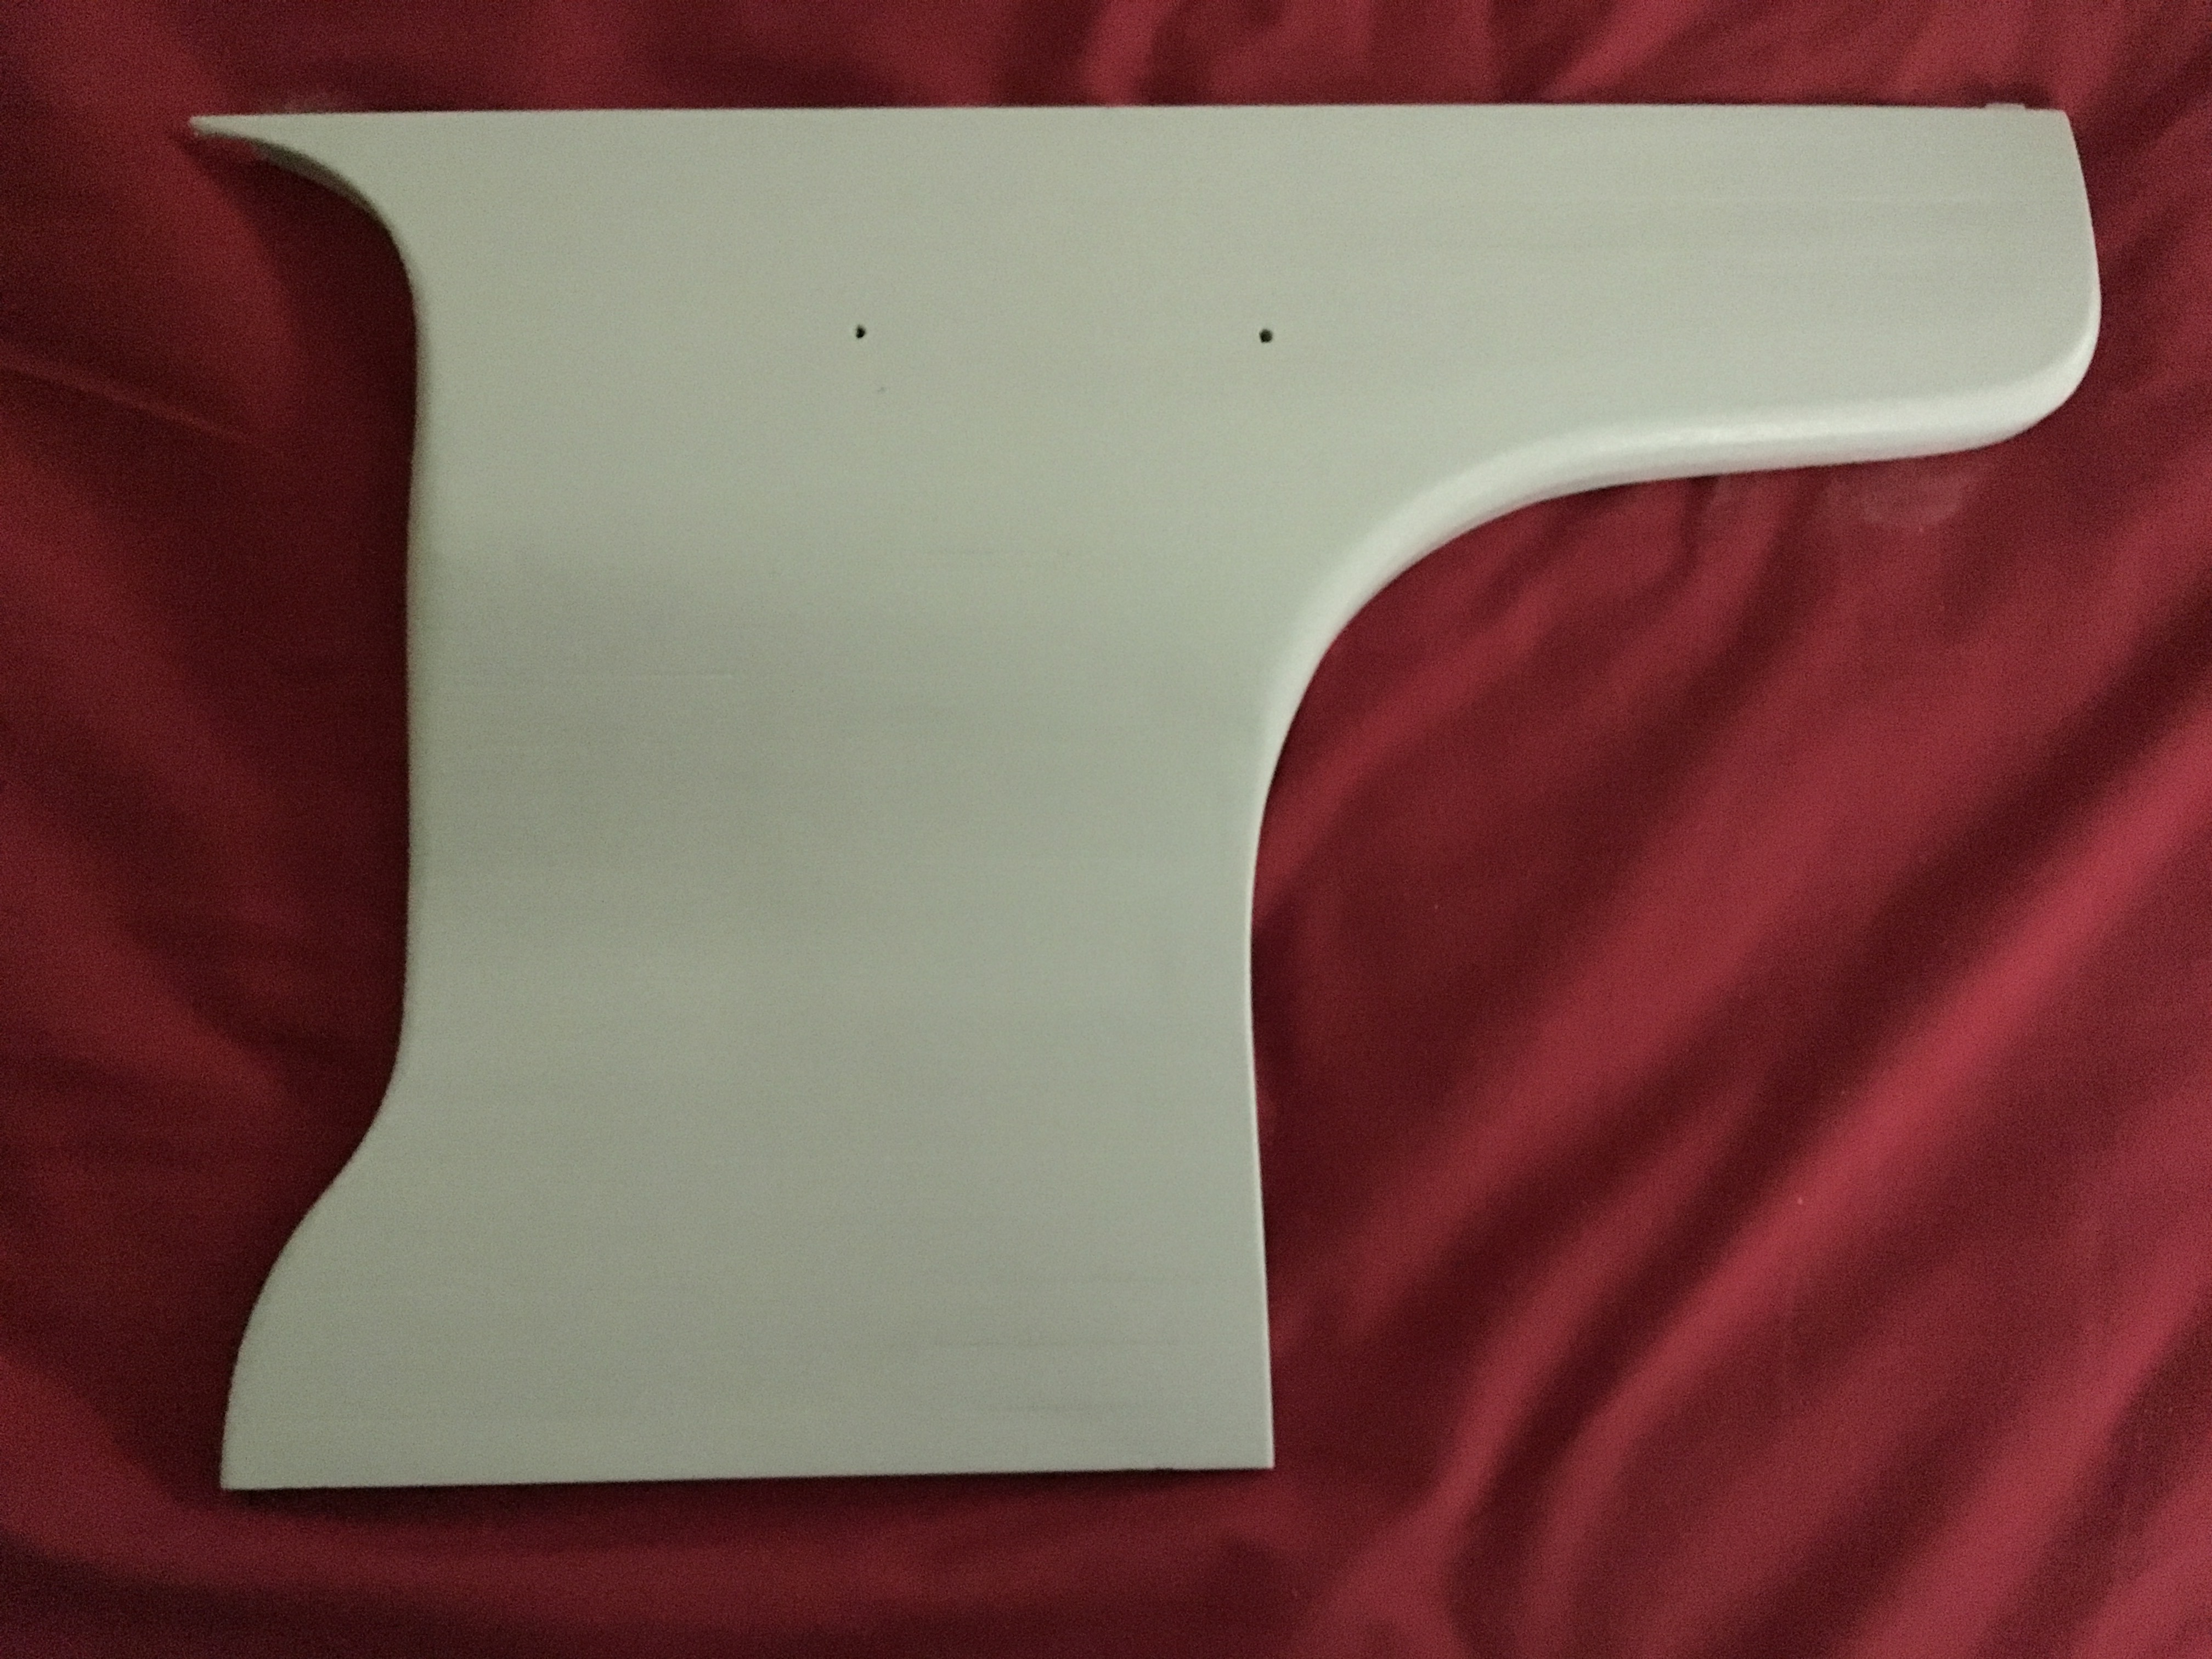 These show the profile which follows the curvature of the metal: 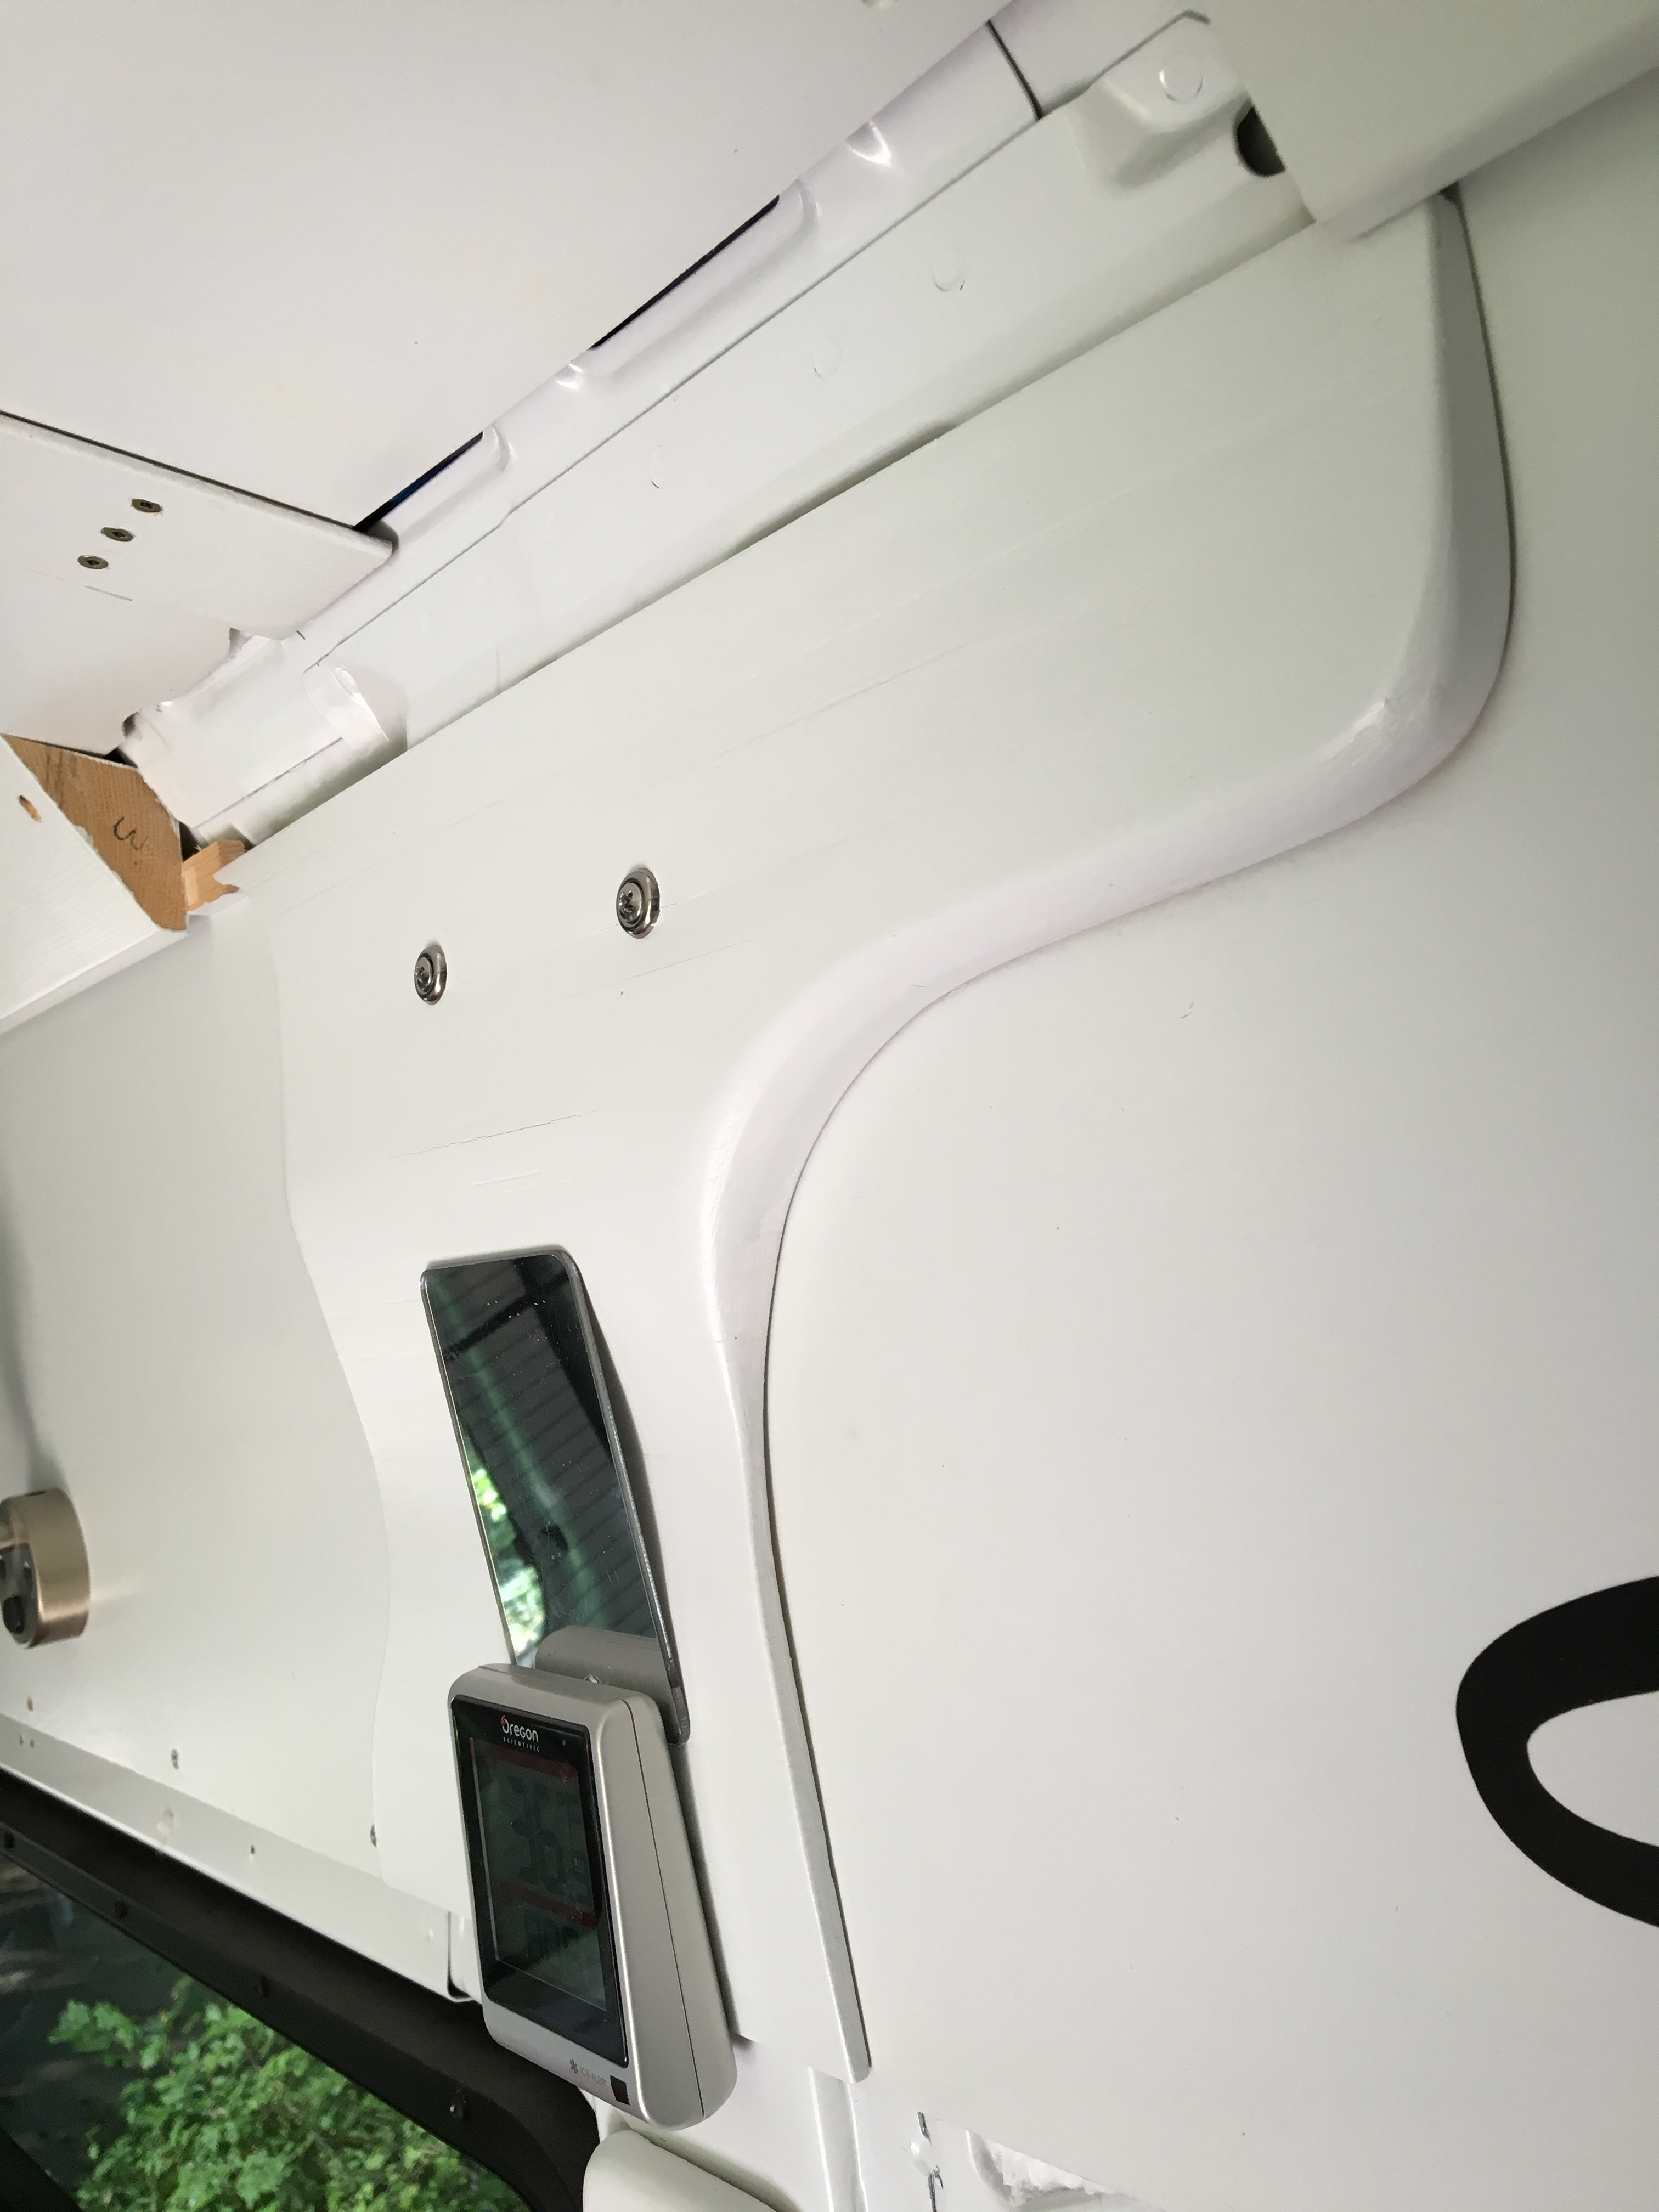 and 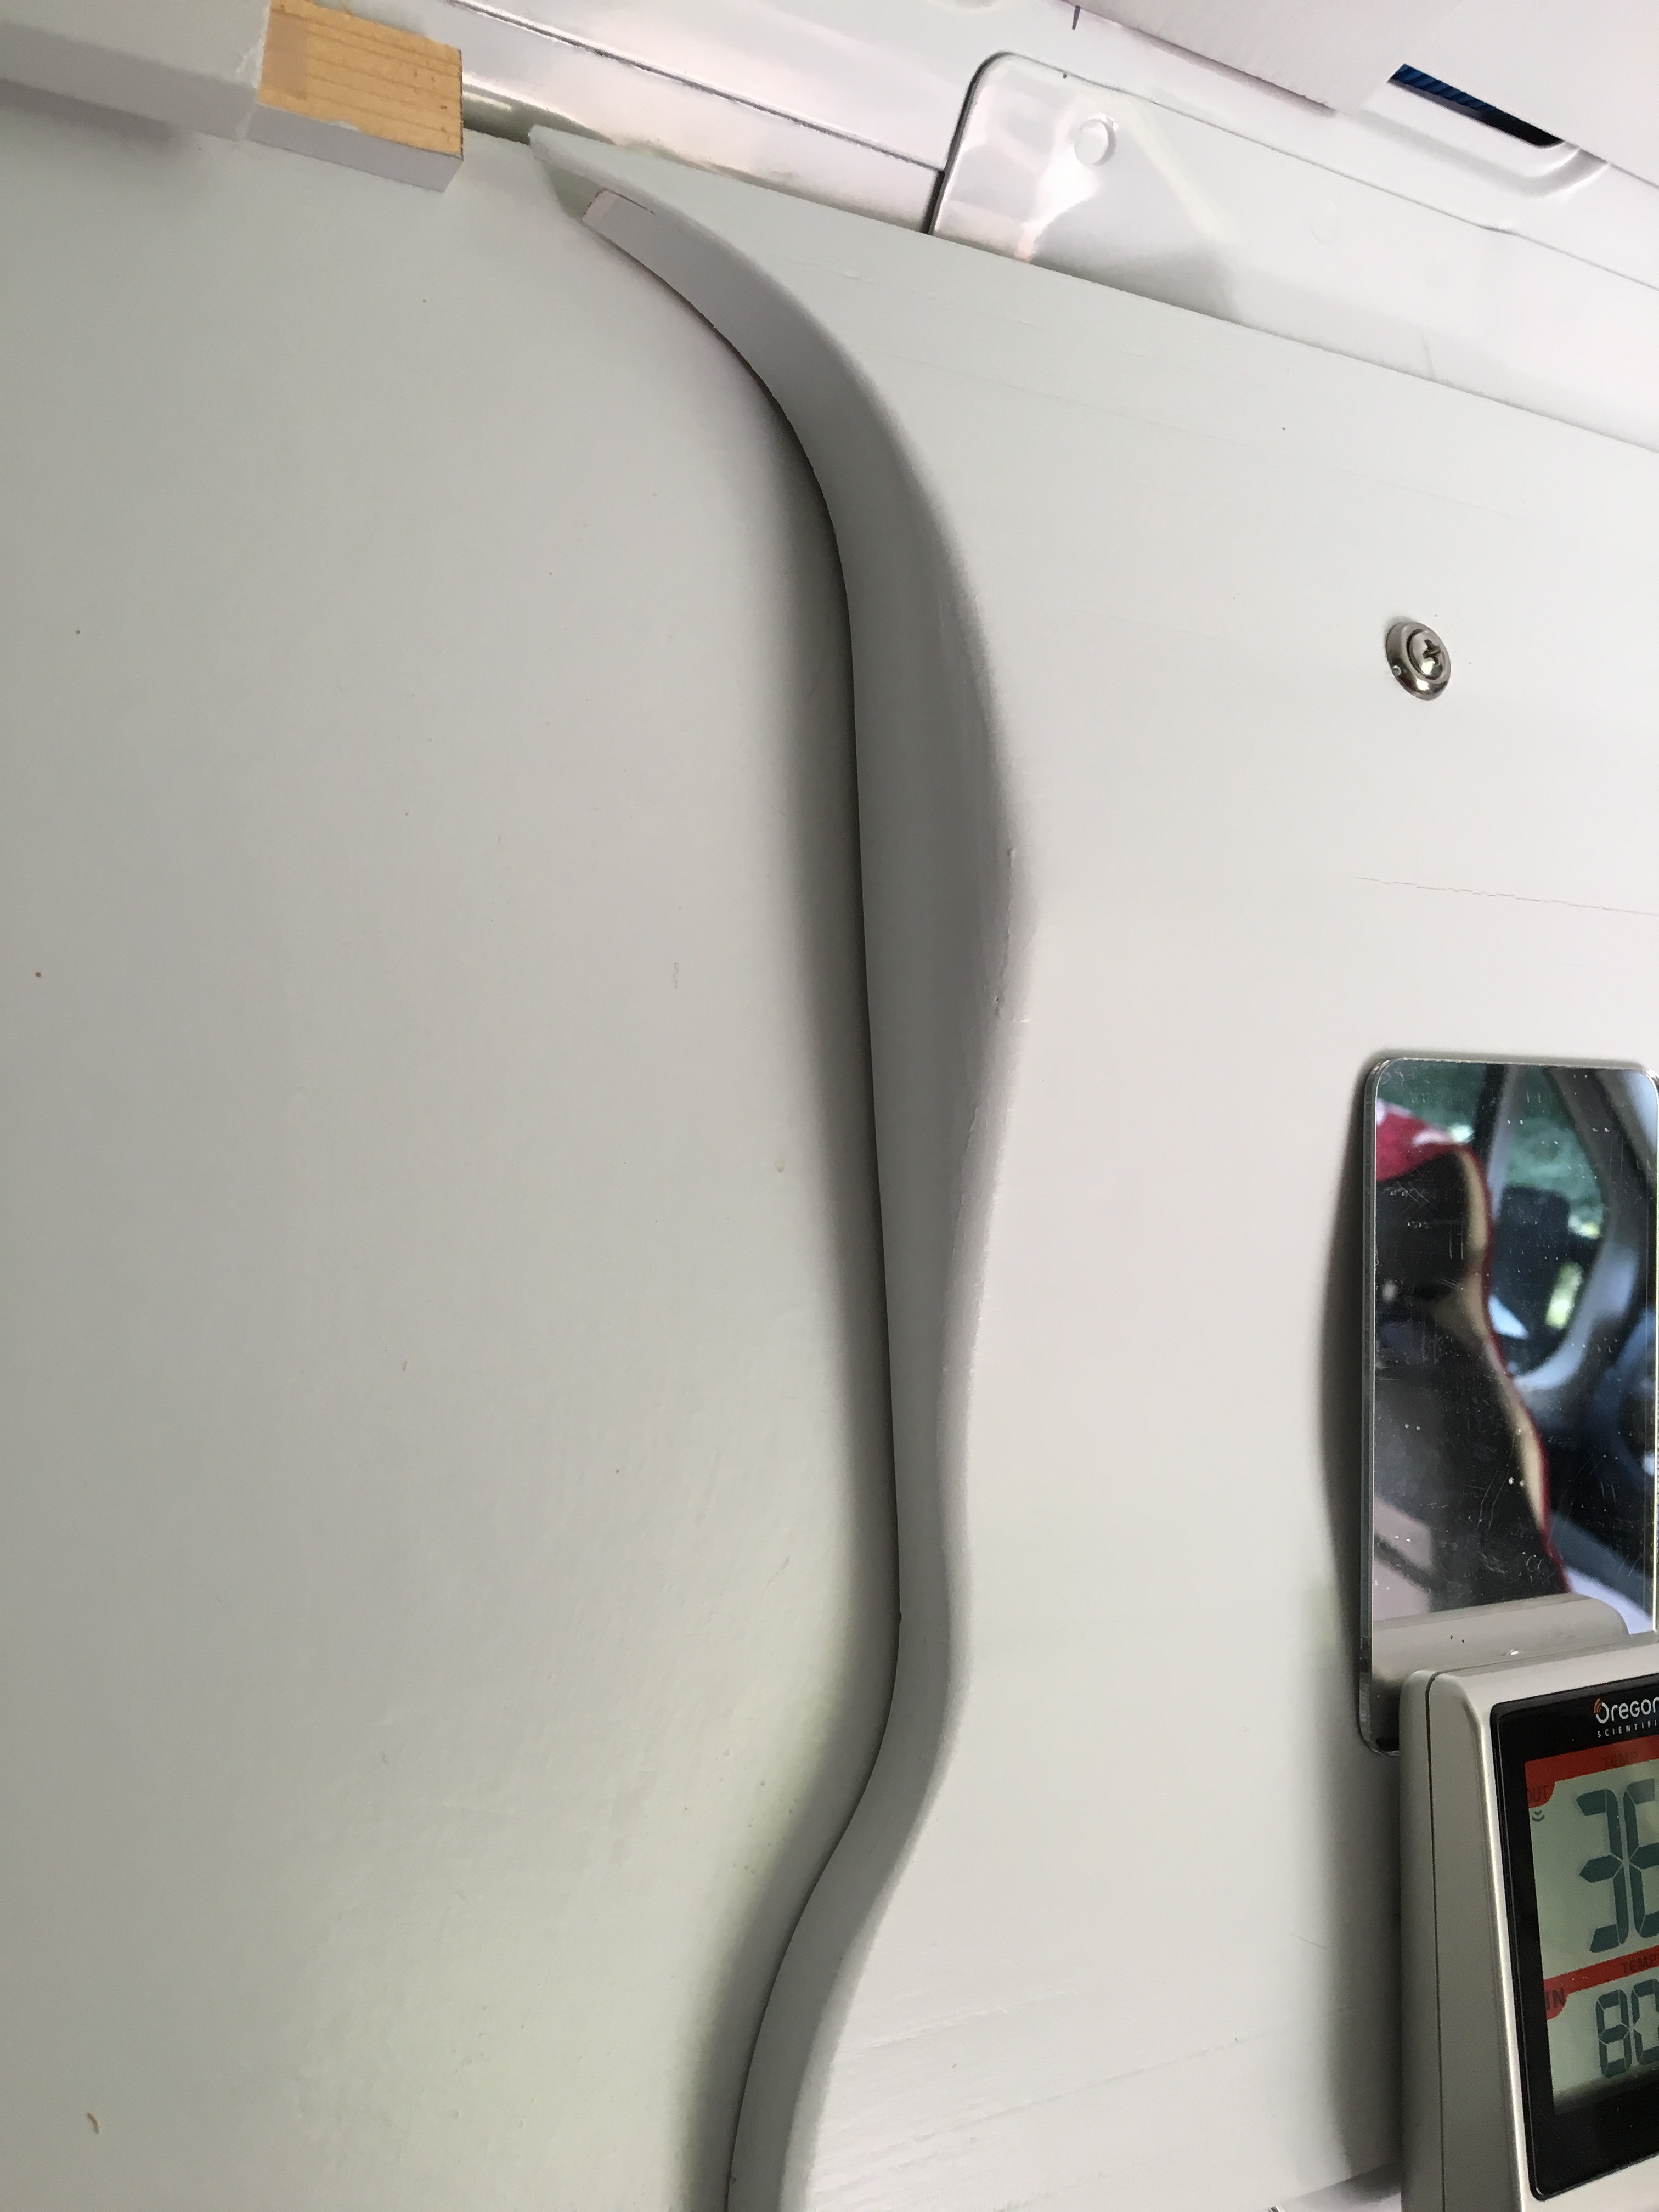 And here is what I look at now, at least til I get that last trim piece up, which should be a breeze. 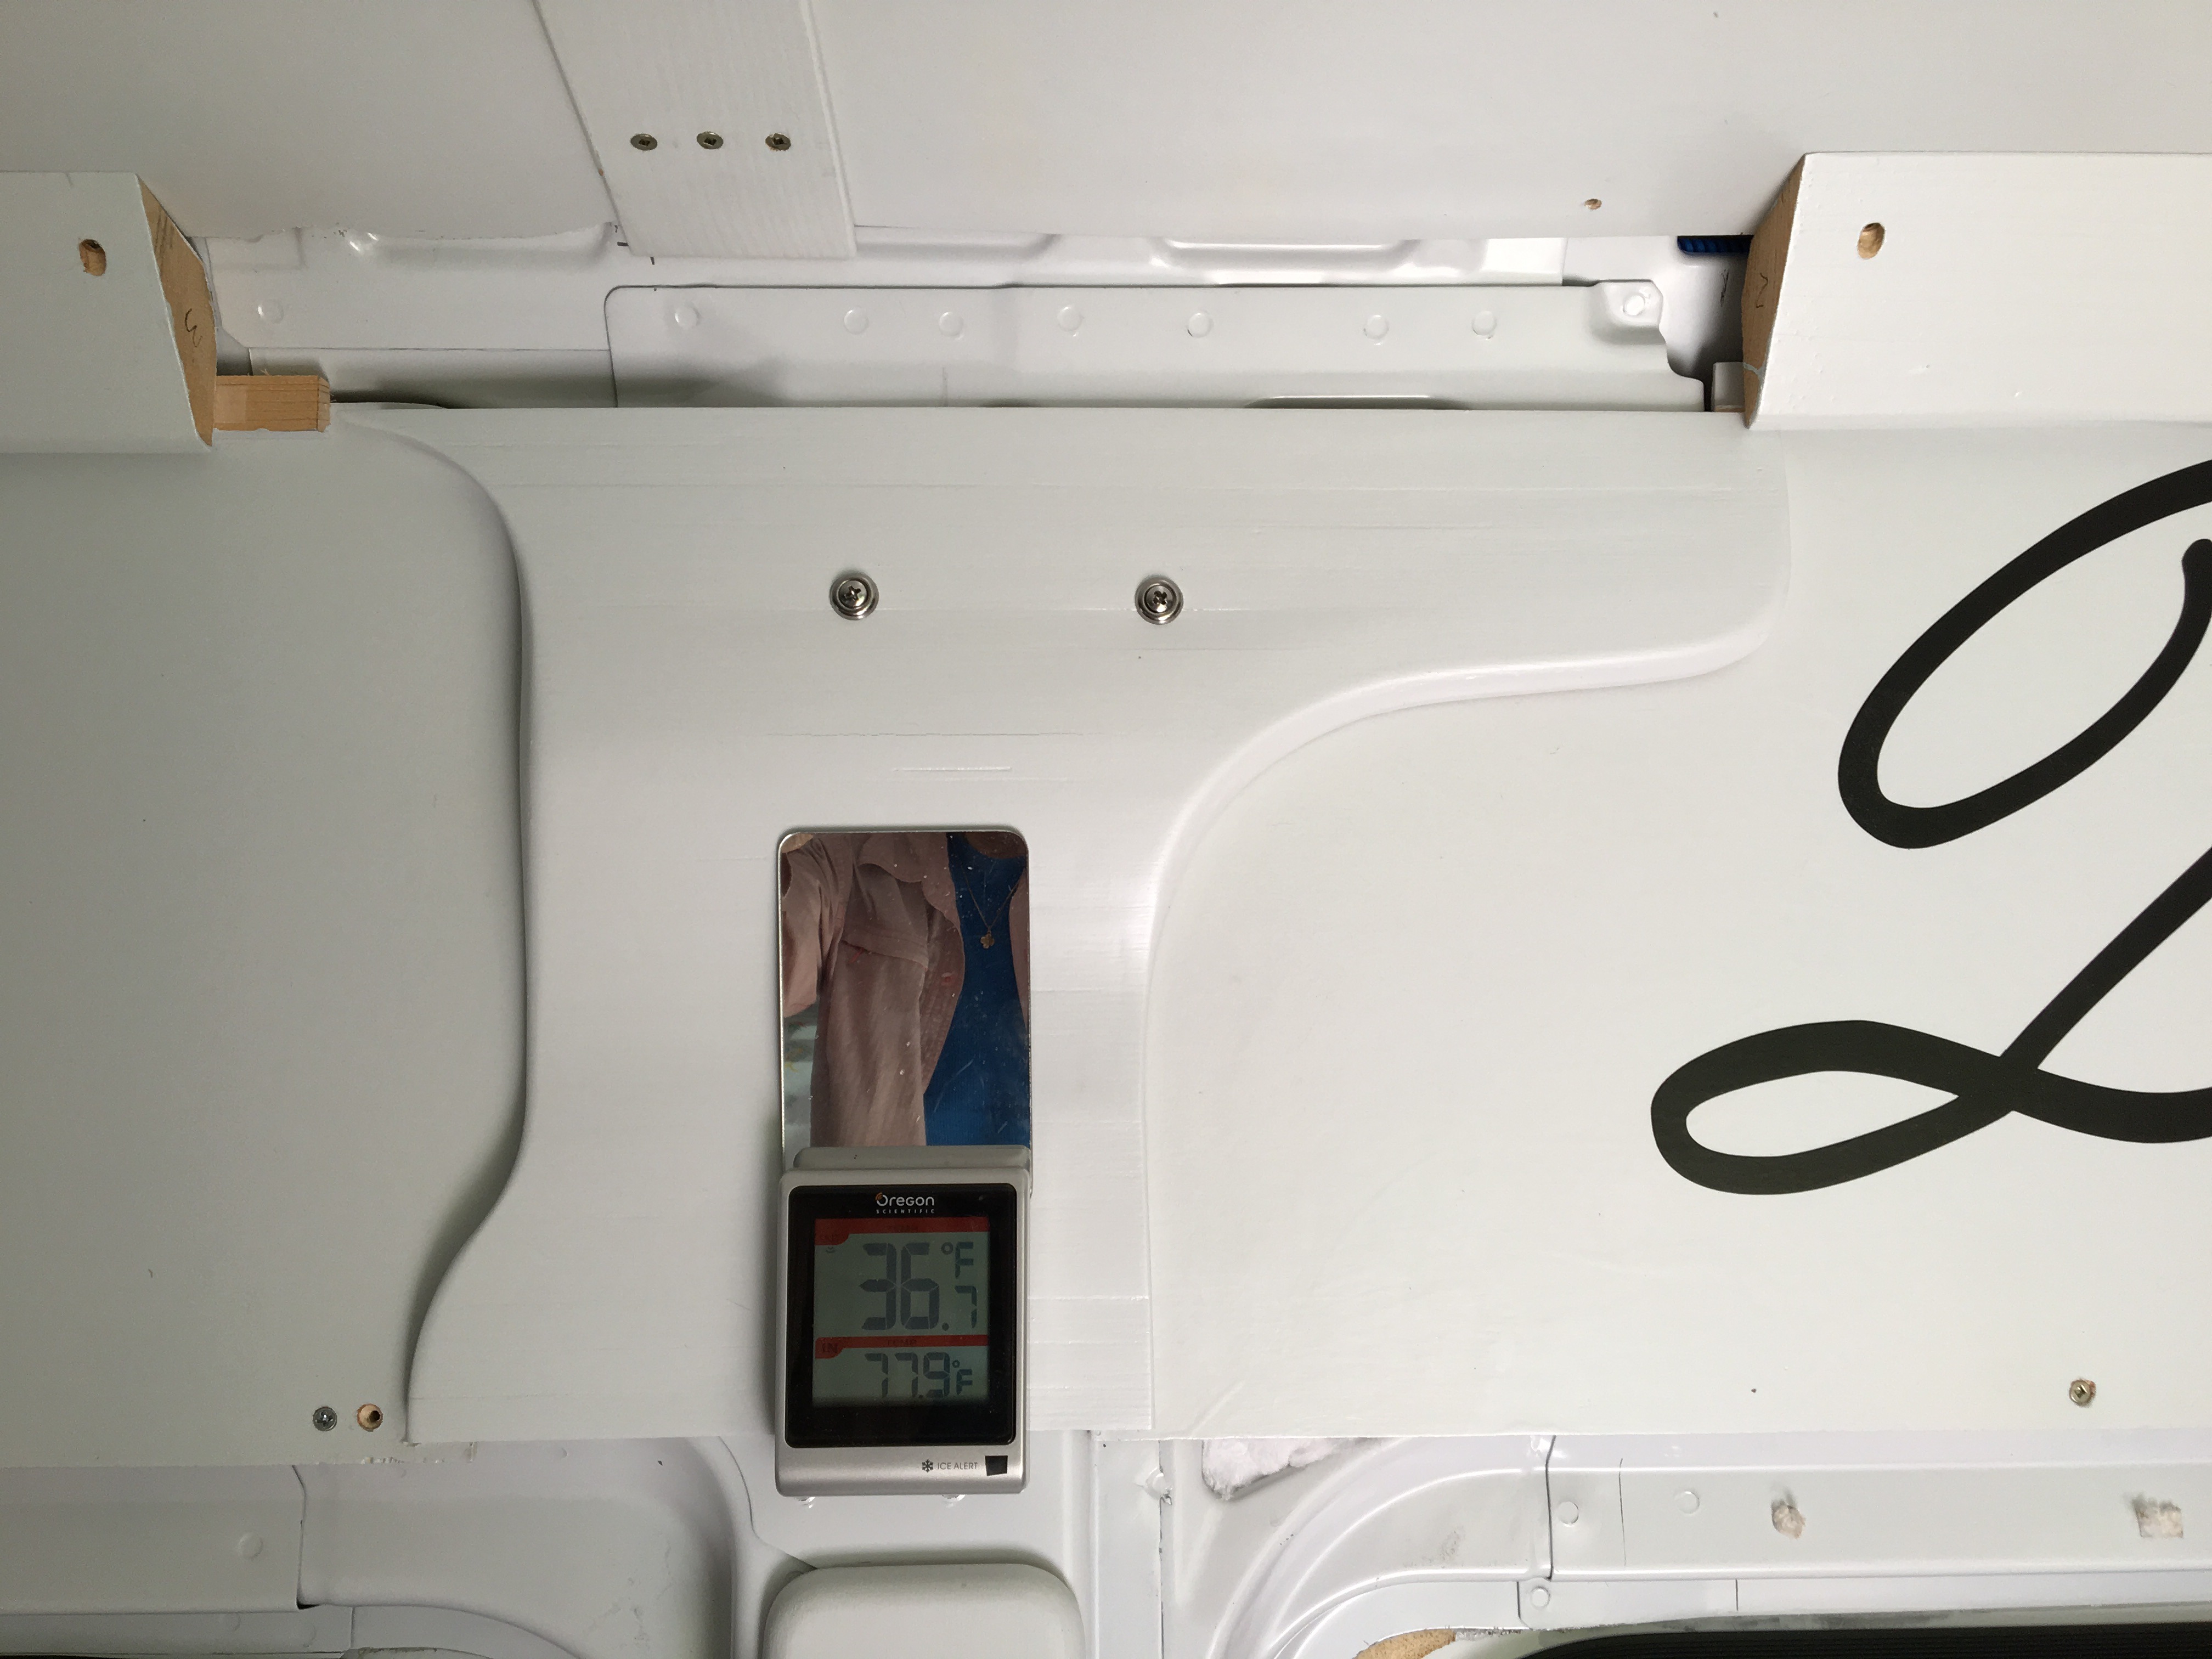 The thermometer at the bottom used to attach directly to the metal with its magnets. Now it is attracted to those honking magnets shown in the first photo. The acrylic mirror wedged above it is sloped just right for applying sunscreen. I assume I will do something similar on the other side by and around the door, but it will be more difficult. |
Very nice!
|
My head hurts. Nice work! I know the mirror is to get your lipstick JUST RIGHT!
|
Actually, the dermatologist just chided me for NOT wearing lipstick. ?
Funny--I was pretty giddy while making this. Lots of fun, actually. Now when I look at it, it's just the way it's supposed to look, like normal, no reflection whatsoever of its 18-month incubation period or the crazy stuff behind the scene. That's the best kind, I guess. |
I'll take one of those too, in Red, right after you get my Mosquito net done :)
|
Hi,
Really nice job on the frame covers. I've been looking for a good way to cover the exposed frames on mine -- this looks like a good candidate if I can figure out how to cut those exotic curved pieces. Gary |
I cut the profile that lies flat first. I made a paper template--one side following the metal protrusion, the other a pleasing curve about an inch out.
I stuck these on with double stick tape, then scribed the outward protrusion onto the inside surface. Where it wasn't deep enough, I glued a second layer on. Bandsaw and belt sander were my best friends. It really was a fun project and not particularly difficult. |
Beautiful work on the trim piece and screen door. Did you get the solar panels installed using our pads? Some photos of that would be nice if you have time to share them.
Celtec would be a great material for making trim like that. I can provide you with some scraps if you are interested. The 3mm thickness bends easily without splitting. I also have 19, 12, 9 and 6 mm thicknesses. It bonds together great using thin CA. |
Hein, I addressed your bases in my "Adding Solar thread. I guess I should repeat or cross-reference in this main thread. The bases worked perfectly and we are thrilled to have 16 fewer holes on the roof. We are not worried about the VHB coming loose because of the fat footprints.
I notice I also haven't addressed the new battery boxes, the articulating bed or the completed rear window screen. Too busy having fun, I guess. Thank you for the scraps offer. I will email you. |
The Awning
Like some of the other projects in this build, the result is simple, but the result of an embarrassing incubation period.
My first attempt was to Velcro the awning to the top inside of the door opening. That didn't work because it leaked around the front corner. Then I sewed a tube for a 6-foot tent pole and hooked it to the front two anchors on the roof with D-rings--the tent pole allowed me to extend it forward past the opening. RD and KOV observed that the tent pole interfered with attaching the D-rings. One day I spied a short tool handle in the shop--essentially a 2-foot dowel with a tapered end. AHA!! Stick the stick into the front of the tube and hang 'er up.  Two poles from Cabelas and some guy lines. I put that tent pole across the middle. 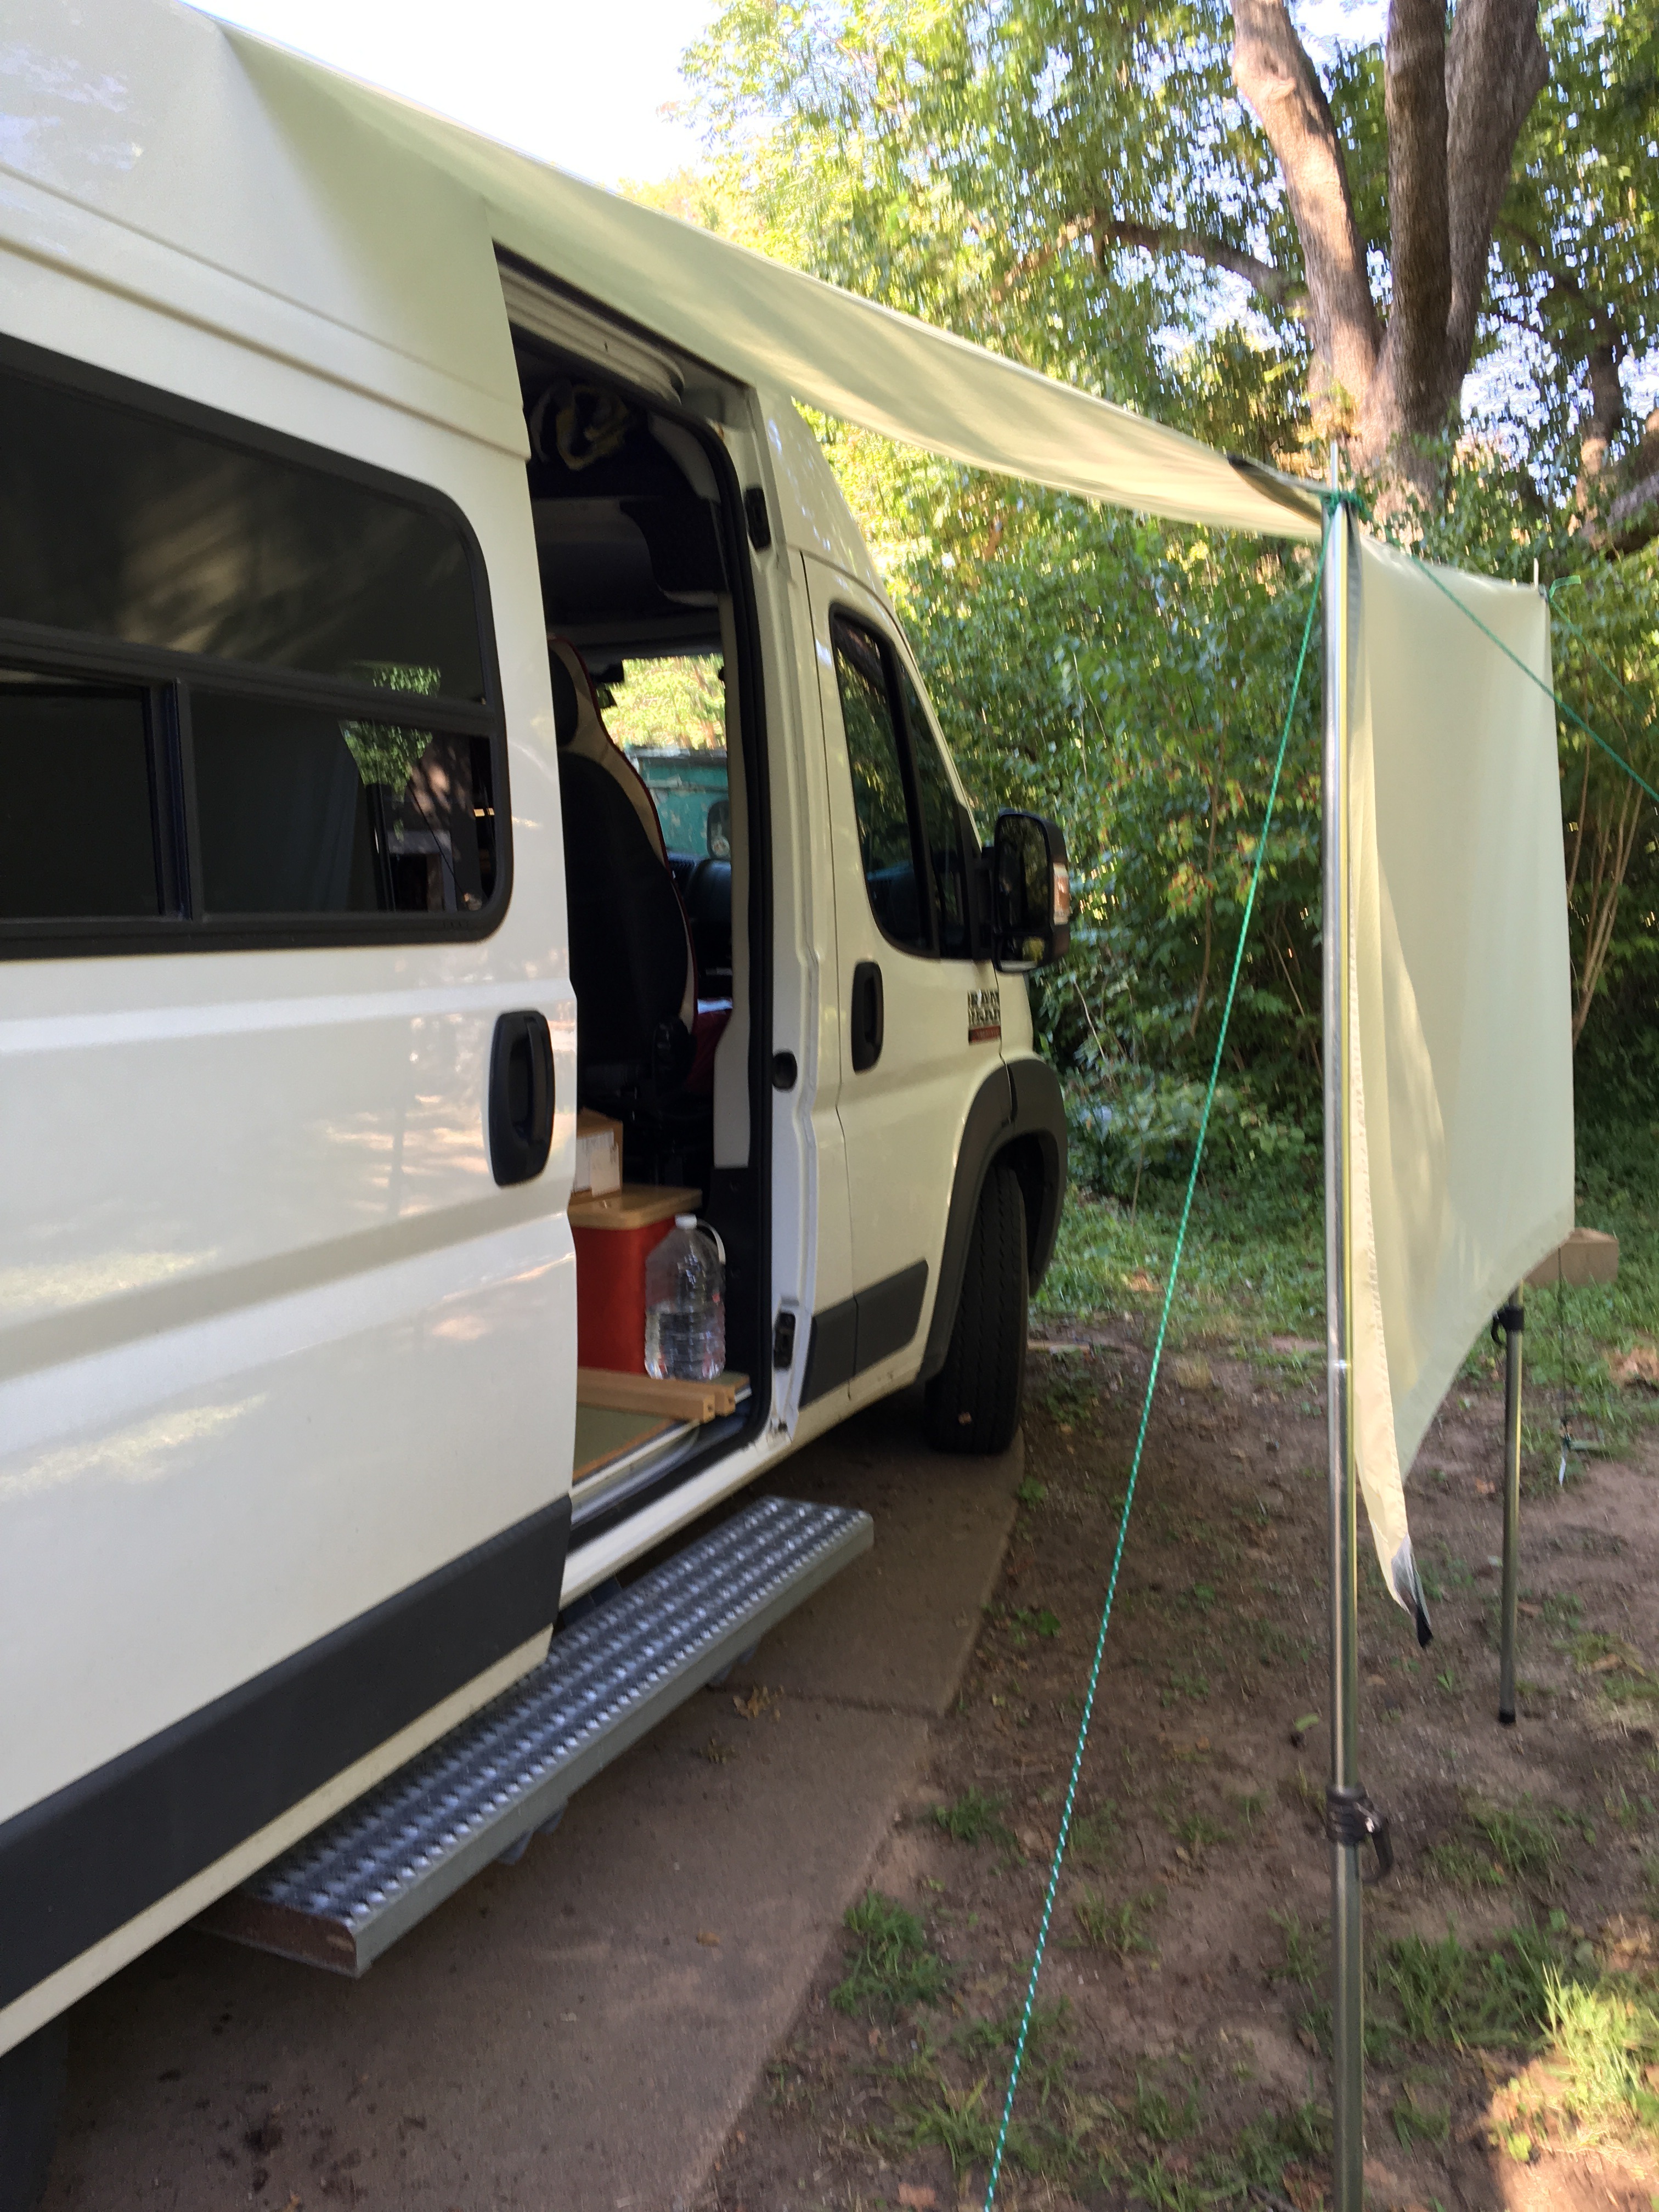 Length is what it is because I sewed two scrap pieces together. It works well. The curtain part can be fastened to the poles or tied up. I wish this has been one of my first projects. |
Ms,
I don't know if you noticed, but.... CONGRATS ON YOUR 1000th POST !!!!!! :):):):):):):) (it's a good one. I was thinking about a similar plan.... good to see it works!) Ed ps. how do you think it would work if you angled the posts back to the van side... no ropes? In your case, the step might be in a good place to attach the poles without holes in the van wall. |
If the posts angled back toward the van, we would not be able to walk along the side of the van and would have to enter from the "outside". I like having the "curtain" to protect from low sun. I also don't know what the advantage would be. The posts are ~4' out.
|
The Rear Awning
Pure serendipity. A couple of years ago, I bought the carcass of an REI Hobbit tent for $39 off eBay. The poles had broken and punched a hole in it. I have gotten more than my money's worth already, using fabric and notions for various projects. Today, I cut the fly in half, added two rings for the rear roof nubbins, and set it up. Reaching the nubbins was possible with a small folding stool. It needs more finessing, but this is good enough for the upcoming trip:
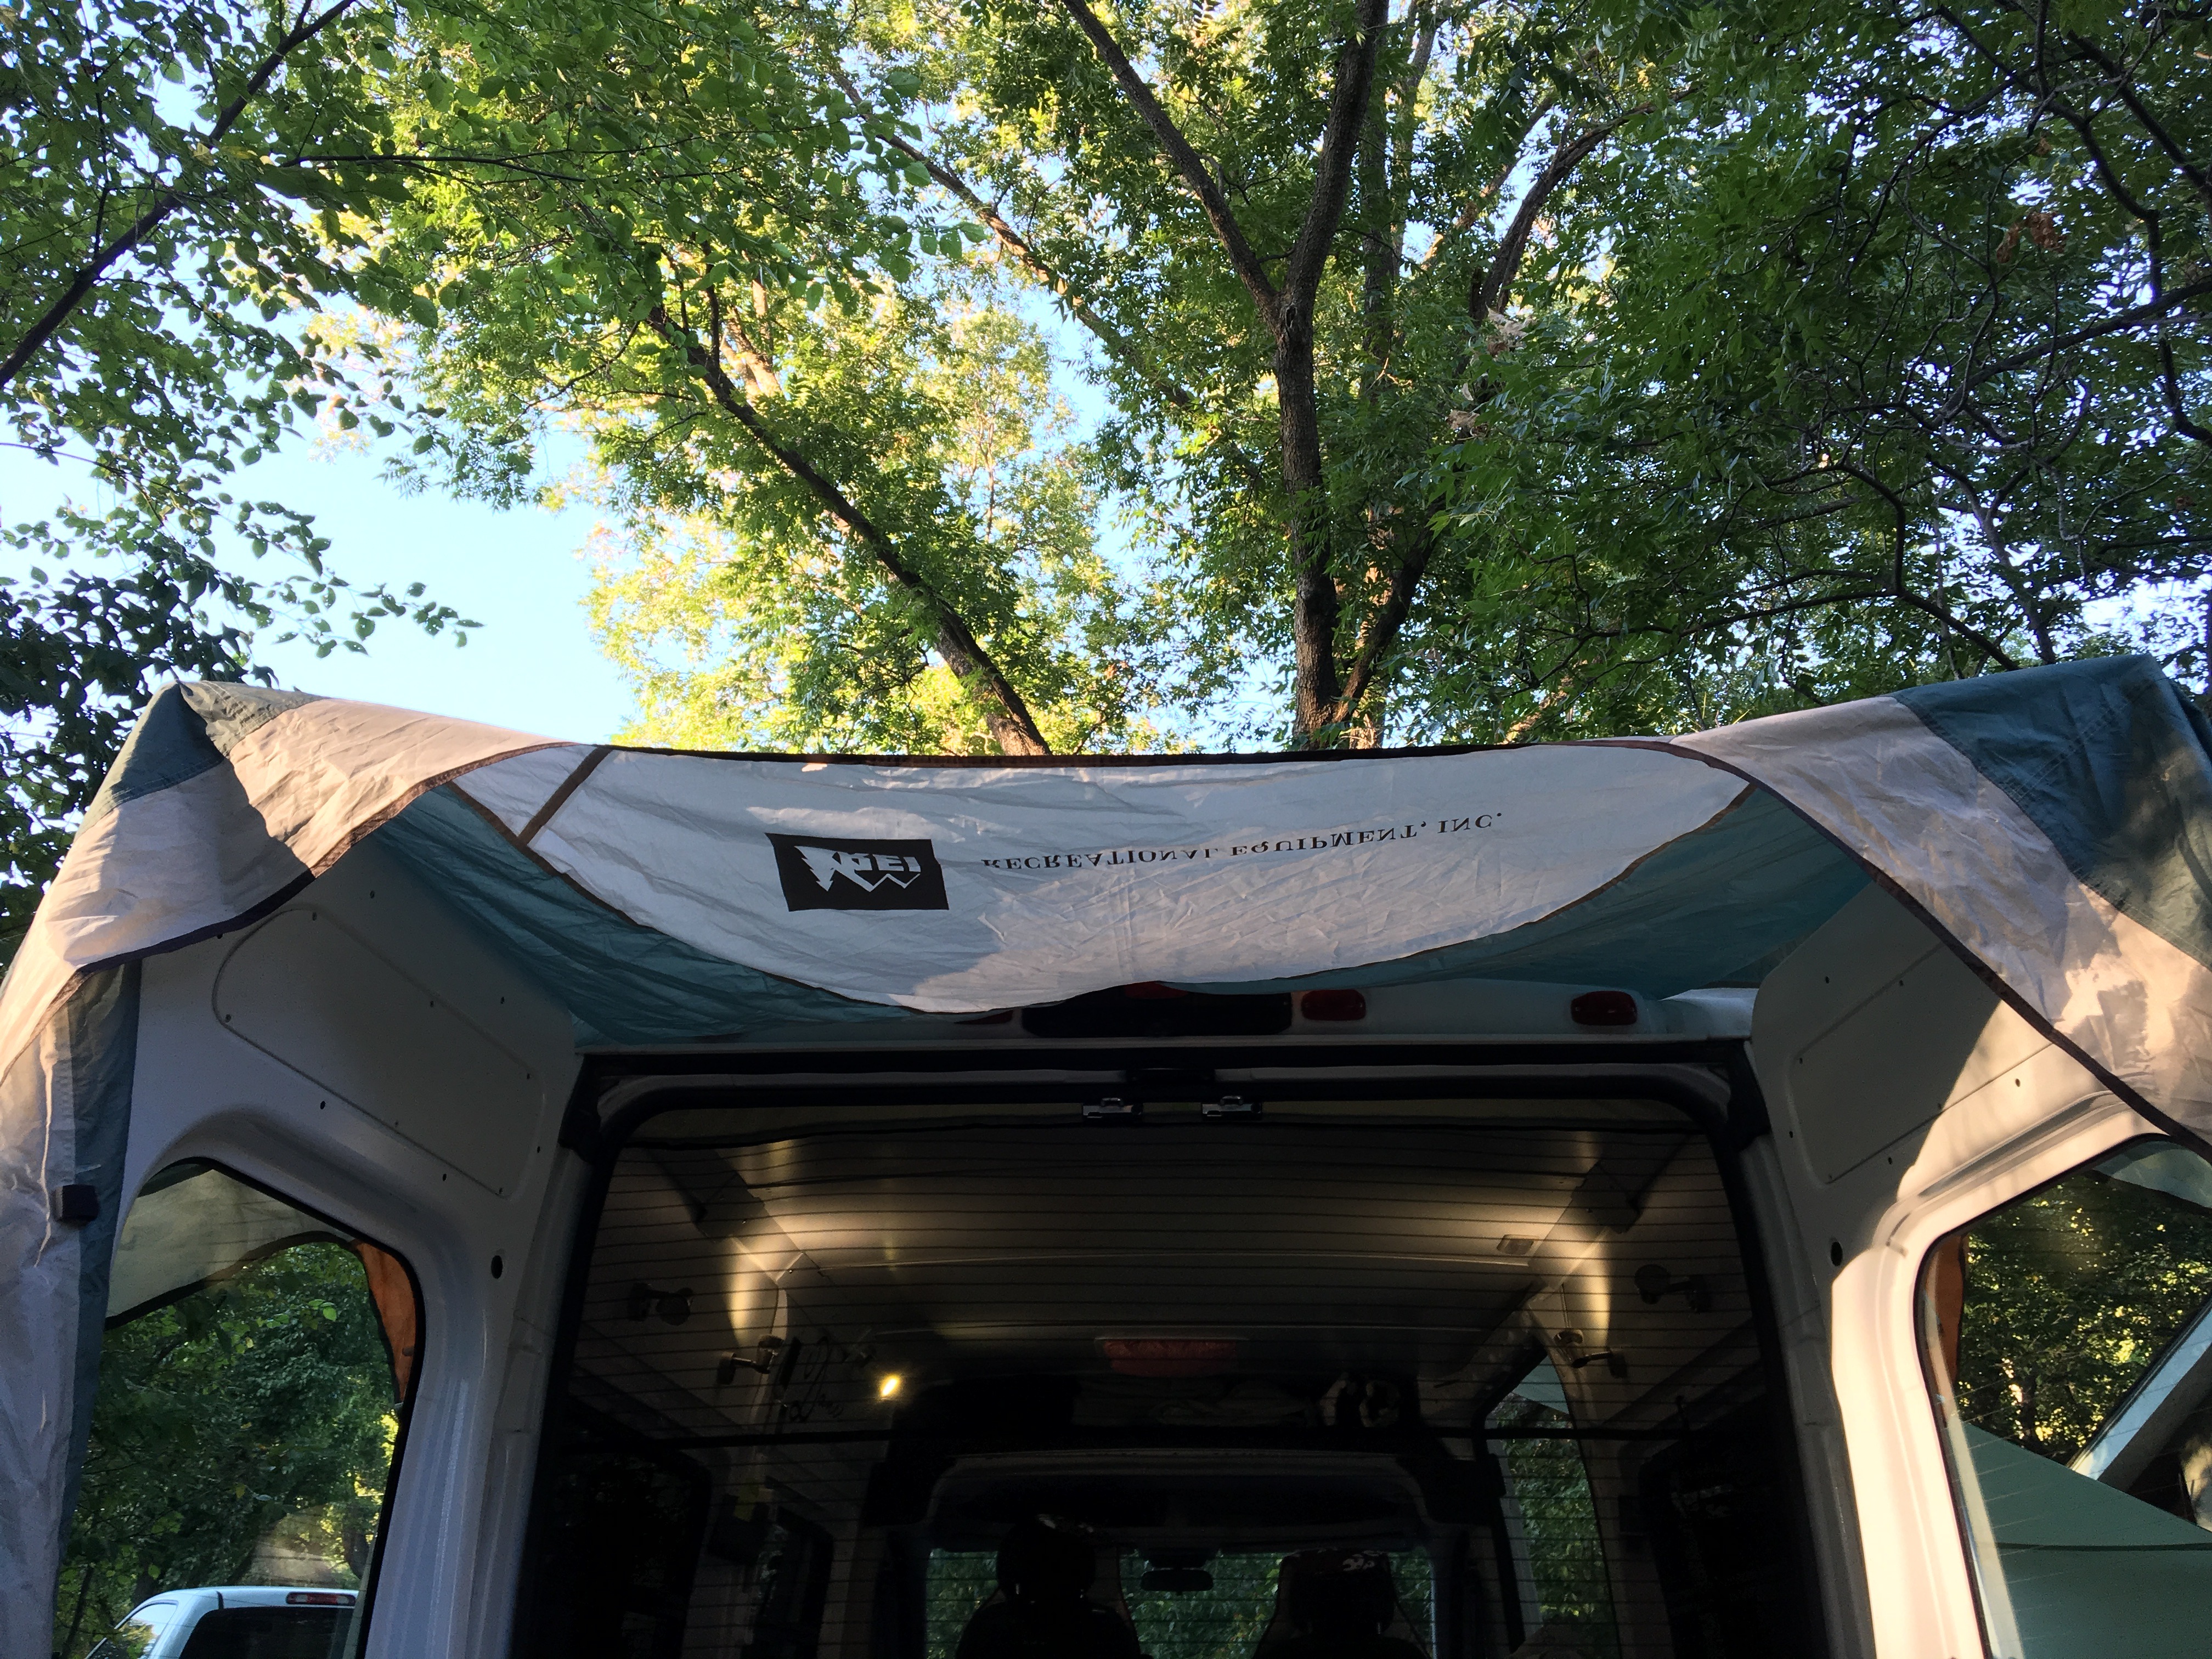 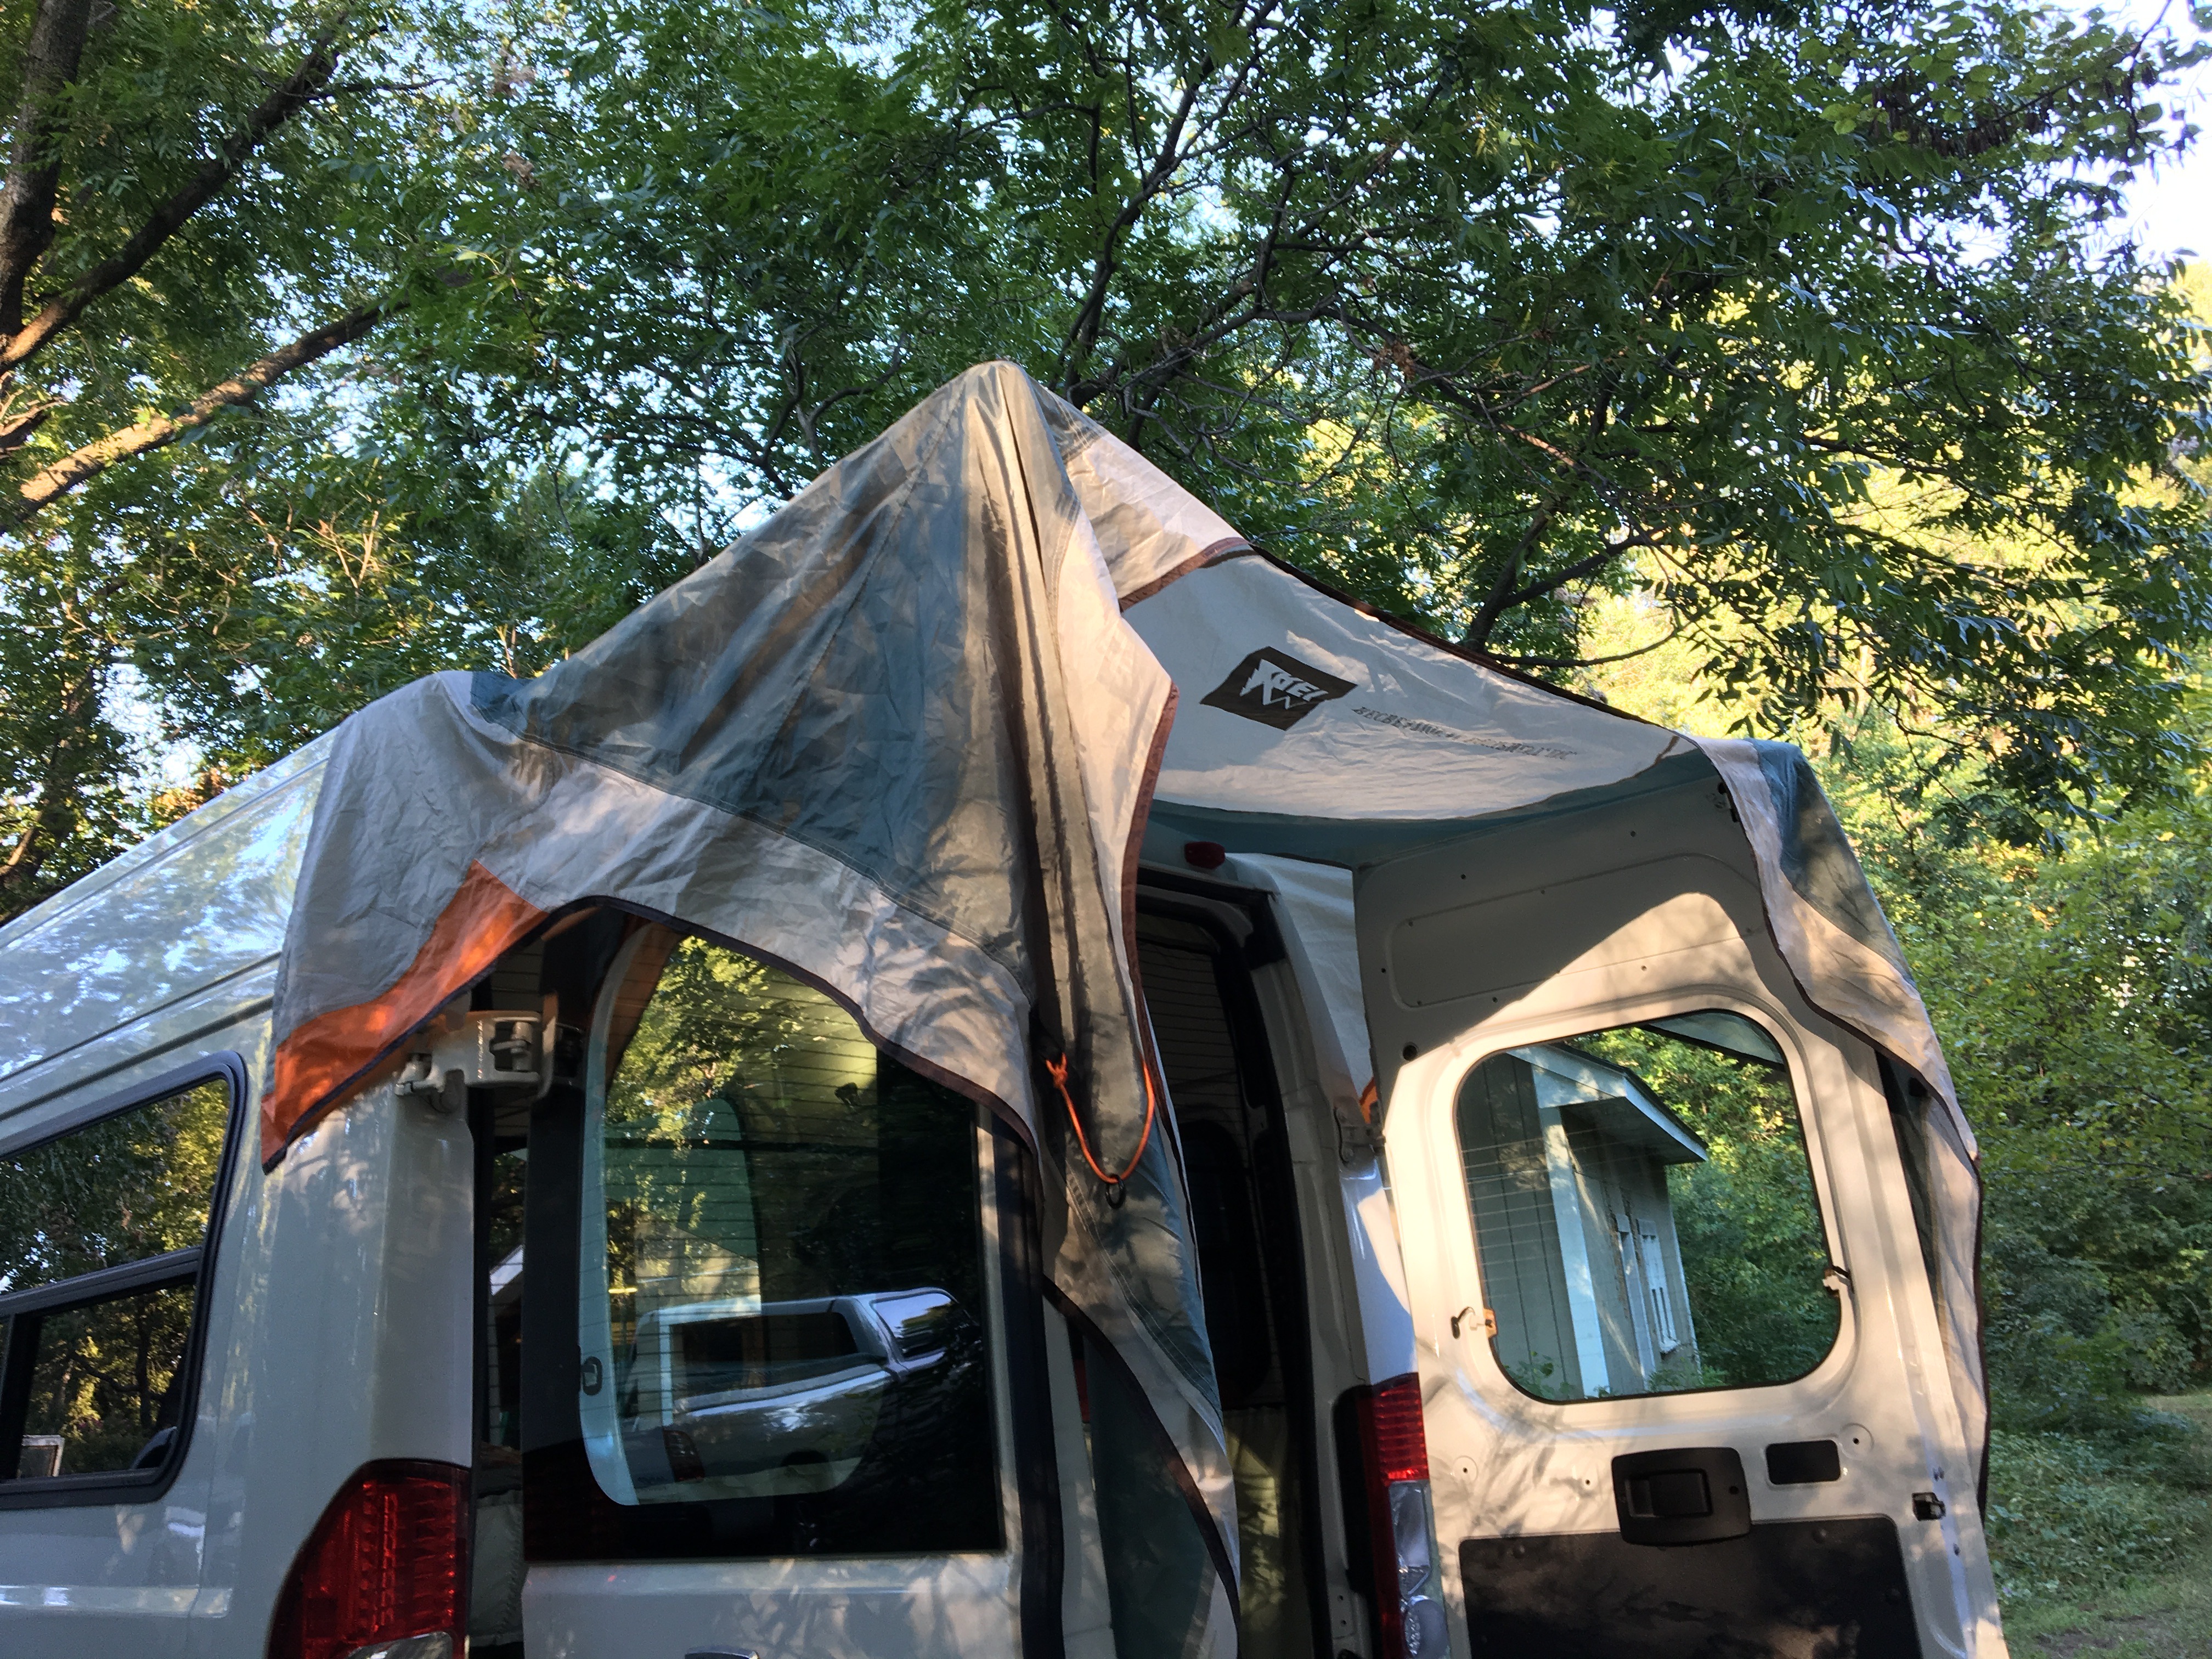 |
The Door Handle
All credit for this goes to RD. His is higher up because of cabinetry, but it's his idea. And I'm thinking, "Why wasn't this original equipment?"
We all learn sooner or later that to close the side door, we really need to slide forward, then push in at the end. That inward push is possible from the outside, but it's not possible to pull from the inside--until you install this simple handle. 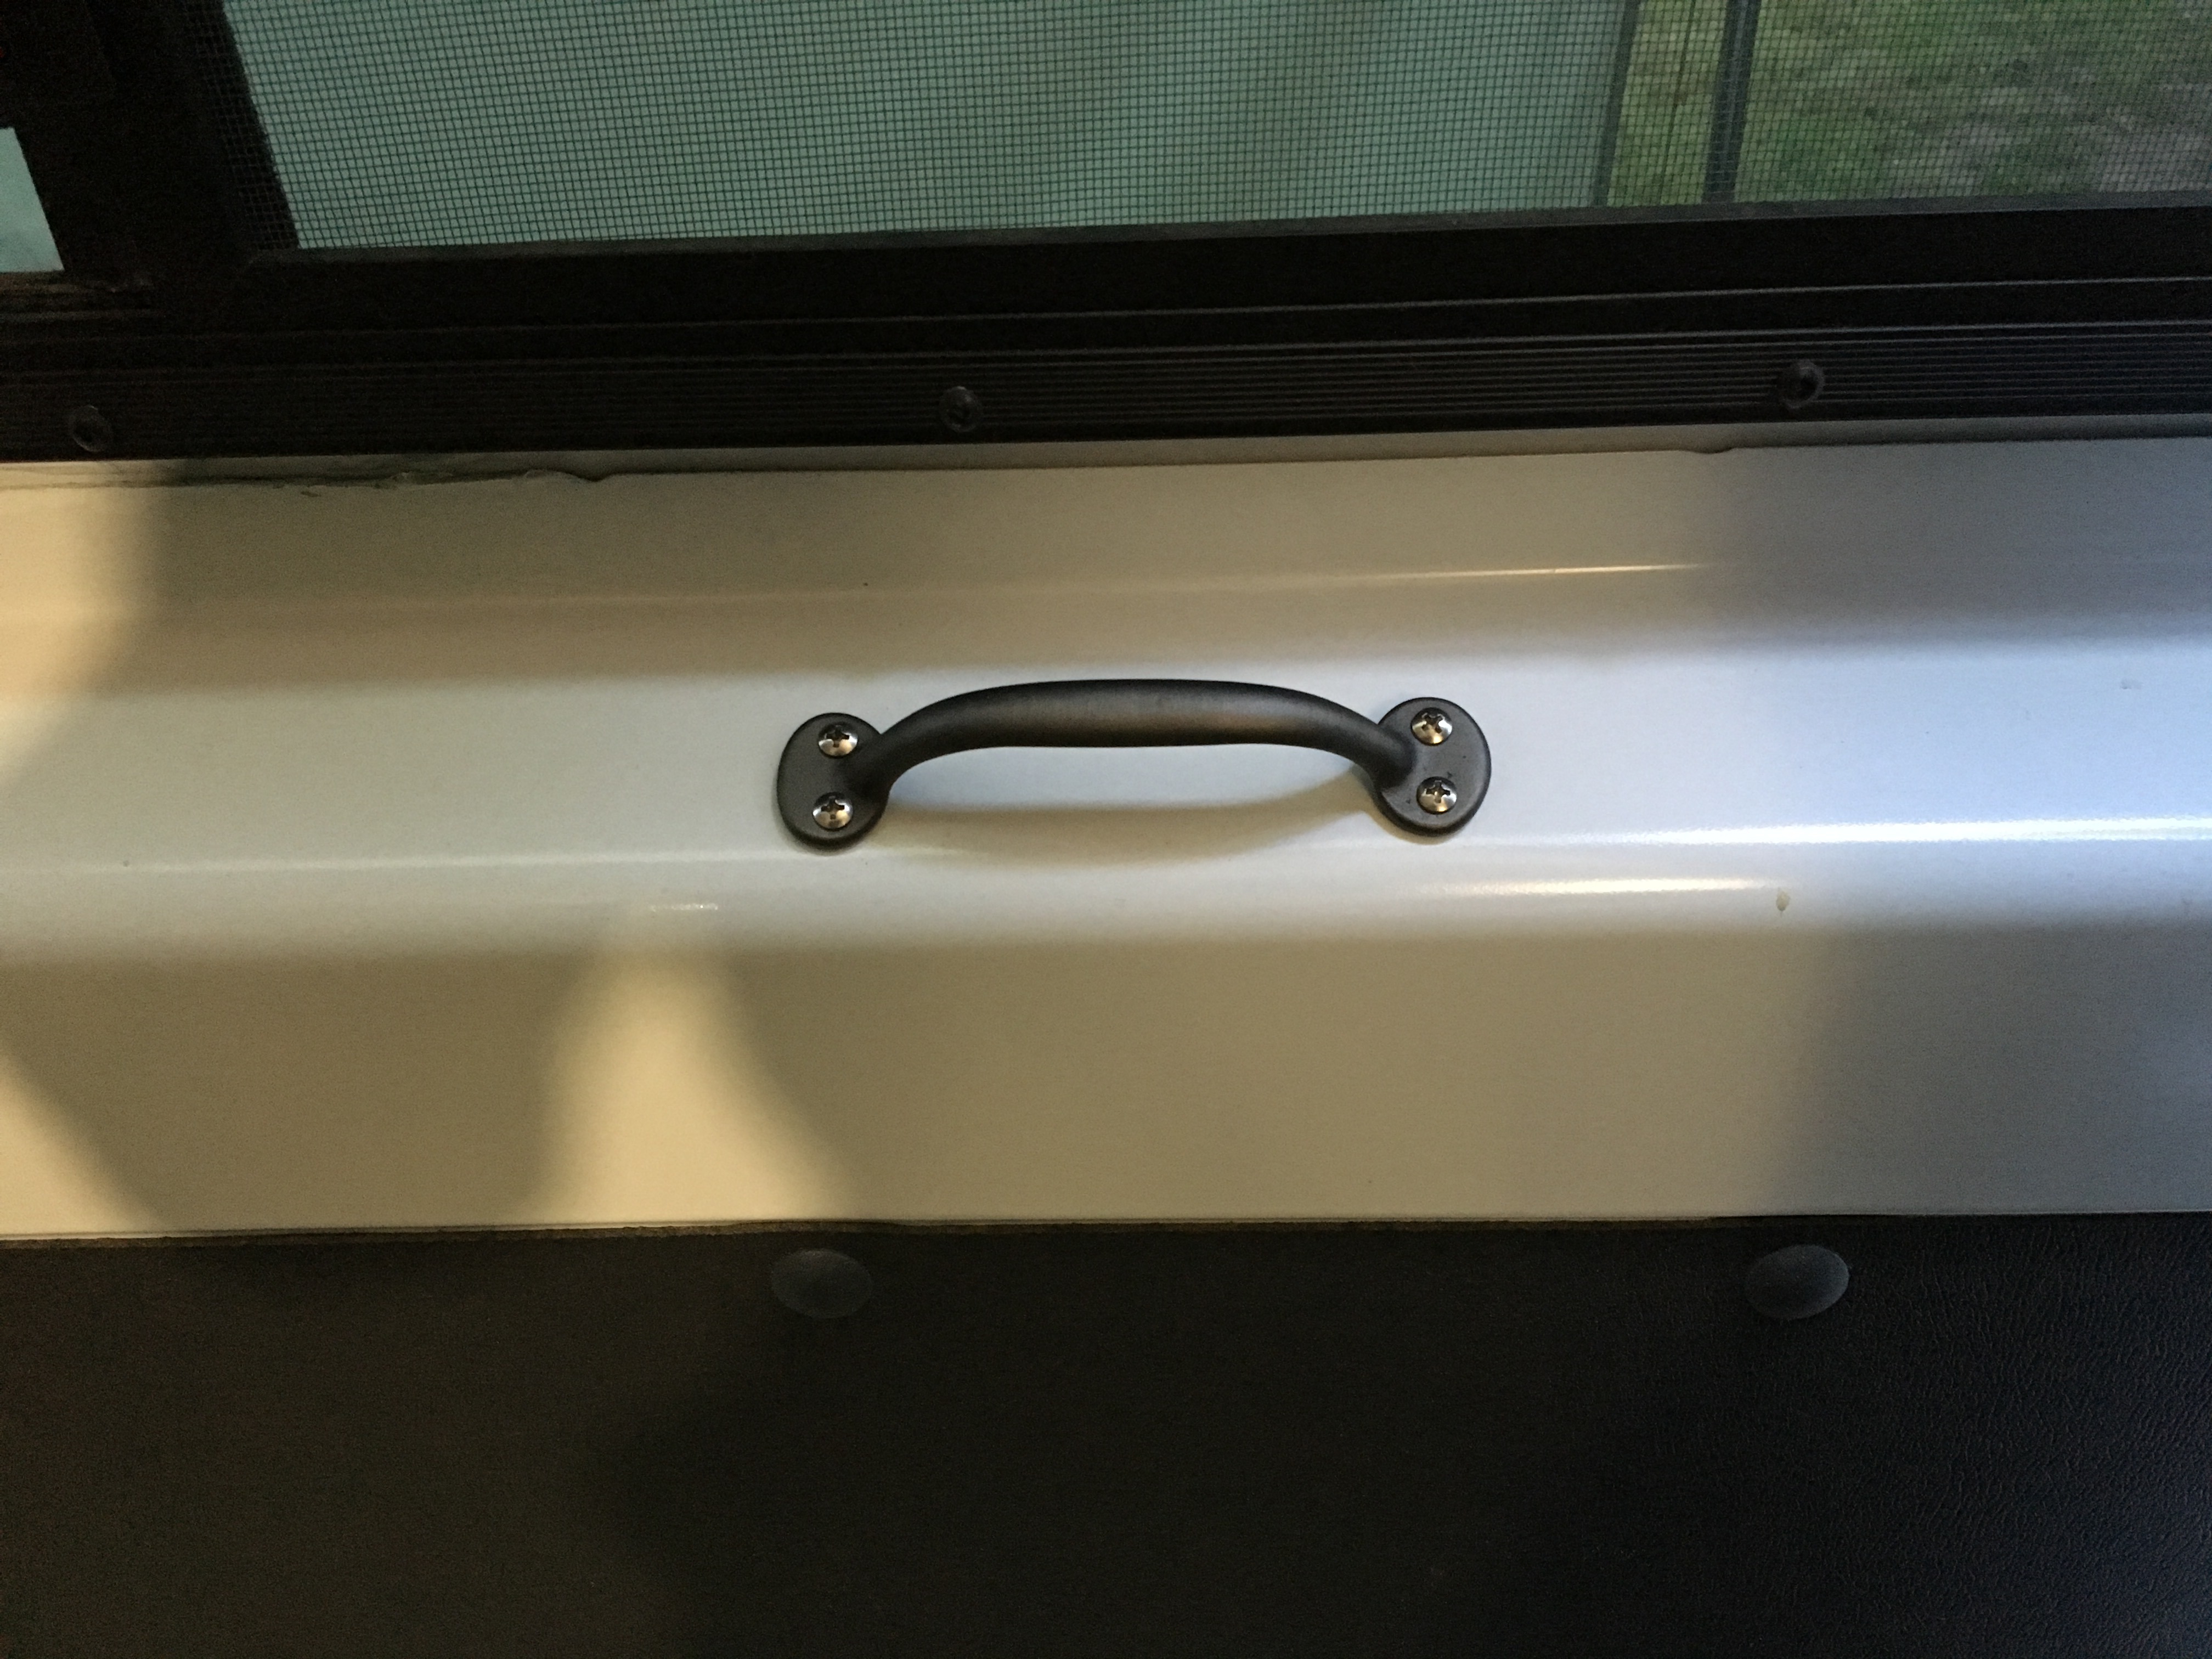 RD centered his front to rear (IIRC) above the window. We put ours just rear of center on the slope below the window. Both locations work well. It is now possible to close the door from the inside without slamming it. I found a pewter finish solid brass handle at Lee Valley. Stainless screws, of course. |
Quote:
|
Easy to do when you're outside. A pain when you're inside.
|
Quote:
Haven't tested whether the roof vent adjusts for it yet. |
Yes, it's easier when the vent is open. But that inward pull still makes a big difference.
|
This winter when I get back to AZ I will rethink the whole shade/rain tarp. My triangle one is super for shade but not so good for rain as the front section is about a foot short of covering the front opening of the door. I have two of the triangles so I will try the "MsNomer rain tarp extension" on the spare one. I could also start with a 10 by 8 or 10 by 10 and have a large covered area at the sliding door with 2 poles which I had avoided.
I like your thinking about the back door and I suppose I might need to get screening in too. So far we have no bugs in the SW all winter, travel back before they get going and have toured the NE after they have peaked. The dry summer had essentially no bugs this summer anyway. Thanks for posting. |
Ms,
A handle like that is on my list. So far, I haven't finished the hole in the slider above the window, so I just grab there. |
Versatility
When I was planning this van, I did not realize how versatile it would need to be and is.
I envisioned the drawers that open into the main area as being "everything in its place," which is the case. When preparing for a trip, I just check those drawers to make sure what's supposed to be in each one is there--clothes, toiletries, utensils, some certain standard foods, etc. But out of sight bhind the bed and in the "tunnel" are where the magic happens. The last trip, we loaded up two full backpacks, two full duffels and 6 bear kegs for our stint in the Wind Rivers. Then we piled in an equal amount of stuff for MrNomer's brother who was accompanying us. Tomorrow, we leave for MrNomer's 4-day convention in Denver (dress clothes and lots of paperwork), then two desert stints of about 5 days each with mountains to hike in between. For the desert, I have the two awnings, the external windshield cover, an outside table, a shower tent and pump/wand, and will have 26 gallons of liquid on board for each stint--15 gallons of water plus soft drinks and Gatorade. It's like this big grinning beast just swallows anything I feed it without even a burp. A reminder for a bit of perspective: This is a 136", I have added no storage above the waistline, and I have a 20 sq ft (4.5' X 4.5') clear area between bed and cabin. |
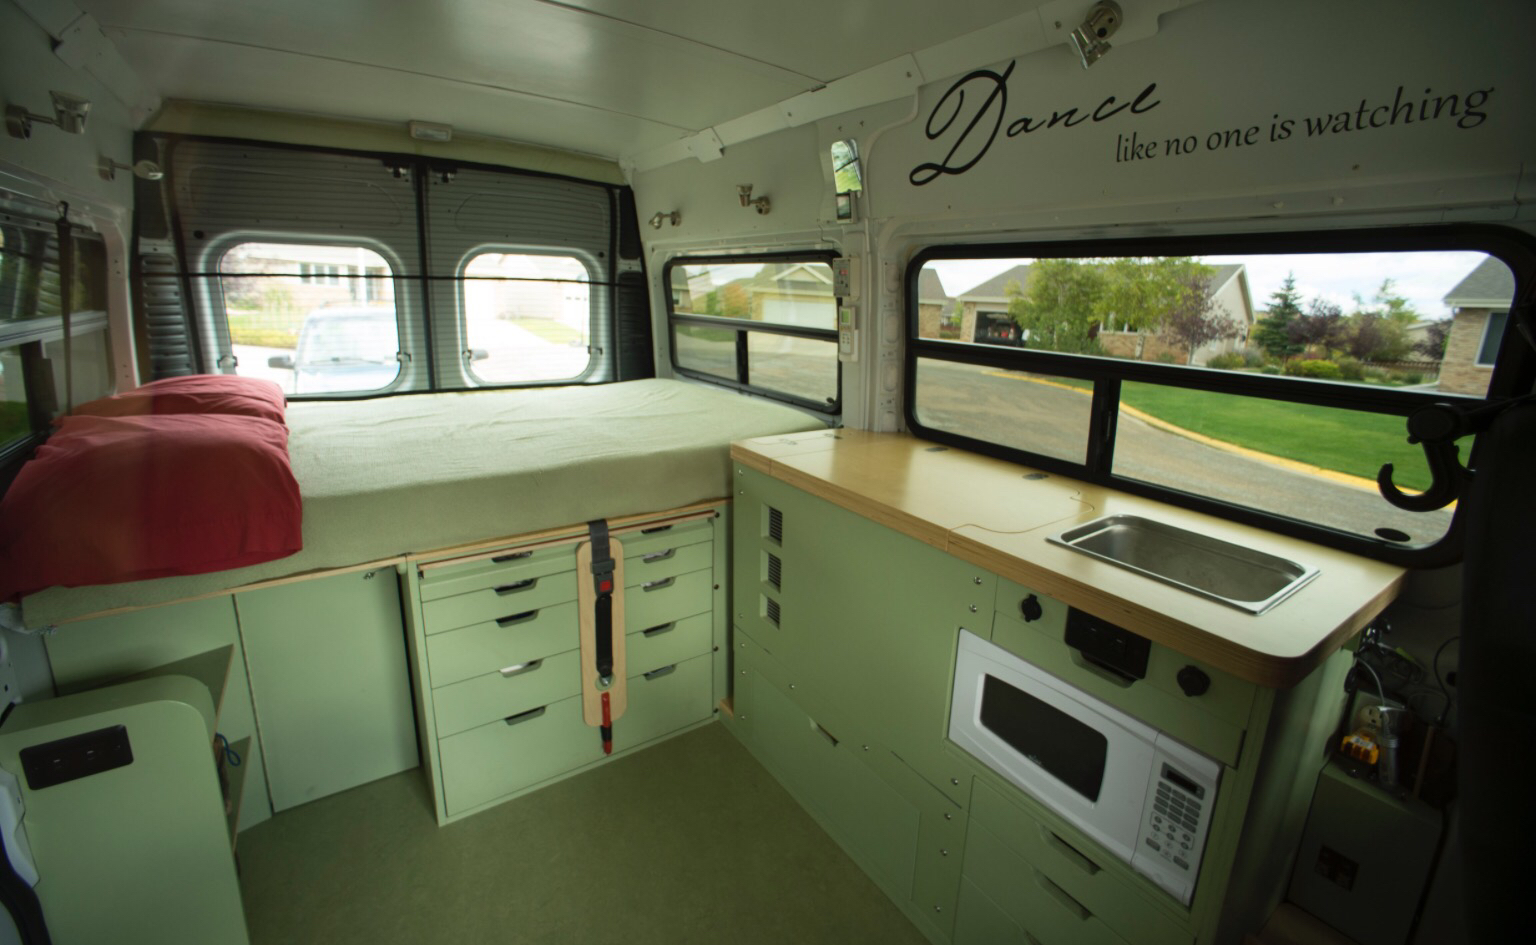
Interior Photo
 |
So-ooo-oo beautiful!
|
Nice! First chance to see an "all-around" view!
I noticed that you have no ceiling lights... how does that work out for you? Probably a much more subdued lighting than the ones shining down from above. I'm going to get to my ceiling one of these days and I'm trying to decide on lighting. Right now I have 4 big ceiling lights - they work well but I often use the dimmer to soften the glare a bit. Ed ps. if you're dancing out in the wilderness... no one is watching.... maybe! |
With a white ceiling, even one of the 5 lights is sufficient. They are tiny--IIRC, 0,3A. Unless we (rarely) need a specific task light, we just use whichever is most convenient and point to the ceiling. We never use the original cargo lights.
I avoid overhead lights at home, too. I look better without them accentuating my wrinkles. |
I love the tidy clean lines. The same rush feeling at having a kitchen remodel completed. Your colors are my absolute favorite. Very nice project and so well crafted. Lovely.
We just got our propane furnace and 2 burner stove to work as expected. A weekend is planned to "shake down" the water and heat and see fall Montana colors. Happy travels to you. |
Solar
I addressed adding 300W of Solar in the thread "Adding Solar."
http://www.promasterforum.com/forum/...t=adding+solar Two 150W Renogy panels Hein's ABS pads with UHB, thus no holes in the roof Bogart Engineering solar controller which mates with the Trimetric meter We are pleased with the performance. We are also glad that we ended up with three charging possibilities: Solar for when we are out and about, Shore power charger for the shady driveway, Van alternator for when neither of the above is available, such as boondocking in the shade. |
Twin Battery Boxes
With solar, came the desire for a second battery. We now have 200Ah of Trojan AGM, which allows us to use the microwave with impunity.
This also meant I needed twin battery boxes. I was a bit squeamish about putting anything in my beloved clear space by the slider, but we have found that the new boxes are the perfect height for foot rests when the seats swivel. The step between them stores a few tools. It was also a bit of serendipity that a gallon of water fits so neatly by the door. The finish on the tops is the same General Finishes Enduro-Var that I put on the counter. It is holding up well to gritty boots.  |
Now what is this contraption the woman thunk up?
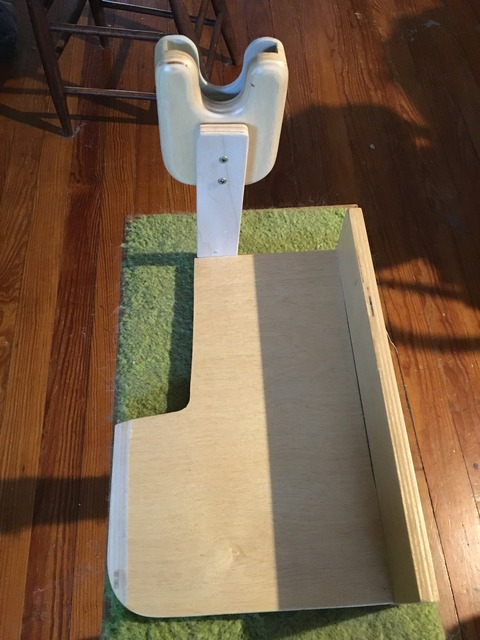 A bookend-phone holder, of course. Fits on top of the battery box behind the driver. Phone is easily reachable by driver's left hand. The phone holder has a padded interior. 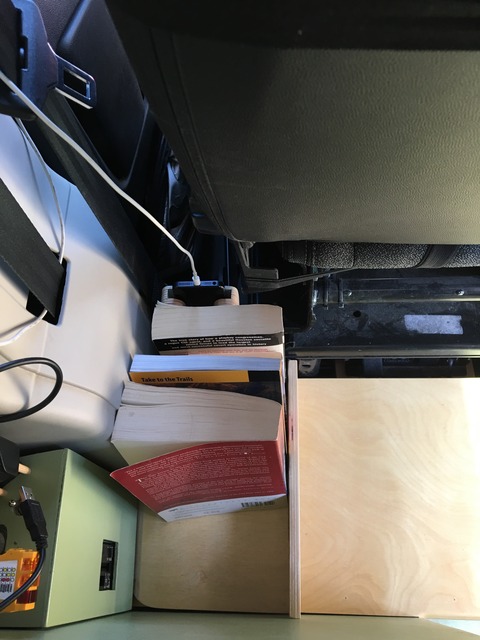 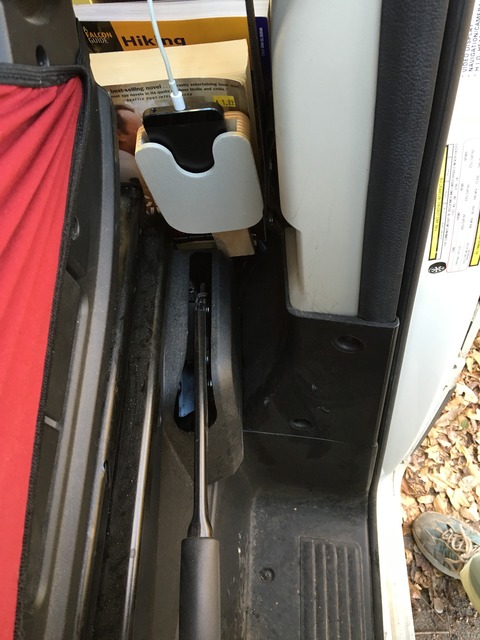 |
I like it! but...
...someone's got way too much time on their hands! Nice Idea! ed |
Quote:
|
It will never end! Thank goodness. You go girl!
|
Love it ;)
|
And to complete this warm day, a template for window surround. This one is a bit short and held on by magnets. Hopefully, the final surround will be white. This is not my preferred solution--I would rather use wood, but everything I've tried has been too heavy.
  |
MsNomer, now that you have some miles on Hiker's Paradise, what is your take on the cross dowel joinery? Some queries come to mind:
Remains squeak and rattle free? Cabinetry seems as sturdy as more conventional joinery? Plywood not showing signs of wear or wobble? Take down benefits as good as planned? Any design tweaks if you did it over using cross dowels? The reason I ask- I am enameled with the idea of breaking down our camper so the van returns to use as. Big work box. Thanks for your insights! Sent from my iPhone using Tapatalk |
Remains squeak and rattle free? YES
Cabinetry seems as sturdy as more conventional joinery? YES Plywood not showing signs of wear or wobble? NONE except some surficial scuff marks on painted finish. Take down benefits as good as planned? YES. I've only removed everything once, but I have on several occasions removed a panel or two when retrofitting something. Can't adequately express how handy that is. Any design tweaks if you did it over using cross dowels? NO. However, to make it easier I'd probably invest in a jig instead of free-handing it. When I was making the joints, I didn't know such existed. Please note that screws go through the top of the bed board into each plywood panel, so the panels are held in two dimensions. No need for many, but these screws hold the bed board in place and keep the cross-dowel joints from twisting. The cross-dowel bolts do not appear to have any tendency whatsoever to loosen. I have never needed to tighten one. |
Today I had to dismantle everything under the bed except the wheel well cover to run the wiring for the Webasto. It's been well over a year since I've dismantled this much. I was pleased that all cross dowel bolts were still tight, yet they came easily with a tug on the Allen wrench. The hardest part was juggling ten drawers.
|
Locating and Building Around the Webasto
MrNomer's installation of our gas-fired Webasto is described here: http://www.promasterforum.com/forum/...d=1#post392161. While he was busy underneath, I was busy accommodating this extra box and its chase in the tunnel.
The exact location of the unit was determined by constraints underneath the van. I built a box which allows the required minimum distance behind the unit, minimum height, and brings the hot air vent to the tunnel doorway. I have not glued the box yet, so I can extend the vent farther into the living area if I need to. On the driver side of the tunnel, I mounted a contraption that serves as storage for a collapsible table and chase for the heater intake. 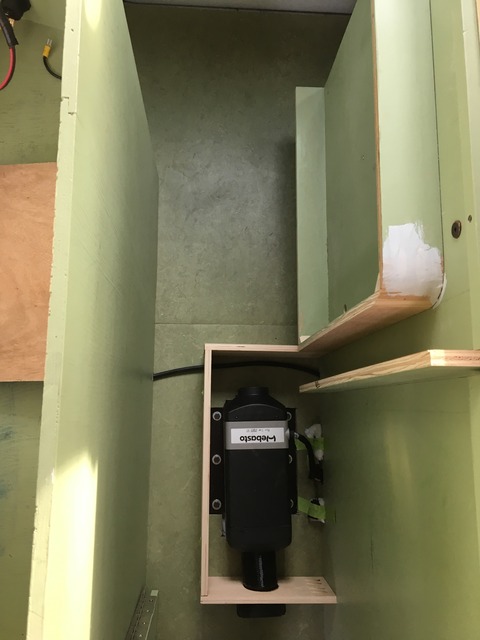 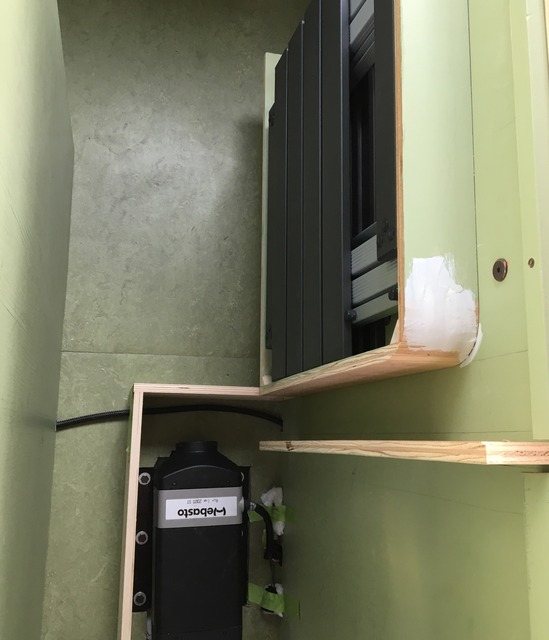 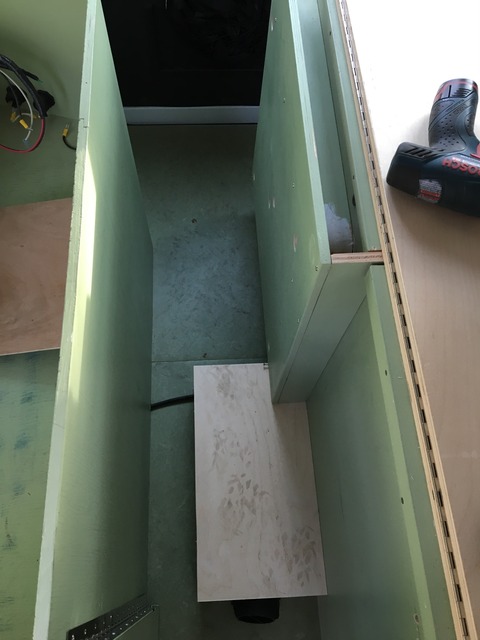  Note that the bed board (hinge seen at right) will fold down over this to provide the 4th side of the chase. The chase has a larger cross-sectional area than the 60mm hose. The conduit going across the floor is for mounting the rheostat on the C pillar so I can adjust it while in bed. I will lay 3/4" ply by the box with a groove to accommodate the conduit. And, BTW, to run that conduit, I had to remove the paneling from the rear quarter panel (after I removed the wheel well box). Those 1/2" sheet metal screws were as tight as the day they were installed, and MrNomer likes where wash boarded roads lead to. One less thing I'll be worrying about. |
The chase is a great idea and seems to be a perfect solution to your wants.
To service my Espar diesel heater it is necessary to access the top and side of the heater. Have you referenced your manual to see if you can get to it for that? It might be easier to modify the housing now- not when it needs service. |
The box is totally removeable with 4 screws.
|
You so Smart!
|
Another unique solution to an iconic build! Nice detail on the rounded spillway. Did u consider adding a vent to the back of the box? Even with stored packs there would be significant air exchange. Cold air from the floor. May also insure u have more than enough combustion air.
|
The reason I went to so much trouble was to avoid pulling in the cold air from underneath. I may add a closeable vent to the back of the box, though. The entire chase structure is easily removeable.
The cross-sectional area of the chase significantly exceeds that of the recommended ducting. My one concern is the possibility of bedding blocking it. Stay tuned for that quirky solution. |
Msnomer,
Somewhere you mentioned that the windows on your van suggest RV. I was wondering if was worth while to paint the factory window indent gloss black and make it appear as a passenger van? |
Quote:
If one were trying to look commercial, I could see it being an issue, but not my problem. |
Installing the Webasto Rheostat
I wanted the Webasto rheostat installed where I could reach it conveniently from bed. The passenger C-pillar was the logical location. As luck would have it, Murphy was almost asleep. The unit fit just barely in the stadium-shaped hole low on the column.
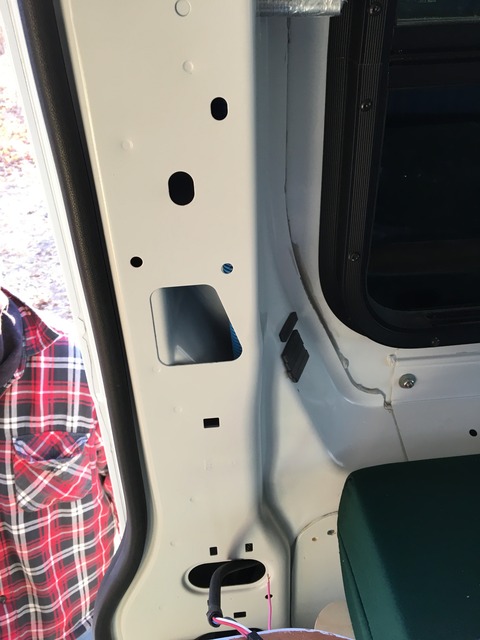 I clad this column with painted luan and cut a rectangular hole at this point. I made a 3" luan circle with a 1/2" hole and mounted the rheostat to it. After attaching the harness, I put the base of the rheostat into the hole, then stuck the circle to the wall with double-stick turner's tape. I can't think of any way to mount this without access to the back side. It's a lot easier to say "put the base of the rheostat into the hole" than to actually do it. Before committing, I verified it would go, but the actual fitting probably took me half an hour. It cannot go straight in, but the forward rear side goes in first. I was not able to use any insulation at this point because the stiff harness would push the rheostat out. 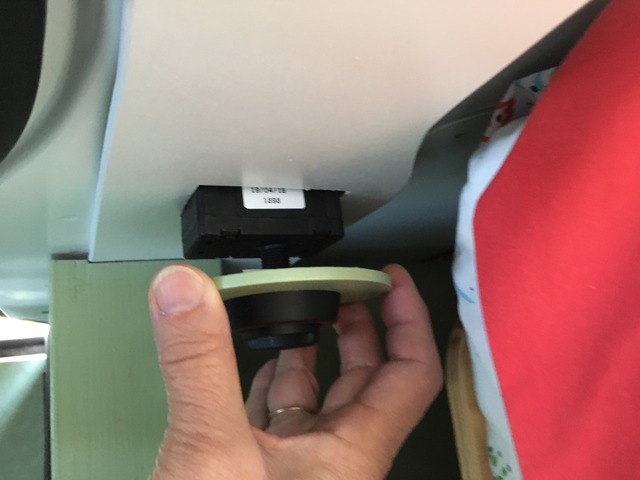 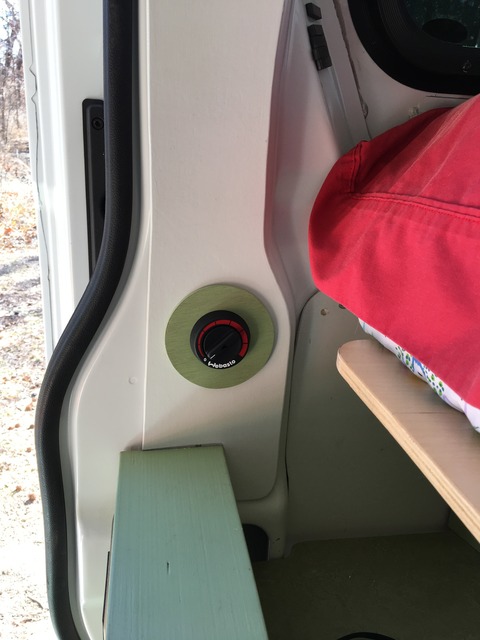 |
MsNomer,
I just finished reading your entire build thread-much of it for the second time. Wow, what a great read! I have no building experience and some posts left me scratching my head. But like a good book -your thread helped me dream, gave me a few chuckles and left me wanting to read more. Thank you for all you have contributed to this forum and please keep posting. If you run out of work on this camper van, you could always start another van and I'd be in the long line of people that would want to buy your original ProMasterPiece. |
Thank you. I am humbled. It has been a labor of love, my most satisfying project ever.
I confess that when I was dismantling to install the Webasto wiring harness, a couple times I muttered, "How did I figure how to do that?" And I have to confess that serendipity has played a huge part. That said, there's not much there that a novice couldn't accomplish with access to some tools, a place to work, and some patience. The secret is the frameless cabinets joined with cross-dowels. Circular saw, drill, driver (powered screwdriver), jig for the cross-dowels (about $40), some clamps, and you can make an entire bed/drawer assembly similar to mine. Cross-Dowel Jig and explanation: http://www.woodpeck.com/crossdoweljig.html It wasn't that long ago that I started at zero, too. |
MsNomer,
Thanks for the tool list and the link explaining cross-dowels. As I mentioned yesterday, I'm still debating between a new or used van but I have ruled out buying a Travato. Like so many others on this forum, I'd like to keep it simple and affordable. |
MsNomer, we have begun our van conversion! Your build thread is my constant reference, I must have read it a dozen times, picking out details each time.
One bit of information I can't seem to find- what thickness plywood you I see for your cabinetry. Looks like 1/2 and either 5/8 or 3/4 in the photos. I'm thinking of using 1/2, or thereabouts for our bed and Galley. What say you? |
Overall: Use the best quality ply you can find--Baltic Birch would not be overkill.
The on-edge plywood that is cross-doweled must be 3/4". Wheel well enclosures are 1/2". Bed board is 1/2" Drawers are 1/2" with 3/4" fronts. I also used 1/2" bottoms not necessarily for strength but because this allowed the bottoms to be encased in a groove and also the drawers have flat bottoms. This way, nothing can catch under the lip of the next drawer above--one of my pet peeves is thus avoided. Kitchen cabinet is a hodge-pudge of 1/2" and 3/4", whatever I needed to work around the steel fridge stand. Broad front panel is 1/2". Counter top is 1/2" Baltic Birch with underpinnings of whatever was needed. Edging is layers of scrap BB. Battery boxes are 3/4" with 1/2" top. All ceiling and wall panels are 3/16" luan ply. This is the exception to the "best you can get" rule. |
Trimming the Window Behind the Driver
Enough of those huge holes staring at me from the sides of that window! The early morning epiphany finally came (after seeing how Proeddie trimmed his) and execution followed without too much hassle. The result isn't the look I would have preferred, but it is good enough and easy to change if I have another epiphany.
I had been stymied by those huge sorta rectangular holes on the sides of this window which left precious little metal to attach anything to. Here's the solution: First, fill the cavity with insulation, not only for the insulating itself, but to help hold this contraption in place and avoid losing it in the bowels as you fiddle. Cut pieces of 3/4 ply about 2.5" X 3" so that they fit behind the metal around the hole. I cut two for each side. Install an insert nut in the middle of each and temporarily screw in a connecting bolt. Put double-stick tape around the outside of each but don't remove the protective tape yet. Using the bolt as a handle, insert the board into position behind the board and remove the protective tape. Pull on the bolt to seat the tape. 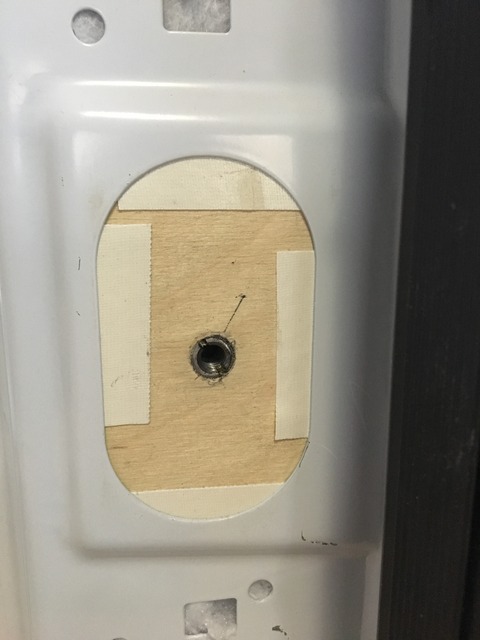 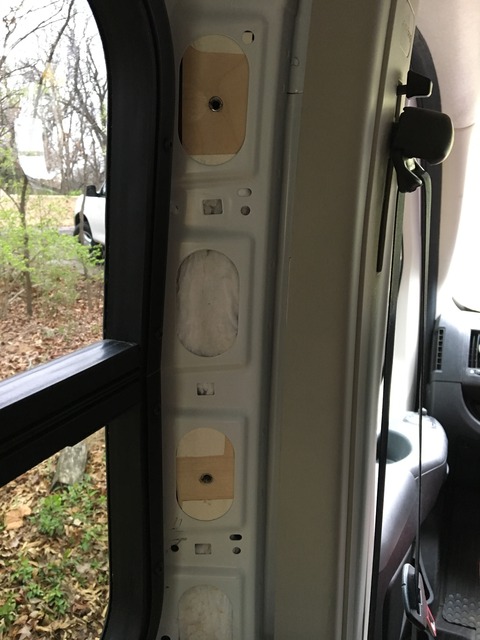 Then I shaped pieces of 1/2" ply to overlay these surfaces. The hardest part was that the outer edge needed a bevel of about 15° to mate up with a piece of luan on the outer surface. This assembly was actually glued up in place with Saran Wrap underneath, then bolted on with connecting bolts. 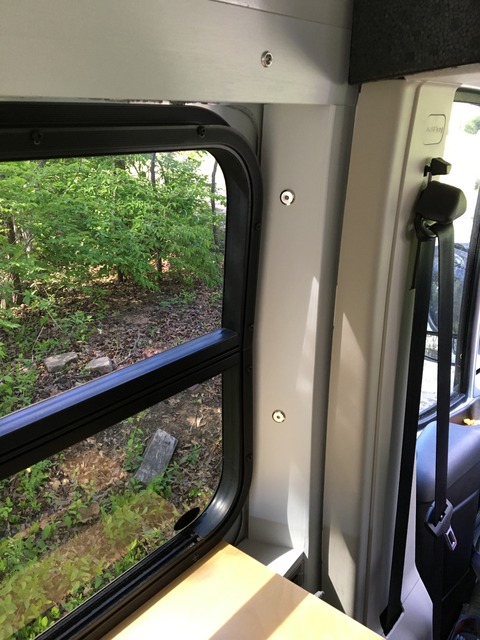 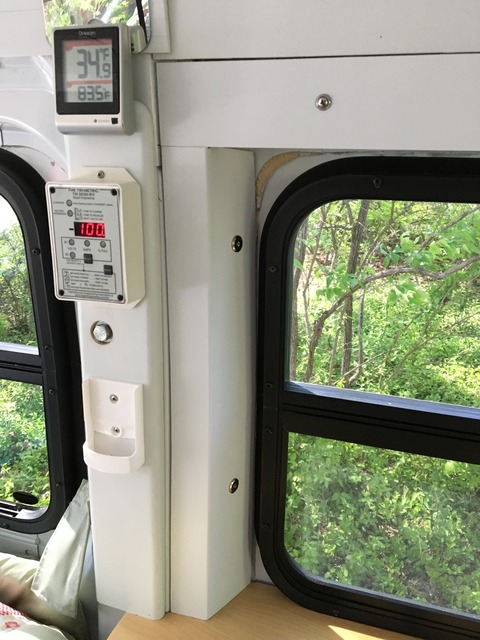 For above the window, I confess I'm having great difficulty describing what I did. This is the assembly with double-stick tape awaiting the final luan layer. The green tape marks underlying holes to help me position the finishing screws that hold it all together. 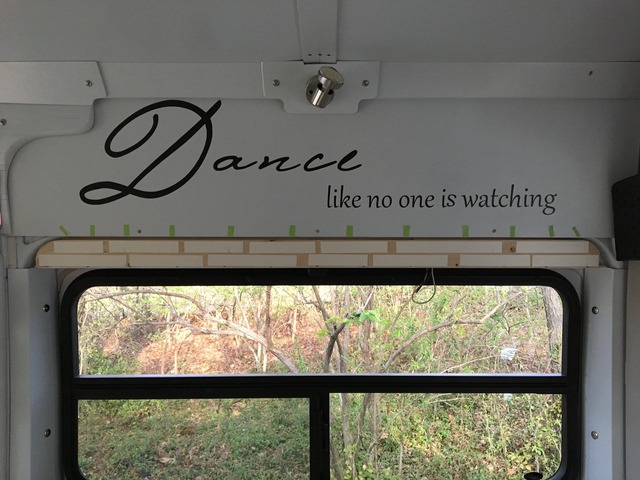 The end result is faced with luan meeting up with the upper luan panel. The horizontal part underneath (just above the window) contains an LED license plate light which provides a subdued directed light for when MrNomer makes his breakfast before I get up. 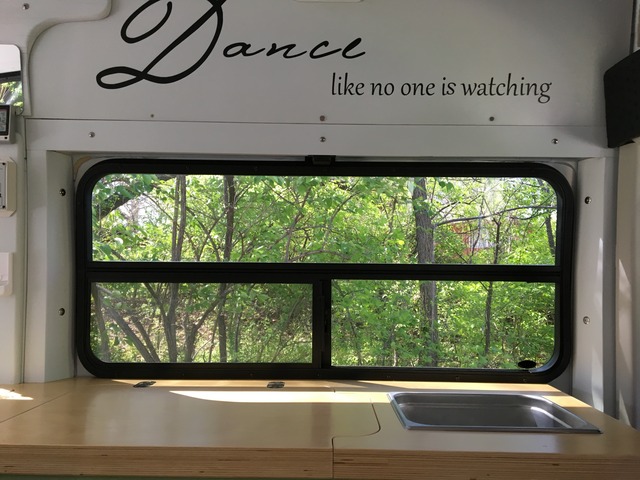 Obviously, this is not finished. I need to trim the seam between this and the upper panel--the trim will cover the screws at the bottom of the upper panel. Then I need to fill in around the window--with what I don't know, but it needs to accommodate the possibility of a cold sweating surface. The rear windows will have a variant of this top treatment but without the side panels. Perhaps I can find a way to explain what I did. |
Final Touch on the Webasto Install
As I described earlier, the cabin intake for the Webasto ends just under the bed. I was concerned that during the night, it might accidentally get covered by sheet or blanket. Obviously, it needed a chimney.
A browse through Lowes with a open mind led to this contraption made from plastic downspout. It fits snugly in the chase, yet is easily removed and stored when not needed. 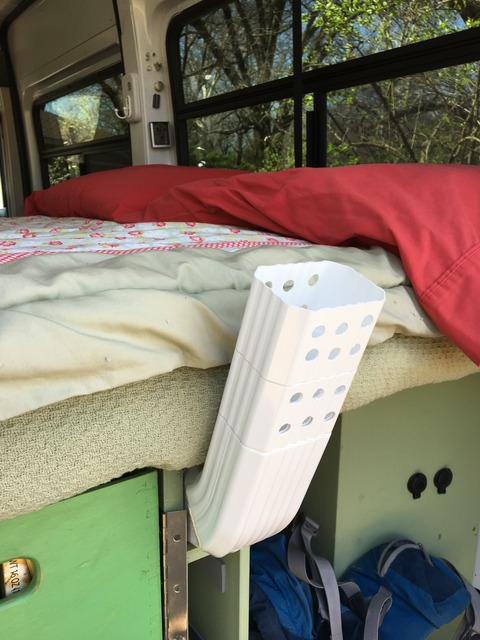 |
With your skillset, I'm surprised you haven't built a jig and glued up a one-piece window liner, radiused corners and all.
|
As usual MsNomer has come up with unique and elegant solutions to problems!
|
Quote:
  I changed direction because of the weight and concern for wood that would be dampened and thus damaged by condensate in cold weather. Even on the coldest nights, we don't cover windows except to hide unwelcome lights. With this attachment scheme, I may revisit with some sort of insulating or isolating liner. Probably for this window only, though. |
Nice solution to a challenging problem! This one goes into the file for when the time comes. The sophisticated radiused corner build-ups were not gonna happen for me.
|
Quote:
Sent from my SM-P900 using Tapatalk |
Two 100Ah Trojan AGM's for a total of 200Ah.
So far, they've never gotten below 69% full. Momentary blips to 11.7-8v when MW runs on inverter. |
Insect screen revisited:
After a spring trip to the Southeast, we decided no-seeum screening was in order for slider and rear. I found excellent quality screening a mosquitocurtains.com. Easy to work with, sturdy but very fine--sometimes seems invisible. It is also a misperception that finer screening necessarily restricts air flow. Nobody makes a magnetic no-seeum screen, so I bought the same magic screen from Amazon, then swapped out the mesh. Rear was a cinch. Slider not so easy. I learned the hard way: DO NOT open up the center magnetic strips. Trust me. With an ordinary sewing machine, you will never get them back together so they work right. There must be some special machine that holds and folds them in the factory. So after destroying one screen and buying another, I carefully cut the screen from the center magnetic strip. Then I basted the screening onto the strip. Then I basted a new tape on top of the strip-screen unit, then I sewed the new tape on. This time I didn't put the solid sides, but made the screening 4' wide and moved the screen opening toward the front of the door opening. Top and bottom Velcro attachments are the same as before, but this time I also managed to keep all side magnetic attachment inside. |
I was going back and reading about your build but none of the pictures are displaying for me. All I see is a graphic from Photobucket saying to update your account to allow 3rd party hosting. Do you have a link to the pictures that I can view? Thanks.
Just saw the other post about Photobucket. |
I tried setting up PB so that I could just refer you to the album, but now when I try to call up a photo, the app locks and I get an X with black background. I'll try some more.
|