Ram Promaster Forum
(http://www.promasterforum.com/forum/index.php)
- How-To Forum
(http://www.promasterforum.com/forum/forumdisplay.php?f=57)
- - MsNomer's Webasto Install
(http://www.promasterforum.com/forum/showthread.php?t=57897)
MsNomer's Webasto Install
So the package came today. It was a blow to the gut that I paid $86 sales tax--the company has a site in Oklahoma I didn't know about. :crying:
It was another blow that while the wiring harness runs to the battery and to the switch are each 13 feet long, the wire to the fuel pump is only 17 inches!! Also, the kit does not include any interior ducting or the outlet grill. Therefore, I may be forced to buy the grossly overpriced RV Application kit. So the guy was wrong that 5010205A contains everything needed for an install. The good part is that the heater appears to fit on the piece of flat floor just inboard of the passenger wheel well. We spent the evening sorting the stuff and figuring what goes where. Fortunately, the connectors are all one-of-a-kind, so at least that should be about impossible to screw up. |
Fuel pump connections
The kit I bought (from U.K. Via eBay) shipped with the fuel pump cable, coming from the heater, without the plug installed. The actual wires had the pins installed but the plastic plug was not on. The plastic plug won't fit through the intake hole with the plug installed. Not the best design since would be hard to take the plug apart once it was assembled if needed to remove the heater. The kit also came with about 10 or so feet of two conductor cable and the parts to terminate it to build a fuel pump power extension cable. You cut the cable to length, then crimped the pins on (I soldered them as well) then inserted the pins in the plastic plugs.
|
http://webastoliterature.businesscat...eatatevo40.pdf <-- the North American literature claims item (3. Hot Air Outlet/Ducting) IS included with the kit, a week or two ago I corresponded with a U.K. supplier who does not sell the ducting items separately due to its high volume/low weight as that is not cost-efficient for their flat-rate shipping purposes, perhaps the items were included in your suppliers shipment as separate bulk 'kit pieces' and overlooked by the shift/person who fulfilled your order?
Could maybe contacting: Webasto Thermo & Comfort, North America, Inc. 15083 North Road Fenton, Michigan 48430 Toll Free: 800-860-7866 and ask about the disparity save you some money? They say it should be included... |
I can’t help you with the sales tax unless a move to NH is in the works? Take the heater to your local auto parts store and see if they have a length of automotive heat/AC duct. Cars are metric, the hose is metric, 90mm I think. I believe I have a length left from my Espar instal and they are probably the same. I can check on January 16th. As for the outlet grill there may be something on ebay, see:
http://www.ebay.com/sch/i.html?_odkw...+duct&_sacat=0 |
Thanks to all of you. Great info.
Webasto is closed for the holiday, and my salesman is off. I'm headed off next week for >three weeks of trips, so this install is delayed until early February. I will leave the van as-is for now. dms, your description makes sense. That way, the cord would be the right length with no extra. Is there anything special about the cord itself? IOW, maybe I could get just the fittings. Are you sure the solder is a good idea given the vehicle vibration? RD, this ducting is reminding me of setting up the dust collection in my shop. It is 60mm. |
I second the solder connection! Heater duct has an aluminized interior can stretch but the process is similar just duct and clamps. How much duct will you need? BTW find a local electrician or plumber and ask to borrow their Greenlee chassis punch for the holes in the van, super slick, or if you want to borrow mine PM and I can send it along.
Mine is an older version of: https://www.amazon.com/Greenlee-735B...e+knockout+set I have the super large ones too, up to about 2-1/2 inch or so. Yes I know I own too many tools! (is there such a thing?) |
Quote:
https://www.amazon.com/Neiko-10193A-...eywords=unibit |
Probably right about the soldering but did't like the look of the crimps since didn't have the right tool. Nothing special about the wire, looks like about 14 gauge stranded appliance cord, 2 conductor with a round covering.
|
I just spoke to Webasto Tech Support. Lordy, Lordy, what a super nice guy! For ducting, he suggested I go to any place that services big rigs and ask for a scrap of ducting since I don't need much, and they might have a grill lying around, too. Big truck graveyards are another source--I've read of folks buying the units from graveyards, too, but I'm not that brave.
He said that especially with gas, lean is better. The manual procedure is not precise, but precision is not necessary. He suggested adjusting to 8:00 for above 10,000 ft and perhaps just leaving it there. Every time it is turned on, it needs to run on high at least 15 minutes even if you're sweating. |
Dang, I was sure looking forward to the details of your install this week. So have a great and safe trip.
Hoping your thread becomes the "authority" for the purchase, install, and operation of these units. Good info is just in so many different places.Here is one operation question I haven't seen answered yet: The standard temperature control knob is referred to as a rheostat. The continuous settings are thin to wide red bands. Are the different setting positions thermostatically controlled to hold a desired temperature or does it just set a dosing level for the fuel pump, thus setting a constant heat output? The latter would not be ideal. Then the SmartTemp controller upgrade may be worth it. The operation manual says set the dial for the desired temp but that is open to interpretation. |
We have the same kind of knob on our electric heater. We usually turn it on, watch the thermometer til it gets to the temp we want, then set the knob right at where the unit wants to cut out. We have learned to get pretty close without much fiddling. Even with the SmarTemp, you are measuring inlet air temp unless you shell out even more for the accessory temp sensor. Don't assume you can just substitute the SmarTemp later. I think it has a different wiring harness.
Remember we are not installing under the seat as most folk are. It will be inboard of the right wheel well, hopefully on the flat spot that is there. |
MsNomer was right. The tech support guys at Webasto are great! He emailed me the whole service manual.
I'm curious if you'd had a chance to test it out. Mine does great heating it up right when I turn it on, usually around 7:00pm. It'll get the van up to 70 no problem. Then at some point in the middle of the night it either can't keep up with the drop in temperature outside or the unit stops putting out as much heat and the temp in the van drops down to 50. Outside temp is around 6 degrees. It unit never stops running but I think there's a drop in the heat it puts out after 5 hours or so. Do you experience the same kind of thing with yours? I'm trying to figure out what's happening. Do I need better insulation? Is the unit not functioning for some reason? Maybe the air coming into the unit is too warm and I need to duct the output air better? My dream is a perfect 70 degrees all night long. :) |
Haven't installed yet. I'm still on my 70th-birthday-present-to-myself solo trip. We will install when I get home. Actually I would love that kind of performance because my biggest fear is that MrNomer will want much warmer than I. 50° to me is perfect sleeping weather.
I had a "duh" moment. We have been discussing whether the gas version is safe, and I realized that the gas version was the original. The diesel version came later. These heaters were developed in the '30s for air-cooled cars. |
klunkytoons, Some pics of how/where your heater is installed may help us plan and better understand how these things function. Which temp control do you have? What setting gets u to 70? Can you increase setting when it cools down to get more output? Is temp control measuring intake air or at the controller? I have a keen interest because I will install one if I learn what the nuances are. Thanks.
|
We're going to install a gasoline burning Webasto AFTER MsNomer learns all the tricks! We're scheduled for a hopeful initial construction mid April and any camping
then will be heated by a double propane Mr. Buddy (or whatever it's called)....in the fall we'll tackle the Webasto, by then team Nomer will have all kinks ironed. |
Quote:
We will get serious next week. A grandson will be making his grand appearance in NH in a few weeks. |
3 Attachment(s)
http://www.promasterforum.com/forum/...t=55410&page=4
See post 32 for my location and description of the install. I have the rheostat controller. The basic knob. Unless you have an external temperature sensor, the sensor is in the unit. It takes the temp of the incoming air. For me, that's at the feet of the passenger. It then blows hot air to the back. You'll notice all my extra seat sensors from my bench swap. Anyone with this issue, see here for a fix. It also makes a great dryer for items place in front of it. I once got caught in a rainstorm in a slot canyon and it dried my boots out completely overnight by just placing them a safe distance in front of the webasto. Here's some more things I learned. If you buy it off ebay and it's not from the U.S. you are likely to get the 2000 STC. It says it right on the top of the heater by the Webasto label. The "C" part of it means it's the Euro model. Things will be different than the 2000 ST which is the North American version. The tech and I figured this out today while searching for the external temperature sensor plug, X8. On the STC it's not where it's supposed to be on the ST. I'm hoping I'll find it when I pop off the cover the top of the unit. The external temperature sensor should be a plug and play install. He thinks my issue with it not running hot after a few hours will be fixed with this. In his words, these units like to run HOT. There should be no problem with it running in high fire mode for 8 hours. I'll report back when I make the upgrade. I uploaded the service manuals for you guys. They're pretty helpful to have. I'm also now realizing I think my US Tech that installed the heater used the american wiring not the euro wiring diagram... it works but the wire colors are all different. |
Kluny, one reason I didn't consider under the seat was concern that inlet and outlet have no effective separation. Just for grins, have you measured the temperature at the inlet?
|
:) I have not measured it but I'm pretty sure this is the issue. Looking at the external temperature sensor to solve this but am now learning my tech might have done the wiring wrong. This could get interesting....
|
My instructions are specific that inlet air to be warmed comes from the compartment being heated, not outside, but there needs to be separation so you get circulation. IIRC, they specify at least 2 feet separation.
|
Righto... that makes sense. I don't know what I was looking at. I'll edit that post to not confuse anyone. hehe I didn't see anything about 2 feet separation in mine.
|
Good posts above.
I'd already discerned from here and elsewhere to buy the ST and NOT STC if you want support/troubleshooting in north America. |
This is from the manual for installation in a compartment inside a truck bunk
  |
MsNomer, in both diagrams presented, the heater unit is under the van, correct?
Me thinking where you see the arrows away and to, is the floor with vents in the floor ?? If that is correct I'd still prefer the under the seat position of the unit and out of harms/gravel, etc way. |
I should have explained. Those pics the heater is in a compartment inside the vehicle.
|
Quote:
That last sentence reminded me of something I read over on the Sprinter forum about managing excess humidity inside an RV. The author recommends installing a Y-splitter in the heater's return-air ducting to switch between inside and outside air. To remove indoor humidity, you switch to outside air intake, heat it to absorb humidity, and crack a vent or window to exhaust it. Remember the factory heater in a vehicle's dash heats outside air by default, re-circulation is optional. I expect the Webasto instructions are there to prevent you from sucking in vehicle/heater exhaust while parked. But, you could also isolate the outside air intake from the heater exhaust. Thoughts? |
Quote:
|
Opening a vent or window while heating inside air should give you all the outside air exchange you seek without adding an intake vent on the heater. There is always some air exchange whether venting or not. If you vent some air out an equal amount must come in. Otherwise we pass out from hypoxia just before the walls collapse inward. No?
Spacing the combustion air intake from combustion exhaust is certainly necessary as stated. |
I concur with Roblee. We open an awning window a smidg just as we do in our bedroom at home to let in a little air even when heating. It seems to have little effect on the heat level and we like fresh air. No way you need to put in a complex y pipe and adjust it when a window is already there.
|
Granted, the increased efficiency may not be worth the extra trouble/expense. But I think outside air piped directly into the heater would be more efficient (quicker) for humidity extraction. With just windows cracked, you'd be re-circulating a lot of humid inside air, too. I just might volunteer as the guinea pig.
|
For anyone that's interested in the under the passenger seat location, here are pics from my install of the exhaust and pump locations. Post #46 .
http://www.promasterforum.com/forum/...154#post387154 |
Here's a china install under passenger seat. I'm going to move the fuel pump and filter to the back side of the fuel tank for easy access and put a Dorman 800-123 quick connect on the tank.
http://www.promasterforum.com/forum/...BARKING+HEATER |
Quote:
|
Thanks klunytoons. I'm responding here cause I'm hoping this will be the all everything gas Webasto thread for PMs. Your pics are helpful. Curious about the constant running fan. Is it also burning fuel nonstop? I hope someone can say what a normal cycle is for these units. Does the fan cycle off or keep running like some A/C units where compressor cycles on-off but fan keeps running? The latter would not be my preference for our battery systems. I need this info before I could commit.
I'll be interested in how you adjust the CO2 without a factory diagnostic. A meter will tell you what CO2 output is but how do you fine tune that? Keeping a setting at 5000'+ seems like a good idea if the heat output is sufficient. Dangerz on the Sprinter site is not getting enough heat at 10F from an Espar D2 so lots of uncertainty for me. I WANT a 2000ST but still researching. |
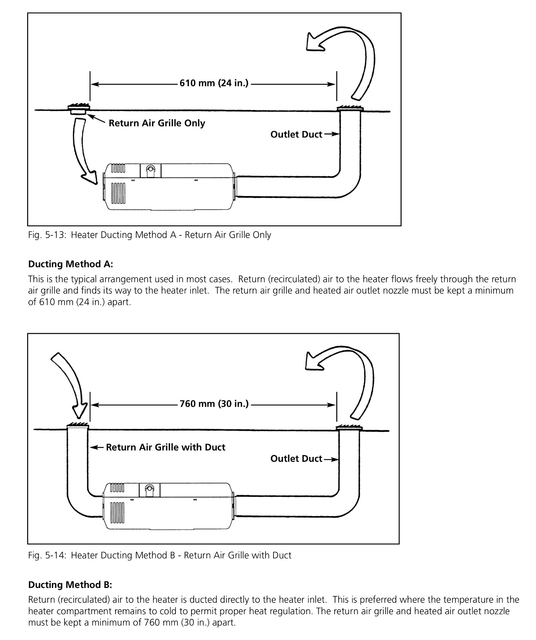
The install begins. The van's rear is on ramps for ease of underneath access.
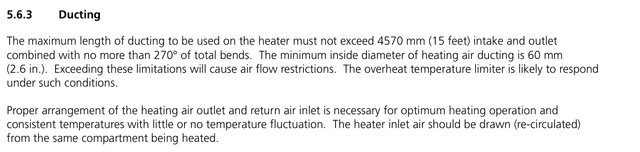
 First task was to position the unit a bit inboard from the passenger wheel well. I discovered that the tie down bolt in front of the wheel well can be seen from below (green wire is routed through it). This gave us a point of reference above and below. 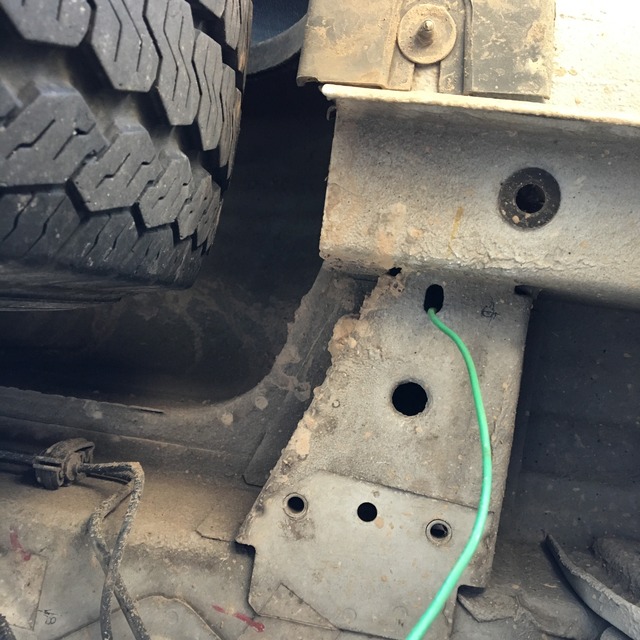 A duplicate of the metal mounting plate held below assures us that the unit will fit between these cross-members. Measurements above indicated that the position should be compatible with existing cabinetry.  MrNomer drilled 1/4" holes for the two opposing corners of the plate. We fastened it so I could scribe around it. Although we measured as well as we could, we were embarrassingly in error. Fortunately, the error didn't matter. It does illustrate how important it can be to drill from the bottom, especially if you already have a floor in place. 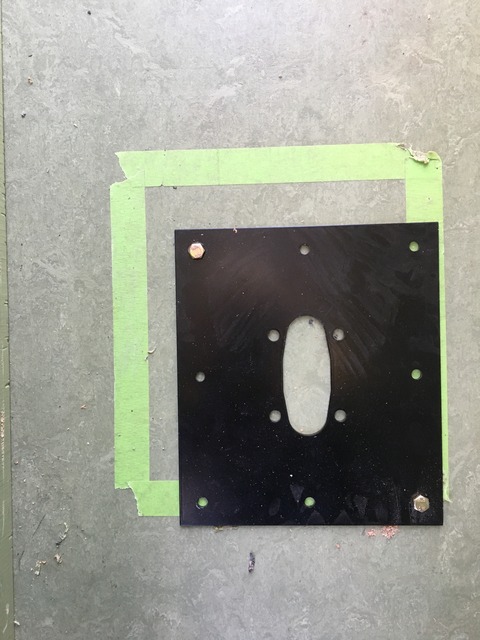 Tomorrow, I will excavate the wood, etc., floor under the plate. |
Temperature outside never got above freezing today, so all that was accomplished was excavating the space for the heater body.
Thank You, Thank You, RD!! I use the multi-tool so seldom I might not have even remembered I have one had you not mentioned it. Right tool for the job. Cutting out the floor was a piece of cake. Scraping off the Dynamat was a pain but not difficult.  |
Quote:
if you don't mind me asking hows your china version holding up? any problems? |
The Hole
Holes, that is.
Position the metal mounting plate on the metal floor Drill the perimeter holes with a 1/4" drill Make a ply copy of the metal plate and drill the perimeter holes Position the paper drilling template over the ply plate Mark the centers of the large holes Move the center of the forward hole 1/4" forward Put a 1/4" ply filler between the metal floor ribs Install the ply copy on the metal floor with perimeter bolts Drill two 2 1/8" holes. 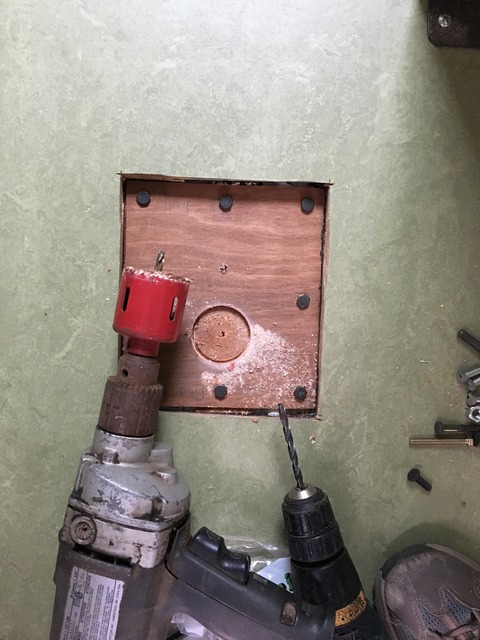 From underneath with metal plate above: 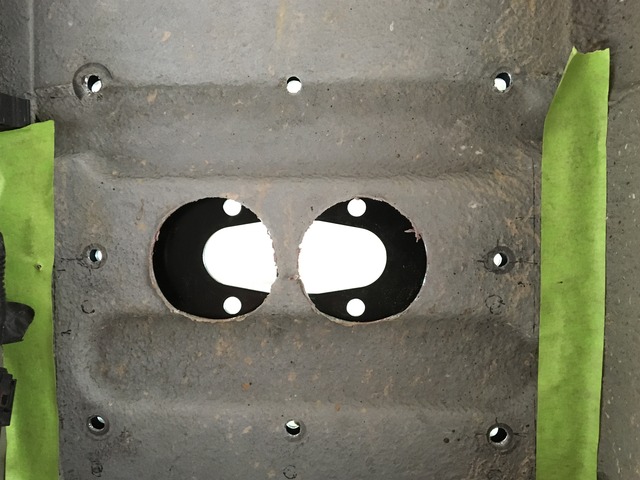 |
Attaching the Heater
Put the seal on the bottom of the unit, then the metal plate. Put the strange provided flange nuts on the four studs and tighten. The instructions say 6nm torque. By the time MrNomer got to half of that, the seal was deforming and ballooning out the center hole in the plate. TechWebasto said forget the torque spec and just tighten until comfortably hand tight. If the seal starts to bulge, back off a bit.
Remove the backing from the closed cell foam gasket and apply the gasket to the bottom of the metal plate. Fasten the plate to the floor with the perimeter bolts. Again, TechWebasto says not to be too aggressive. He suggested compressing the gasket about 50%. No more is necessary and this will allow the gasket to be re-used--tighten more the second time. |
Attaching Fuel Line to Tank Auxiliary Port
Thanks to KillWerBzz for leading us in the right direction. He recommended a Dorman 800-123 quick-connect. I could get a 800-081 overnight; it worked perfectly.
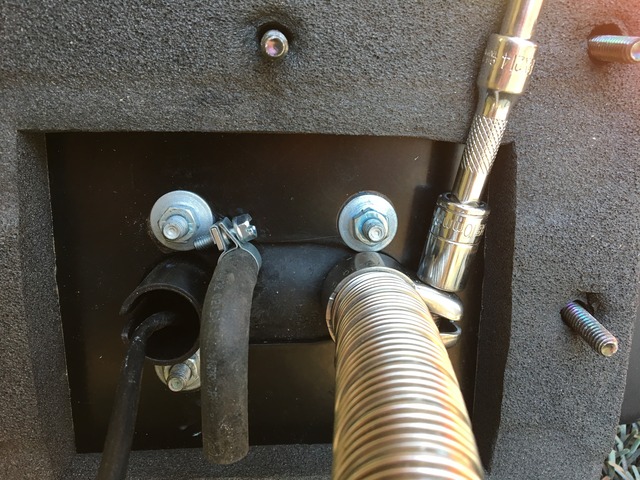
MrNomer devised this assembly I don't understand, so bear with me. Attach 1/4" fuel line to the quick-connect Next is a barbed elbow with 1/4" nipple, 1/8" NPT. Next is 3/16" nipple with 1/8" NPT Next is Webasto fuel line. According to TechWebasto, the wings on the fuel line clamps should touch. MrNomer arranged this photo showing the assembly, side view of the extra quick-connect, and required 7mm wrench for clamps that came with the kit: 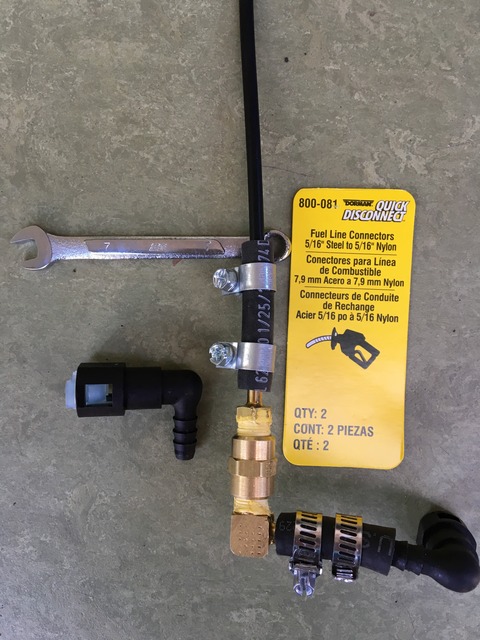 Installed:  |
Great to see you back at this. Nice pics. Amazing that it takes 10 pieces to connect fuel tank to Webasto fuel line. Good tips on gaskets. Here's hoping you get it running before the temperature plunge expected Sunday night so we get performance reports!
|
I updated the Barking Heater thread, but it does work.
Quote:
|
I'm hoping for pics inside were the Webast sits. I think it's in a box but I'd like to see the overall placement.
|
Coming soon. I'm trying to keep this thread generic, though, and will cross-reference my build thread for the details specific to my build.
|
Attaching the Heater, Part 2
I just thought the unit was attached yesterday. Nope, it was just sitting there because MrNomer wanted to attach the combustion exhaust and the fuel line in a more convenient position than on his back under the vehicle. Seems logical to me. That's a 10mm socket on the exhaust hose clamp.
 Warning: Especially if you have to excavate an existing floor, it is h#% grabbing and holding the bolts under the unit while they are tightened from underneath. I used a very thin cheap wrench. If we doing it over, we would not drill those, but we got'er done. More got done today, but I have no photos, so I will post that tomorrow. |
"If we doing it over, we would not drill those, "
What would you do? |
Just ignore them--don't drill the holes. The plate is super sturdy. With 6 bolts instead of 8, it's still not going anywhere.
|
Attaching the Heater, Part 3
I should have waited till the project was finished before reporting how we did it. ;)
On the wiring harness close to the unit, there is a funny-looking u-shaped gasket. This seals around the harness when it is plugged into the unit. Do this BEFORE you mount the unit. It would be difficult to maneuver even in the best of circumstances, much worse when on your knees. |
Under the Vehicle
Everything under the van is finished. No holes were drilled except the ones described previously at the heater itself.
The kit contains plenty of fuel line. It is quite sturdy, thus TechWebasto's admonition to tighten the clamps til the wings meet. However, the provided electric wire for the fuel pump is only 17" long coming out the bottom of the unit. TechWebasto sent us a short extension so we could use the fittings to make a longer one, but MrNomer lost it before I ever even saw it. We assumed it would appear as soon as he sliced the original, but it hasn't appeared yet. For his extension, he used 5/16 OD air brake hose to protect the electric wires. Its stiffness was an added benefit--he could tape this to the fuel line in places where it would otherwise be difficult to prevent dips, for example when he routed behind the heat shield. The fuel pump nests in a very nice protected location just forward of the driver side of the fuel tank and just aft of another tank?? The brackets that hold the fuel tank have two large extra holes each. MrN used the hole closest to the driver's side. He used a 5/16 ID rubber grommet (wide groove) and a 5/16 coarse bolt. TechWebasto suggested their all-rubber holder to dampen noise, but we would have had to order. We hope the grommet serves the same purpose. This is a lousy photo, but the hole you see at the top is the unused hole in the driver side bracket. His connection is at the bottom of the photo. 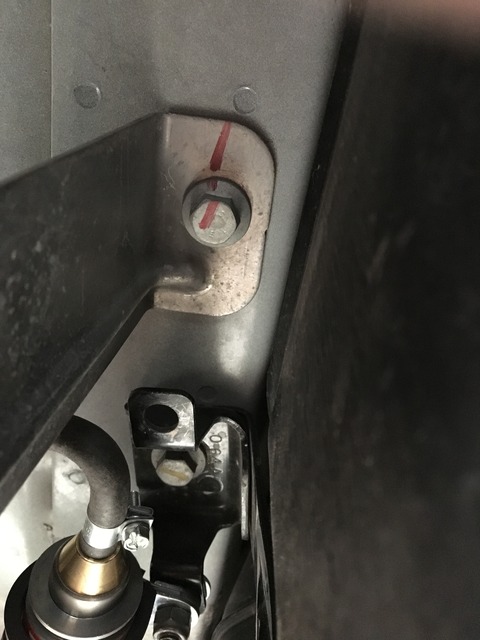 The fuel line and electric wires then travel together down the driver side of the van. There were already brackets holding electric wires in conduit--these were spacious enough to include the added lines. 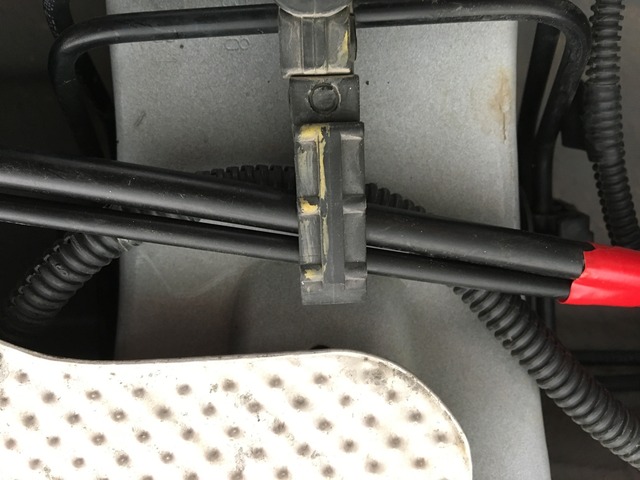 Anywhere heat might me an issue, MrN encased the lines in this: https://www.amazon.com/gp/product/B0...?ie=UTF8&psc=1 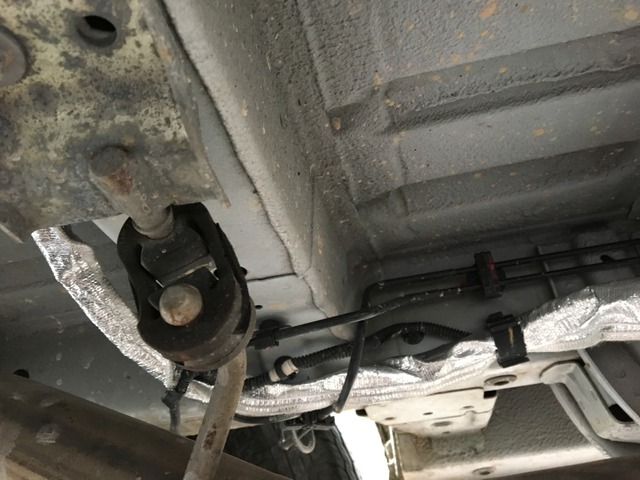 At the unit: 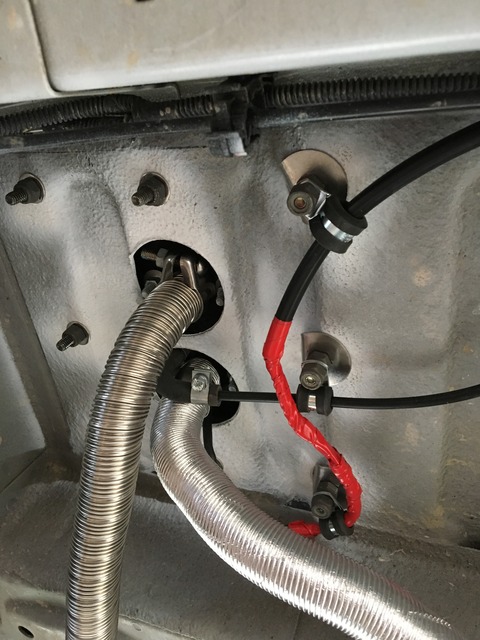 The combustion intake ends just in front of the spare tire: 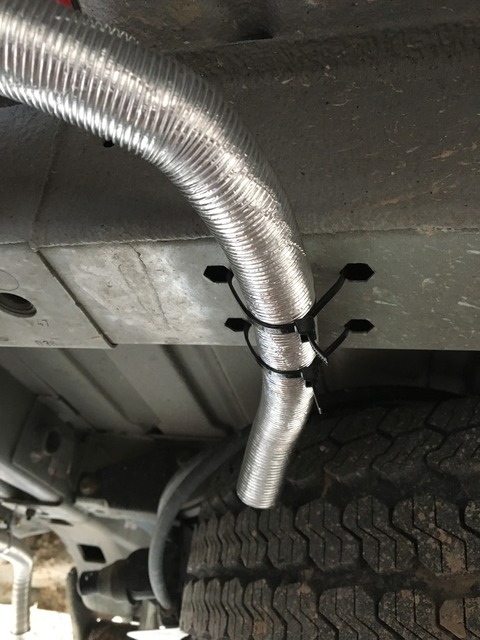 The combustion exhaust ends just inboard of and behind the right rear tire. |
All that's left are to install the rheostat and connect the wiring to the battery. I will address the heater box, etc., in my build thread (referenced in my sig line) because it is specific to my build.
|
I have a comment re the picture of the combustion air intake ending near the spare tire. It appears that the intake line is held in place by plastic wire ties and that these ties pass over sharp edges of metal where they enter and reappear. Over time vibration could cause them to be cut at the sharp edges and then the intake hose would drop. A solution is to use wire twisted tight with padding so it does not bite into the hose. Almost any wire would work. Seizing wire for such purposes is available. The hose does end facing aft in a good protected location.
|
Thanks. That is much appreciated.
What is seizing wire? |
MsNomer, here ya go-
https://www.amazon.com/Western-Pacif.../dp/B0064MXUS2 |
I hear you on this issue but I have found the nylon zip ties remarkably resistant to cut and wear through. I’d probably add a second one run loosely and check them in a year and if good then they are good to go.
|
Ouch. That seizing wire would seize the wallet. MrNomer is contemplating the issue.
|
If you don't like RD's suggestion.
Use heavy duty zip ties. Hole mount zip ties. Zert nut's with pipe or conduit hangers. Well nut's with pipe or conduit hangers. Hose clamps fished through the holes instead of zip ties. and...... |
westmarine.com has stainless steel seizing wire in 10 foot length for about $12. Available in store and on line. Very handy for many projects.
|
HF has ss wire ties, or just use several with different tightness on each one.
|
Findng a gas-fired Webasto 2000ST is proving to be more difficult than a diesel model. Just one EBay (UK) source, so far. Any first-hand experience or suggestions appreciated. Thanks!
|
I use scraps of any solid copper wire I have for things like that. Twist with pliers. Strip it or not depending on need-no cost.
|
Go to Webasto.com and search for dealers. Call as many as you care to and compare prices. Gas version is 5010205A. AFAIK, Webasto is not sold in the US except through dealers.
European version, look at melloronline and butlertechnik. If you go European, know that you will get no warranty support or tech support from North American Webasto. The units are apparently not the same. North American is AT 2000 ST. European is AT 2000 STC |
And It Lives!!
Wow. I am so totally amazed.
It started on the third try. Fuel pump ticking before it fired sounded like a distant clock. Not at all objectionable. Now that it's running, I can't hear the pump at all over the blower, which sounds like a blower. No worse than our electric heater. The exhaust sound outside, though, is objectionable. Not something I would want a neighbor to subject me to. I'm ordering a muffler today. The velocity of the output allows the warm air stream to easily clear the alcove it is in--no need to remake the box--yet I will have no difficulty with the potty in its usual position by the bed. It will feel soooo good to warm cold hands in that air stream, which clocks on my laser at about 200°F on high. I started with a 30°F van. Temperature rises at about 1°F per minute. This is with all-around windows uncovered, doors not insulated, and a fair bit of exposed metal. At 60°F, I turned the rheostat back to half-way and it is maintaining. Temp of the airstream is about 130°F. Fan has quieted considerably. The unit draws about 6.5A when powering up, 1.5A when just running. There is an admonition not to start with a low battery. |
Quote:
|
All authorized US dealers get all their parts & units from Webasto's main facility in Michigan. If a company is an authorized dealer they can get what you want. Not everything is in stock so wait time can vary a lot. $975-$1100 is best I've seen/heard from US dealer. You need to catch their parts dept at a slow time, have all the parts numbers, and walk them through it. They can get them if they want to spend the time.
|
Just the kind of info I was looking for! Yea the exhaust noise is a concern for neighbors. I've heard propane water heaters from campground RVs but not noticeable with my doors closed. Same with propane furnaces. I don't expect Webastos can be louder or more problematic in campgrounds than everything else already being used. Loudest campground utilities noise is roof top AC. Not an issue for boondocks. Even so, pretty sure I'll order a muffler.
For nighttime hanging out in shirt sleeves I'd sure like to maintain 75F with 10F ambient. Probably can't test for that this year but do you think it would do that? Opinions I've seen for diesel units are not consistent. Thanks again for prompt details. |
Right now, it's 37° outside, 68° inside and rising, the rheostat is about quarter round and the fan is quite low. Yeah, it may we'll meet your criteria.
|
MsNomer congratulations!
We'll be following your mighty footsteps in the fall. I do have a favor if possible. I'm just now realizing that I will need the very proprietary cable before I do my wall panels :( That way I can install the cable which in my case (forward of the passenger wheel well install) will need to cross up and over the walls and ceiling. Do you know the part number just for that cable? Can one even order just the cable? |
All I can suggest is call a dealer. You would be buying twice, as it comes in the kit. You may be better off going ahead and buying the kit.
|
Canadian Webasto contacts
Quote:
I have investigated this as well and I have a contact from the Webasto Canadian distributor. Gary is who I spoke to and he can set you up with an installer in your area. I haven't gone as far as getting quotes so I don't know if you will be overpaying for Canadian product but it may be worth it to use a local installer. Here is his email: gjwilson@wajax.com Shaun |
Check Liberty, MO and Lincoln, NE. Those were the cheapest I found.
|
Woohoo, we will then call you Grandma Nomer :)
|
Thanks MnNomer.
One more question please. We're going with the gas burning Webasto (my dealer carries/installs Espar I think)...but the control cable (now mentally link the thread on pulling wires across the van)....do you think, or maybe Mr.Nomer, if the control cable will fit through 3/4 inch PEX. Next week we begin the wiring runs and the insulation so if I'm going to put in some kind of transit pipe for the control cable it is best I do it then, though I can't afford the whole Webasto/Espar install now. Thanks for your best guess. |
Am I having deja vu or did you also ask this somewhere else? Yes, it will more than fit. It goes across my floor in a groove I cut on the underneath of 3/4" ply. The fitting for the rheostat is tiny.
|
The Silencer
As I noted previously, exterior noise was just too much for polite company. It was noticeable even 100 feet from the van. Close up, it was just plain obnoxious, even though inside noise level was fine.
So we added an exhaust silencer. I called my US dealer first. It would have cost about $100 with taxes and shipping, but he was kind enough to give me the part number--86450C. I found that this part is the same for US and European. I got it from heatso in the UK for $51 shipped. It arrived in two days!! MrNomer found a convenient hole in a bracket to hang it on and decided to address support of the intake pipe at the same time. He made this out of aluminum angle (drawing is a tracing of the two sides): 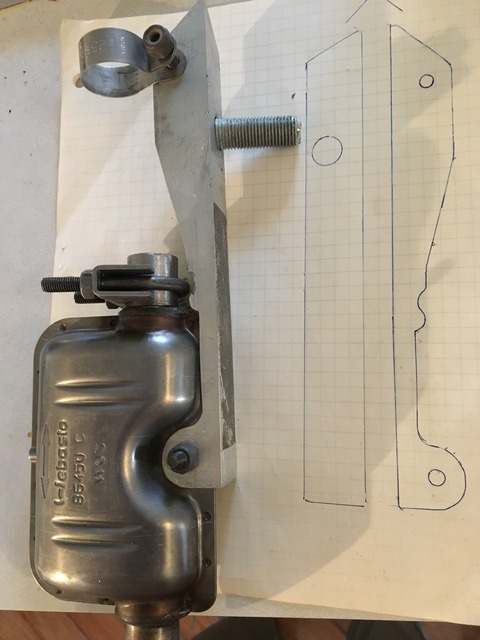 He says to tell you that hole takes a M14 x 1.5 mm bolt. It was very difficult to photograph it in position because I couldn't get the phone where it needed to be. Ghis is the best I could do. I really don't think any of this is going to budge any time soon. 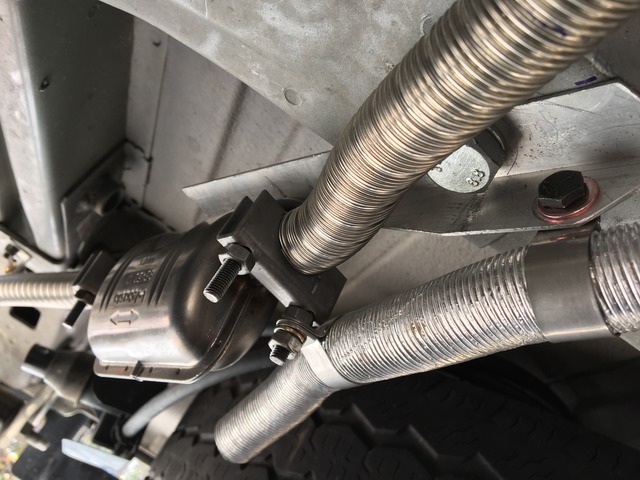 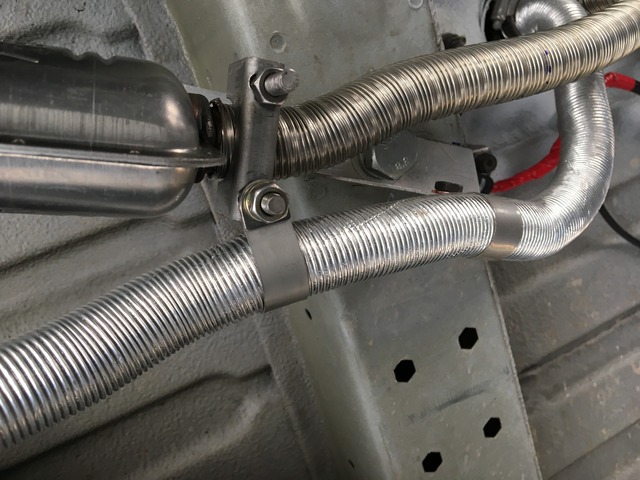 Result: Well worth the effort. The worst of the noise is dissipated within a few feet of the van. We'd still try not to use it close to a tent, but otherwise, I think it's respectable. |
A Real Test
Last night, it was 36° at 5:30 pm when I started up the Webasto. I set the dial on the rheostat about half-way, and the temperature climbed about a degree per minute. When the inside temperature reached 70°, I set the rheostat here, which we estimate to be about 1/4 of the way to full on:
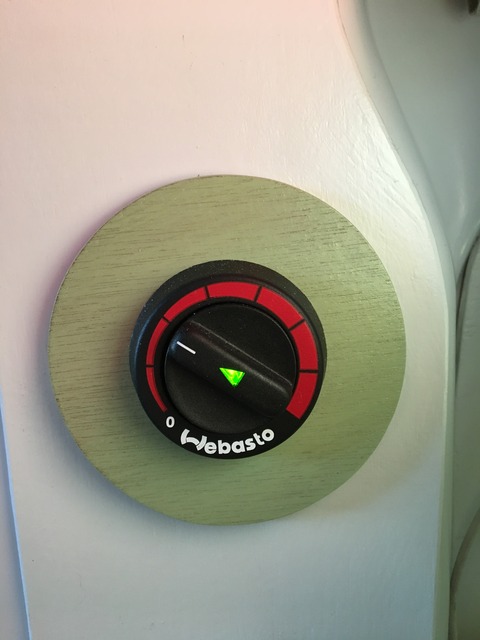 In the living area, including my side of the bed, the temperature settled to 66-68° for the night. I threw off the quilt. The cab, partially closed off, and the area behind the bed sank to 52°. MrNomer's side of the bed toward the rear was somewhere in between and he kept the quilt on. It was 46° in the tunnel, ironically with the thermometer sitting directly on top of the heater box. Outside temperature this morning was 23°. Next time, I will take the cooler side of the bed because I sleep warmer than he does anyway. We have not heard the fuel pump click at all since it first primed itself. We have even put our ear to the floor trying to listen. The fan sounds like a fan. From inside, we do not hear the outside exhaust. The Webasto and the Engel fridge together averaged about 1.5A overnight. AFAIK, the Webasto fan ran continuously. I was never aware of the burner starting or stopping, so I'm guessing it ran continuously also. Kinda hard to estimate fuel usage, but it certainly wasn't dramatic. One thing I'm learning: the Webasto has mysterious routines that can make it do strange things, like shut down and restart if you fiddle with the dial too much. This week, I was a bit smarter and didn't have a problem. Kinda like a cat. |
Great report MsNomer. The rheostat looks nice too.
|
great info. looking forward to more tests maybe see how hot it could get in a 136"? nice muffler/combo install.
' '? |
I will let someone else run that test. Last week in a driveway test, it crept up to 80° before I turned it down. It was still vigorously rising when I turned it down this weekend. We will be in NH in a few weeks--that should let us test it with colder outside temperatures.
Remember--this is full windows uncovered, lots of exposed metal, no insulation yet in slider or rear, no insulation in the channel below the ceiling because of conduit. The only areas adequately insulated are the ceiling, upper panels, rear quarter panels, and lower behind the driver. Given that heat rises, I have become convinced that my 2 layers of Thinsulate in the ceiling are my saving grace. |
Reading that report MsNomer tells me a circulating fan of some sort will be a nicety. I'll google 12DC fans and see what comes up.
One could have a 4 inch pipe/tube/conduit/ducting/whatever periscoping up high and running to the floor and periscoping and a 4 inch fan inside pulling the air back down. I can't see that in your build but you never know. I've got a tall cabinet in the works and a duct could run beside it. I need to quite think-talking myself into ideas at this point and get a horse first. This one looks like it could move some air- https://www.amazon.com/Attwood-Quiet...rds=4-inch+fan And I guess the duct could be square wood structure....paint it that novel green color MsNomer and it'd fit right in :) Scratch the above fan.....way too serious....way to much amp draw. Looking at computer fans now. |
That fan is nice, but I'm not quite sure what your purpose is. Are you thinking I want to equalize the temperature zones? I don't. Im looking forward to sleeping on the cool side of the bed and have no desire to warm underneath.
HOWEVER, you read my mind on the periscope--I've just neglected to post. Because it is an adaptation specific to my build, I'll post it there. |
MsNomer, I purchased the silencer per your recommendation and just got it. Wow! 2 business day delivery from the UK for under $50
|
Just to mention it, there is also a input silencer as well, since some of the external noise comes from it, It is all plastic, easy to install and works well.
http://www.ebay.com/itm/Air-intake-S...dTR0bF&vxp=mtr Also very nice exhaust muffler bracket, but if don't want to roll you own, I found this on eBay as well: http://www.ebay.com/itm/EBERSPACHER-...sAAOSwhglTxpaG |
Thanks.
While checking that out, I came across this comment in a forum: "Make sure the pump is mounted on an angle with the outlet upwards this makes sure the pump chamber is purged of air, the pump tick dulls considerably once all the air is out." Our pump is pretty much level, but this comment is consistent with our observation that we haven't heard the pump since it purged the air. Therefore, I'm contemplating that if someone did have a problem with the ticking, they might want to adjust a bit to make sure all the air is purged from the pump. EDIT: Call me paranoid, but I was bothered that nowhere I looked could I find an intake silencer for this particular heater or even its European counterpart. I did find them for the larger heaters and water heaters. The one referenced by dmsdms2000 is a smaller diameter than this intake hose. So I called TechWebasto. He said do not use anything on the intake. Nothing out there is approved for this particular heater. So I will leave well enough alone, and it is OK. |
Mine is slanted a bit more than the 15º they recommend which is very clear in the install instructions. The ticking can be heard on our Espar diesel but we seem to have let it become part of the white noise.
|
RD, your post makes me wonder whether that bracket MrNomer tied our pump to is attached to something and therefore unavailable in the diesel. Your pump is in the same close vicinity as ours, so I think you would have seen and used it if it had been available.
|
The pump came with a very nice bracket with rubber isolator. I don’t recall it being more than a few minutes to install at the angle and with the feed line and tiny pressure line to the unit. Next time I get under the van....... BTW I just was out adjusting the air pressure to get the TPMS turned off and when I slid under to do the spare a scorpion was under a small rock near me checking me out. They are such cute little guys!
|
Picture of scorpion please!
|
Yea like I was going to flip that rock and hold my phone close enough for you to see it in the picture! Here is a back yard find that shows up better, harmless but my point is that crawling around under a shady vehicle can be an adventure here. There is not much to kill you here except a centipede that has venom. We used to find them in our living room before we put in a concrete patio, they come in on your shoes. Arizona has a bad rep for pricking things, biting things, stinging things but hitting a burro on the highway causes more serious injuries. Our clinic doesn’t even keep rattlesnake anti-venom as there are almost no strikes and you can get driven to a major hospital for that in a coupe of hours, you won’t die of it.
 |
Quote:
In Florida right now and caught a puffer fish. A fisherman near us realized we did understand how dangerous they really are. A google search after the fact and we realized how lucky we had been he was there. Puffer fish have enough venom to kill many people and there is no antidote. |
Things you learn here!
Puffers and scorpions, enough to keep me home ;) Not long ago I was at Coral Pink Dunes S.P., looked all day, flipped a hundred rocks---never to find a scorpion. Noticed a sign at the park office 'night hike with a ranger'. He carried a black light (I think it was a black light) and then we found 25 scorpions in less than 10 min's. |
MsNomer, I can't find where people were asking about my remote sensor so I'll post a review here.
I think the questions was, did I notice any difference? It's really hard to tell. I didn't record any temps so it's all based on my feeling comfortable. I don't think it changed the performance enough to justify the $55. The problem I was having was the heater keeping up when the outside temps dropped below 10 degrees. I thought it might have been a sensor issue. When I talked to the Webasto tech he was skeptical but said try it out and see what happens. I talked to some other ski bums in Telluride one weekend and he said his espar performed about the same as mine. It'd keep the inside temps in the high 60s until the outside temp dropped to 10 and under. My van is insulation with Thinsulate and he had regular house insulation. It hasn't been in single digits since that trip but I think I'd rather have spent $50 on an exhaust silencer than this sensor. My estimates for single digits are that the inside temp in the van drops down to the 40s. I need a sleeping bag with the heater on full blast at those temps. Outside temps in the teens or twenties and I sleep with a quilt. Just my two cents. Sorry there's no real data to back it up. |
Hi...as per my knowledge the actual wires had the pins installed but the plastic plug was not on. The plastic plug won't fit through the intake hole with the plug installed. Not the best design since would be hard to take the plug apart once it was assembled if needed to remove the heater. The kit also came with about 10 or so feet of two conductor cable and the parts to terminate it to build a fuel pump power extension cable.
|
1 Attachment(s)
I need help with the Webasto dosing pump wiring. I think it's the connection LulaNord mentions above. I can't figure out how the wires attach to the plastic clip. The clip attaches to the connection on the pump but the wires won't attach to the black plastic. I can't tell how to orient the wire tips to insert them and the blue plugs are too big to fit inside the plastic clip. Webasto techs not available on weekend. I haven't seen anyone detailing this. Any ideas?
|
That black tip snaps apart. Then the wires go in and the lid snaps back on. Do this after wires are threaded.
|
2 Attachment(s)
Thanks MsN. I took a fresh look and made that work. I was burned out from toiling this install for 2 days. Got it running today (third day) on second cycle like yours. Truly an amazing machine. Nothing particularly high tech about the install but good grief there are a lot of steps. And they have to be sequenced just right or it's 2 steps backward. I did under passenger seat and raised it to clear the lower seat base bar. Connected fuel line to Dorman Quick Connect without any brass fittings-a significant simplification. Still have to replace heat shield and catalytic converter and figure out final exhaust route. Will be putting lower seat base and swivel here also.
|
MsNomer all your install pictures don't show as looks like the links on photobucket have disappeared. Any chance you can repost the images of the install? Looking to do the same. Would you do anything different?
|
Quote:
|
Quote:
What did you use to raise up the mounting plate and how far did you have to raise it? |
2 Attachment(s)
Just used wood and painted it black-photo in post #95 . Floor under seat is angled compared to cargo floor so I beveled the thickness-thinner toward front. Max thickness is about 1.5" I think. Could be 1" and still clear the horizontal seat brace. Heat transfer to wood frame does not happen. Here are some completed views with lowered base and swivel.
|
Roblee, since you mounted your Webasto onto a piece of wood can I assume that the combustion exhaust does not produce enough heat to worry about. Reason I ask is I am considering installing a gas fired Webasto in an area where I have the floor finished (1in. polyiso, plywood, vinyl flooring).
MsNomer, do I understand correctly that when you did your install you removed a section of finished floor in order to get down to the metal van floor? Sure look forward to when you are able to get your install pictures posted again. |
1 Attachment(s)
Yes. I used metal mounting plate on top of the wood shim. The plate has an elliptical hole for the intake/exhaust ports rather than the individual hole pattern used by many. This bigger hole means there is significant space for the exhaust tube. Also, the shim is only a frame about 1.5" wide so there are several inches between tubes and wood frame-second pic @ #95 . No flammables touching exhaust or main unit. Here is an underside view that kind of shows the space. People mount these units in lots of tight spaces very close to partitions, seats, batteries, floors, etc. Sure, mfg recommends space from combustibles & rightly so but the only really HOT part of the above-floor unit when running is the hot air vent. Never want a towel or clothes blocking air flow. No need to test the myriad built in safety features.
|
My Espar exhaust runs down through a floor consisting of wood, insulation, and wood. I made a hole larger than the exhaust and lined the hold with a piece of copper pipe. I dropped the exhaust line through and had a 1/4 inch space all around. I packed this space with bits of familiar pink fiberglass insulation. It serves 2 functions: it keeps heat away from the floor sandwich and it prevents pesky rodents from coming up through the space between the exhaust pipe and surrounding tube.
|
"MsNomer, do I understand correctly that when you did your install you removed a section of finished floor in order to get down to the metal van floor? Sure look forward to when you are able to get your install pictures posted again."
You are correct. This is the way Webasto Tech told me to do it and it wasn't hard with a Multi-Tool. It wasn't a matter of combustibles. It was to assure a tight seal. I am also looking forward to getting photos back up. It's bugging me. |
Ok, I bought my Webasto and now I am into a kind of hold mode and and am doing other things on the van. I've now done paneling with headliner for the ceiling and lightint and I now am in a quandary regarding posting pics. Photobucket turned into a paid service. (really look forward to MsNomer's Webastp install pics) So now has anyone come up with what is the best way to go regarding photos of our builds??? Up until now I have only posted photos directly to the forum but from what I understand that does have its limits. Don't know what those limits are but but apparently a photo host is a better way to go. What do you all suggest for photo hosting, maybe tinypic.com or post images.org or is there something better, easier, more reliable?
|
I use http://postimg.org it’s free but one never knows with these "free" sites. A lot of people use Google images or Flickr.
|
MtDave,
My tinypic.com account lets me upload and post but now it takes me to a Smokey the Bear ad when I click on any of my pictures and clearing cookies etc has no relief. I’d stay away. It is a PhotoBucket product. ‘Nuff Said? |